User manual · September 2026
From site to decision, step by step.
URBN Planning helps development teams test what can be built on a site, what it would earn and which option to take — with every number traceable to its source. This manual walks you through each feature with annotated screenshots. The numbered orange markers in each screenshot match the numbered steps beside it.
1. Getting started
Sign in, or create your organization's workspace in a minute.
Sign in
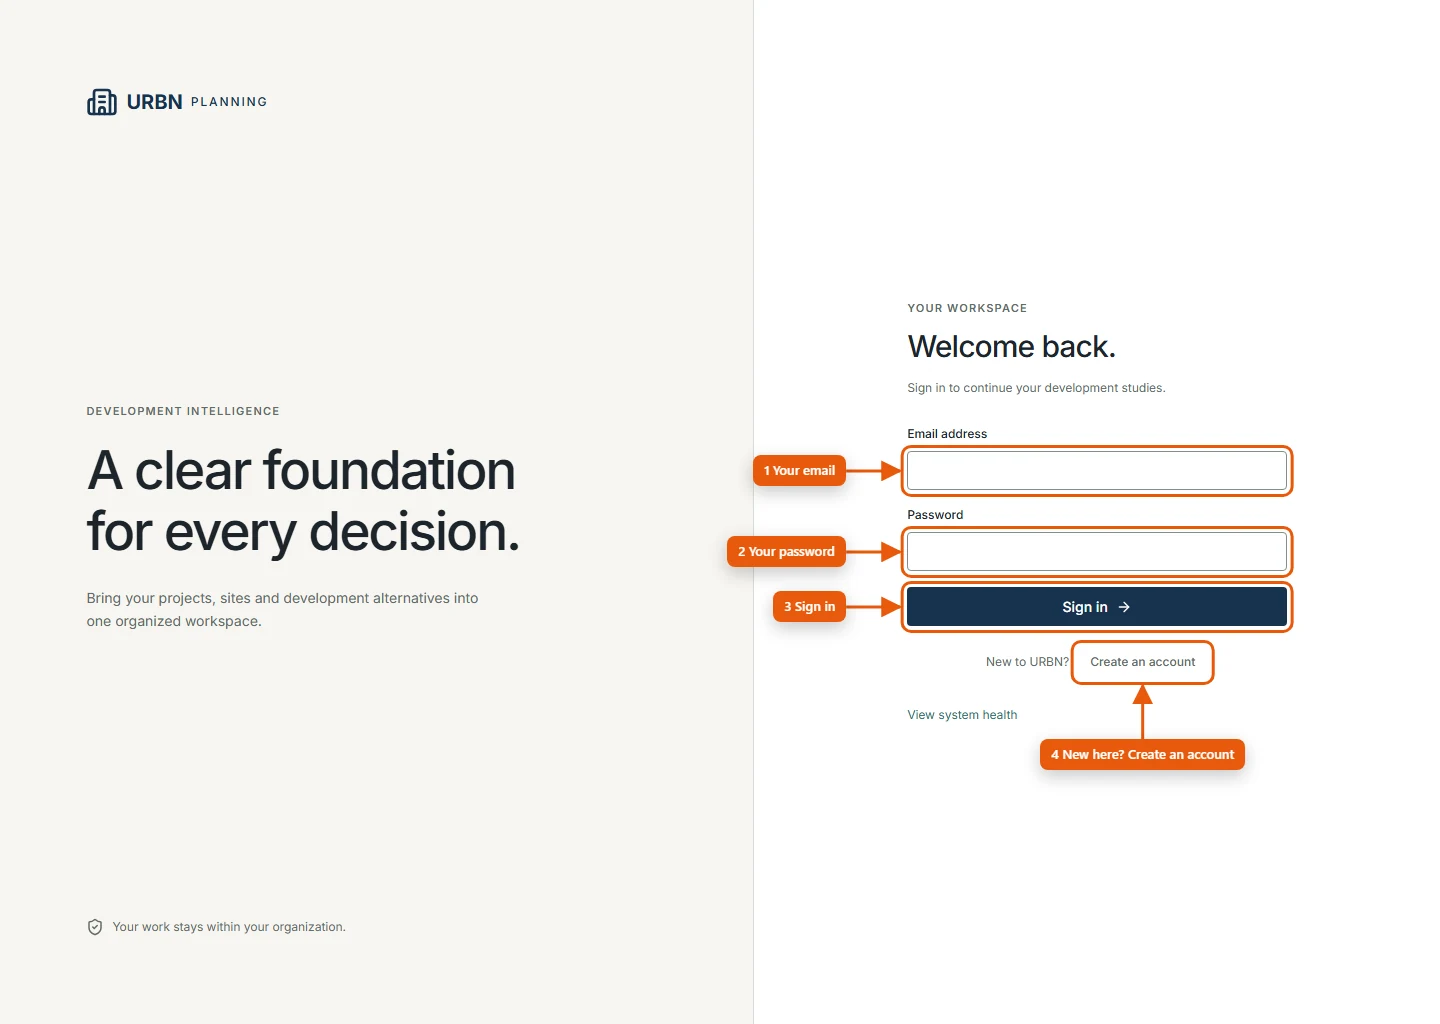
- Enter your Email address.
- Enter your Password.
- Select Sign in. You arrive in your last workspace.
- No account yet? Select Create an account.
Create an account and organization
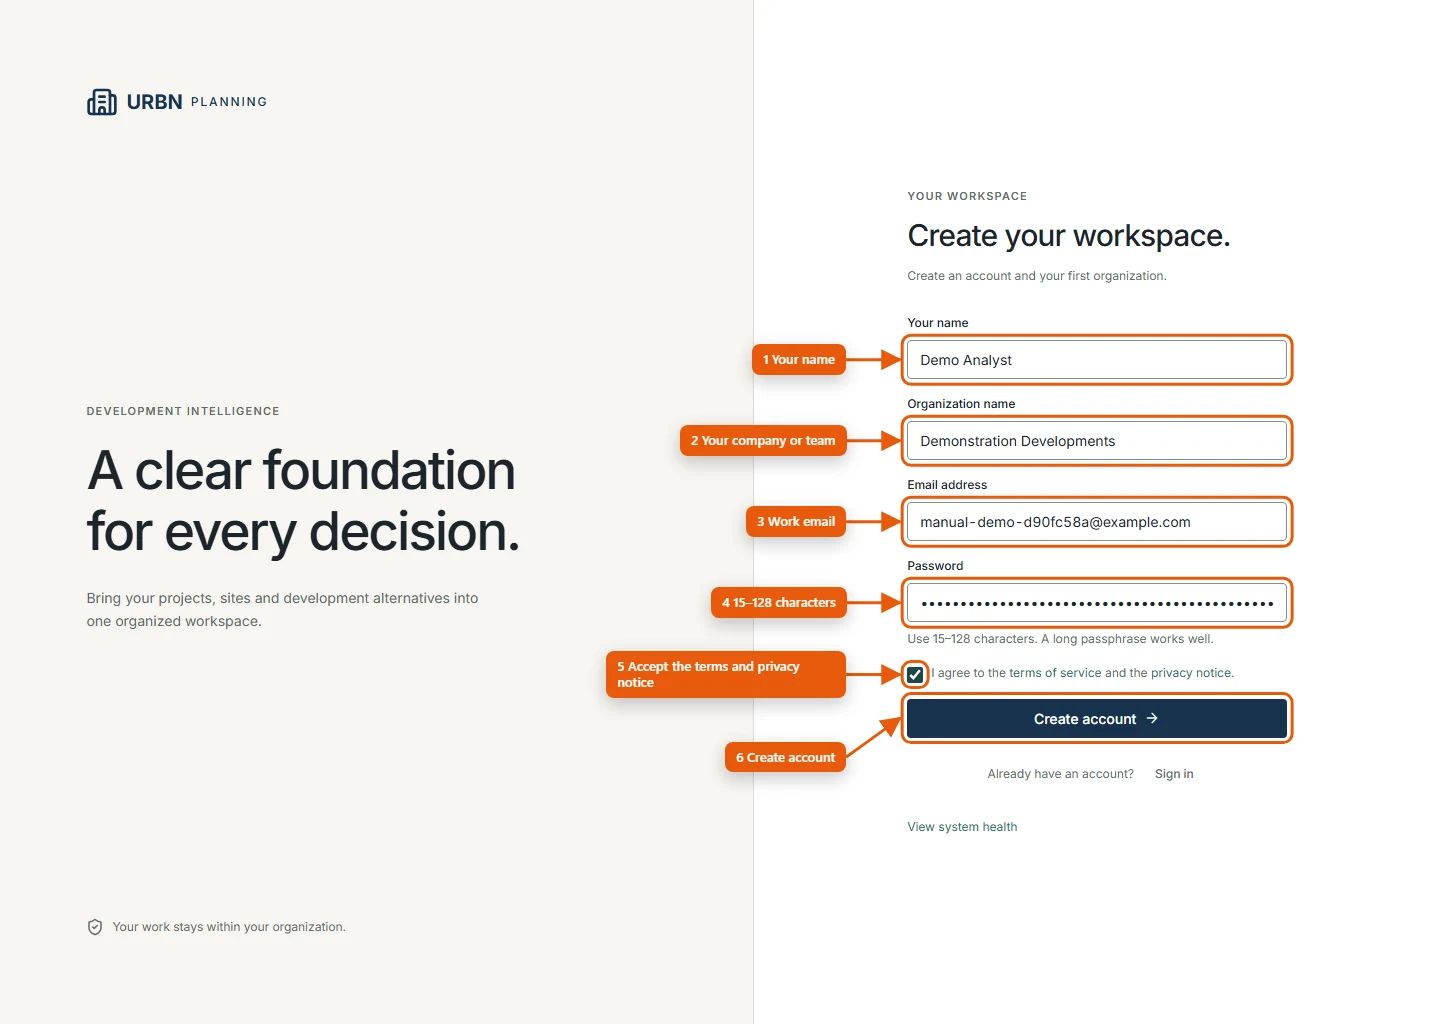
- Type Your name.
- Type your Organization name — usually your company or team.
- Type your work Email address.
- Choose a Password of 15–128 characters; a long passphrase works well.
- Select Create account.
Check the service status
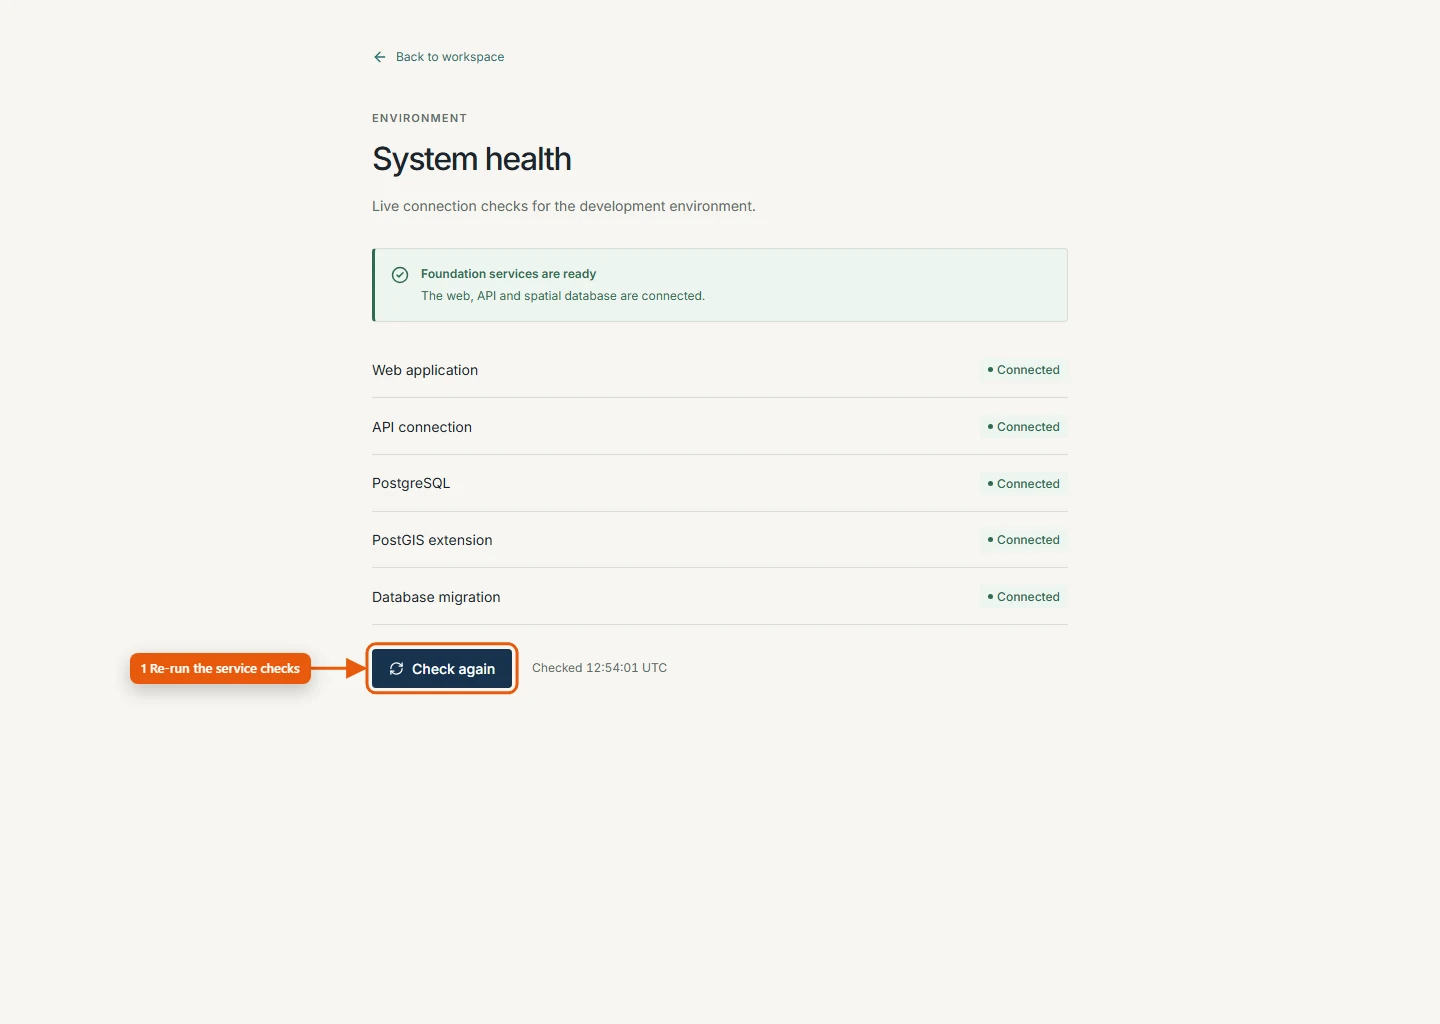
- Select Check again to re-run the live checks of the web application, API connection, PostgreSQL, PostGIS extension and database migration. Every row should read Connected; if one reads Unavailable, wait a minute, try again, then contact your administrator.
2. The workspace at a glance
One screen holds your project, the working canvas and the evidence behind it.
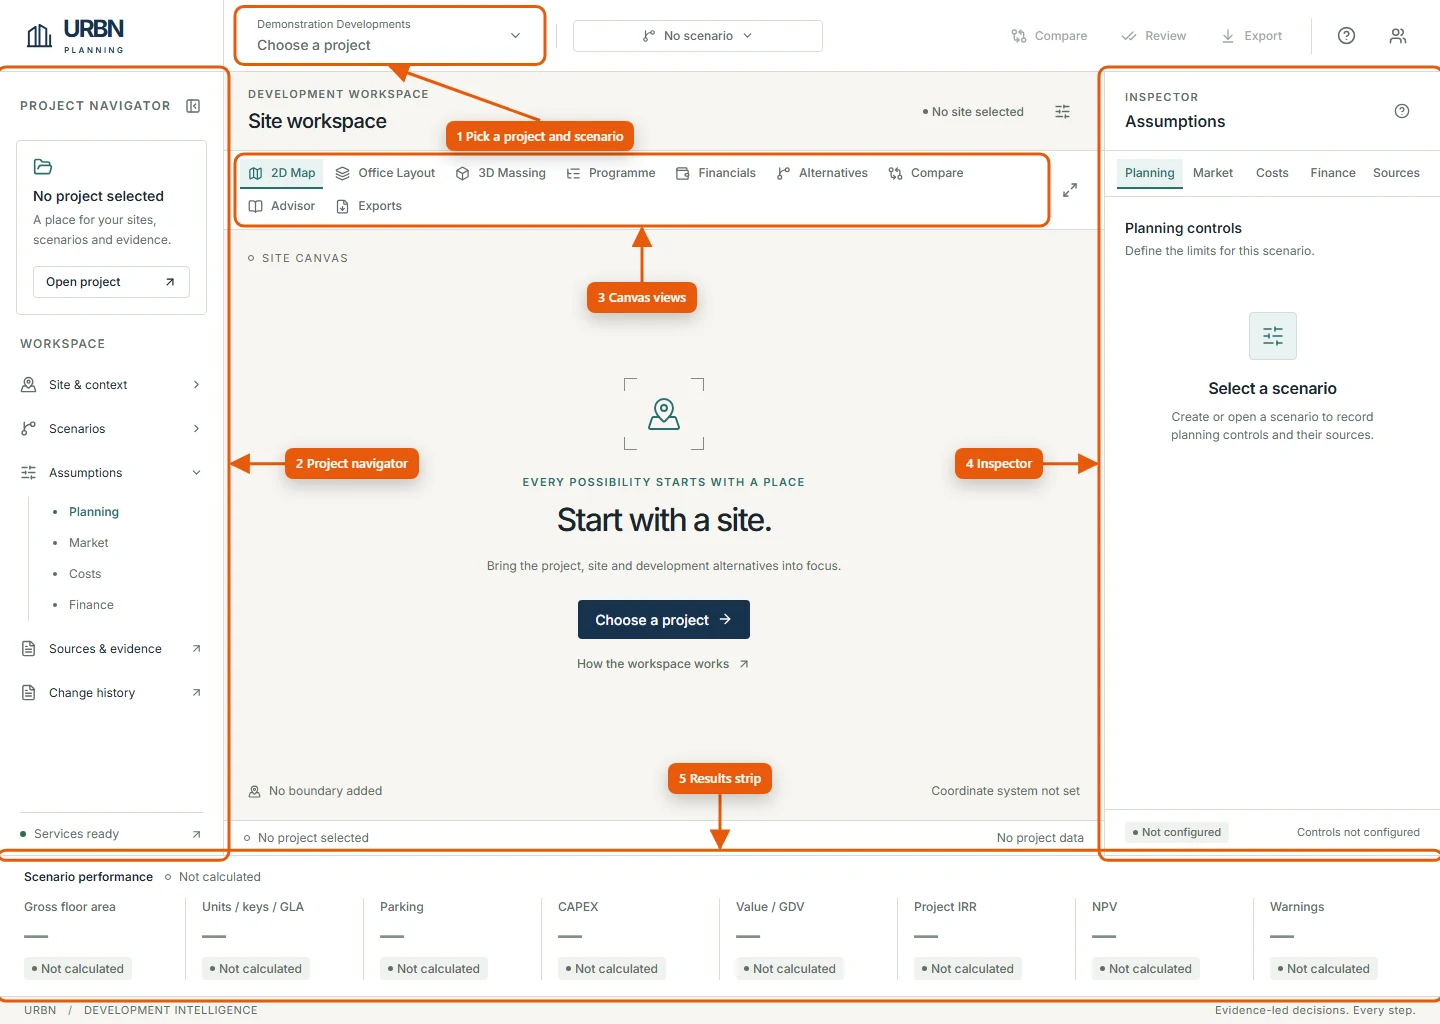
- Header. Pick the project and the scenario you are working on. The header also holds Compare, Review, Export, the Workspace guide (?) and your Account and organization menu.
- Project navigator. Open the project, its Site & context, Scenarios, assumption groups, Sources & evidence and Change history.
- Canvas views. Switch between 2D Map, Office Layout, 3D Massing, Programme, Financials, Alternatives, Compare, Advisor and Exports.
- Inspector. Record the inputs for the selected scenario in the Planning, Market, Costs, Finance and Sources tabs.
- Results strip. The scenario's headline numbers — GFA, units, parking, CAPEX, GDV, IRR, NPV and warnings — each marked Ready, Stale or Not calculated.
Layout controls
The sliders icon beside the canvas heading opens Display options: set the navigator (200–280 px) and inspector (300–380 px) widths for this session. The expand icon at the end of the canvas tabs focuses the canvas by hiding both side panels, and the icon beside Project navigator collapses the navigator. On screens narrower than 1,050 px the inspector opens from an Open inspector button.
Keyboard
Tab moves between controls, ←/→ switch tabs, Home/End jump to the first or last tab, and Esc closes dialogs and drawers. With the map focused, arrow keys pan, +/− zoom and Shift+arrows rotate and tilt.
Links you can share
The address bar keeps your selected organization, project, site and scenario, so a copied link opens colleagues (with access) at the same place.
The workspace guide
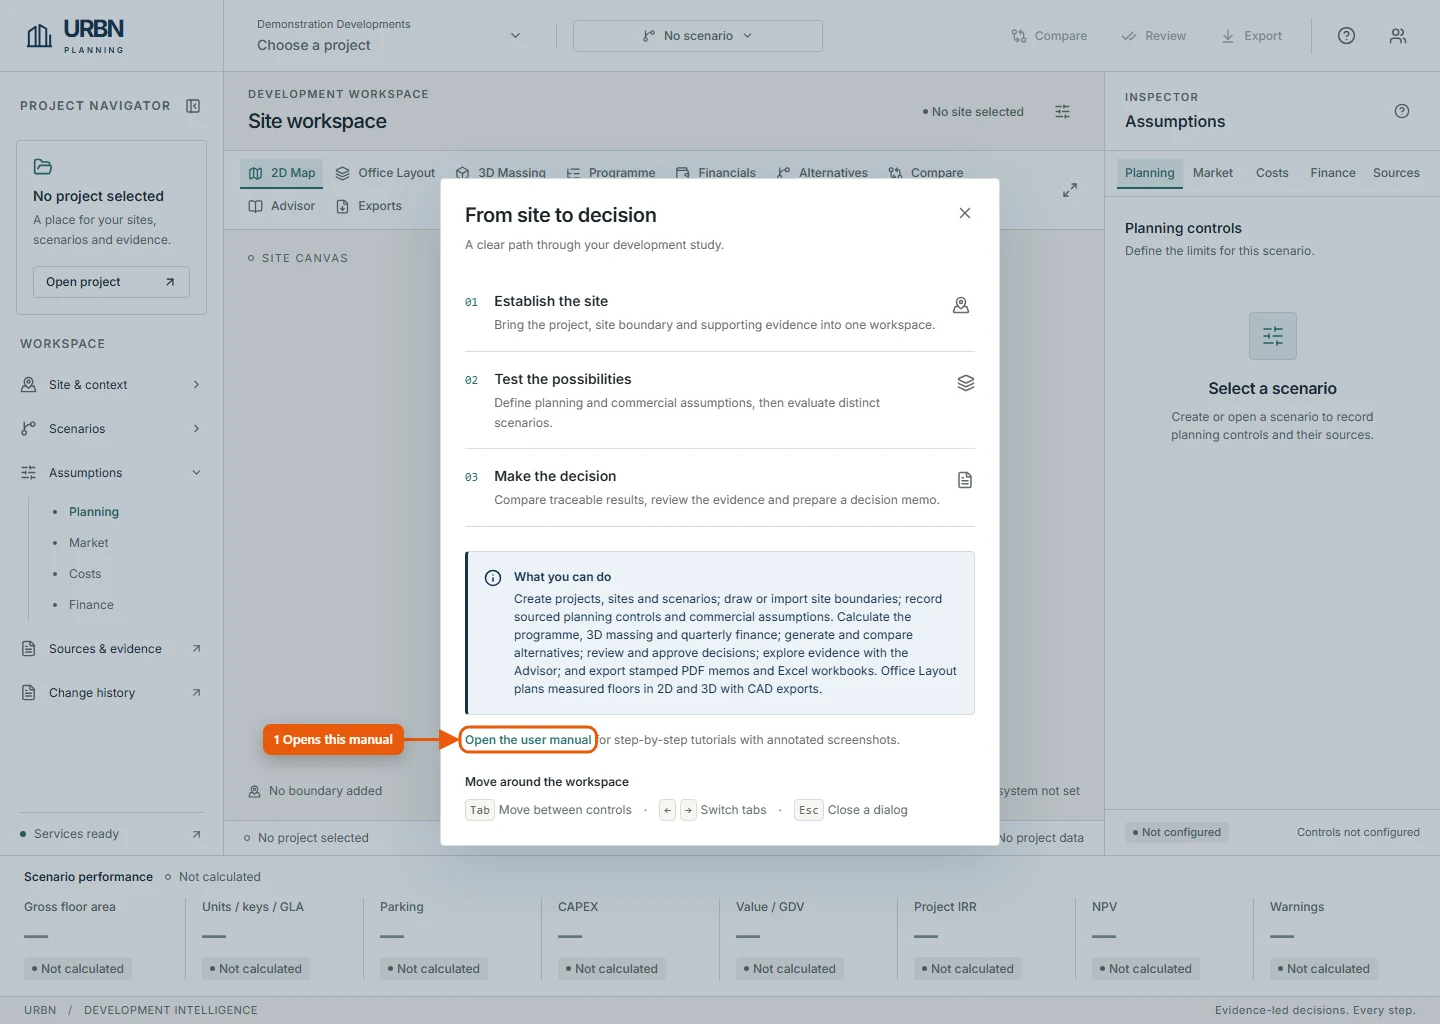
- Open the user manual brings you back to this page.
Phones and small screens
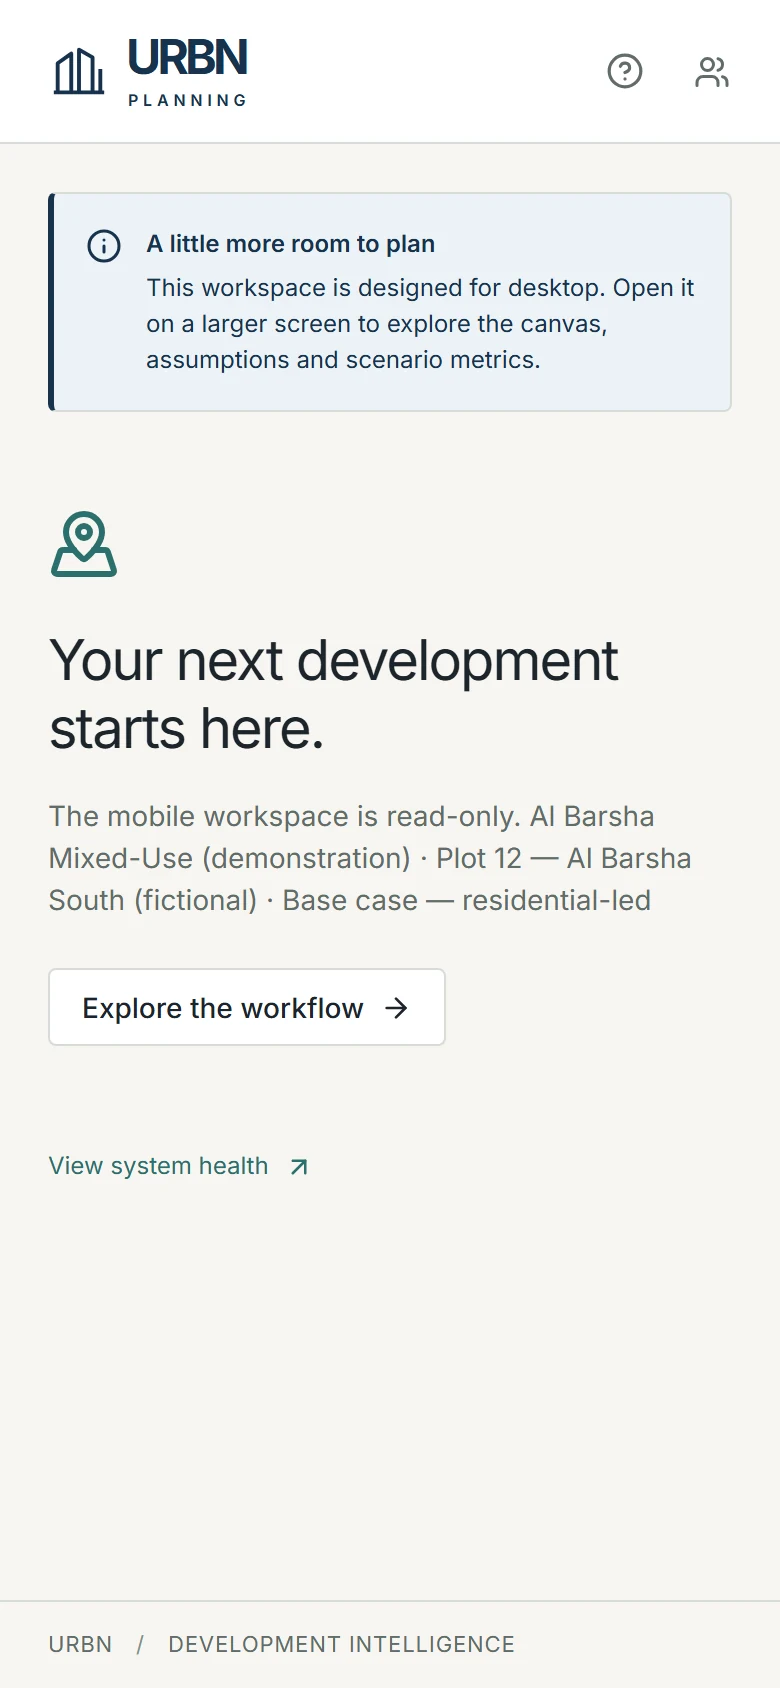
3. Tutorial 1 · Your first feasibility study
In this tutorial you set up a fictional 100 × 80 m mixed-use parcel in Dubai, record its planning controls and assumptions, then calculate the programme, massing and finance. About 20 minutes.
3.1 Create a project
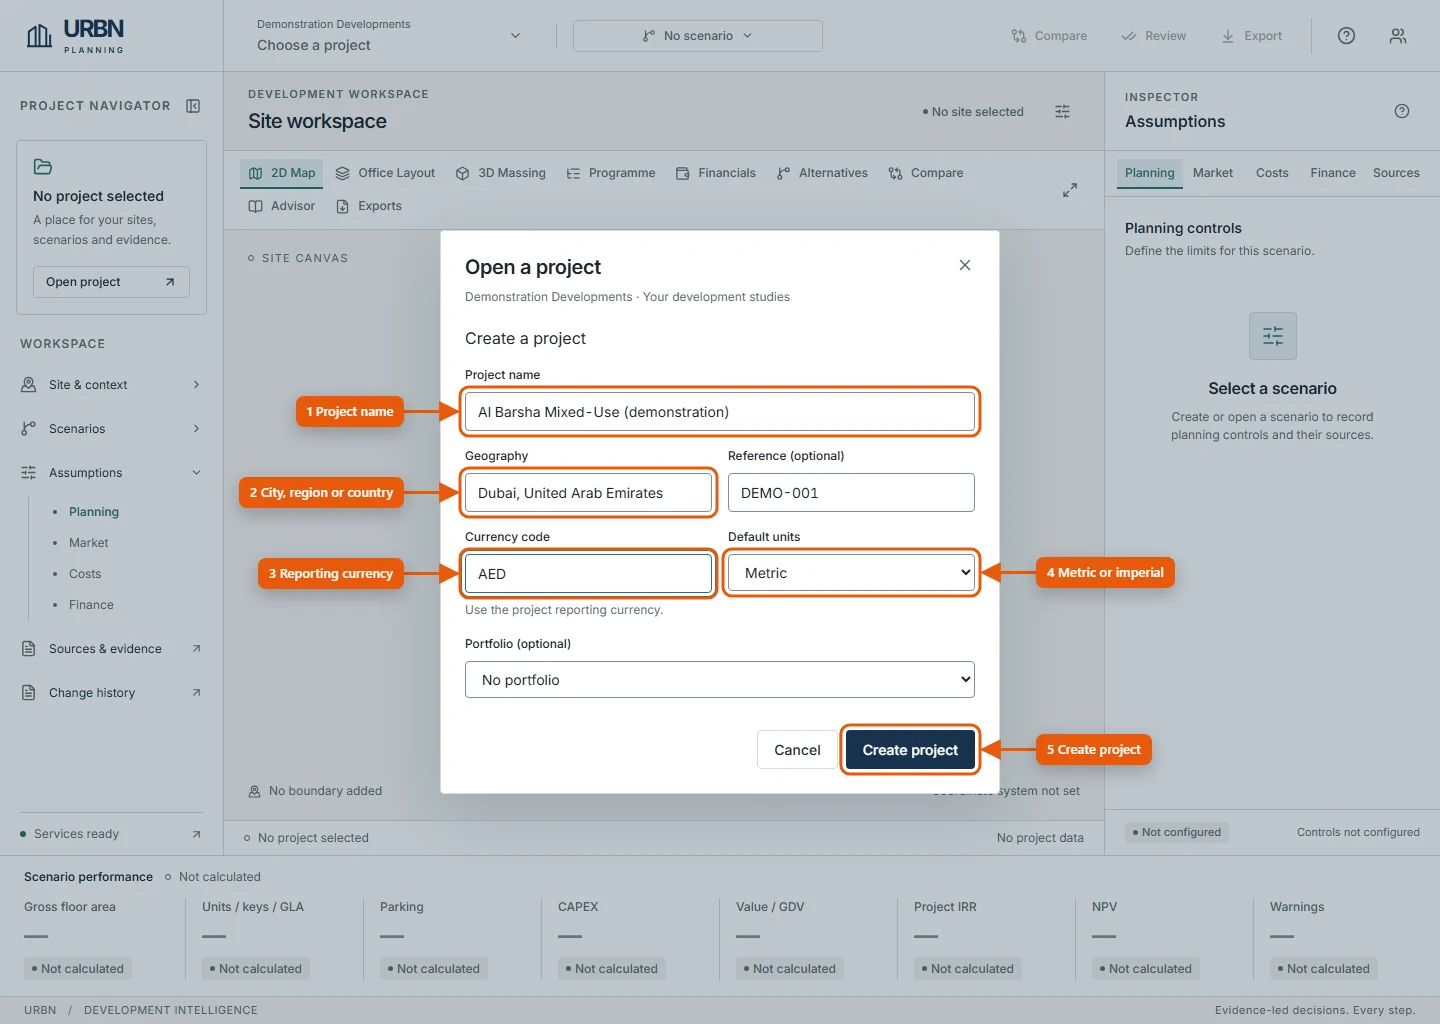
- Select Choose a project, then New project. Type the Project name.
- Enter the Geography — a city, region or country.
- Enter the three-letter reporting Currency code (for example AED). All amounts use this currency; nothing is converted automatically.
- Choose Default units (metric or imperial). Optionally add a reference and a portfolio.
- Select Create project.
3.2 Add a site
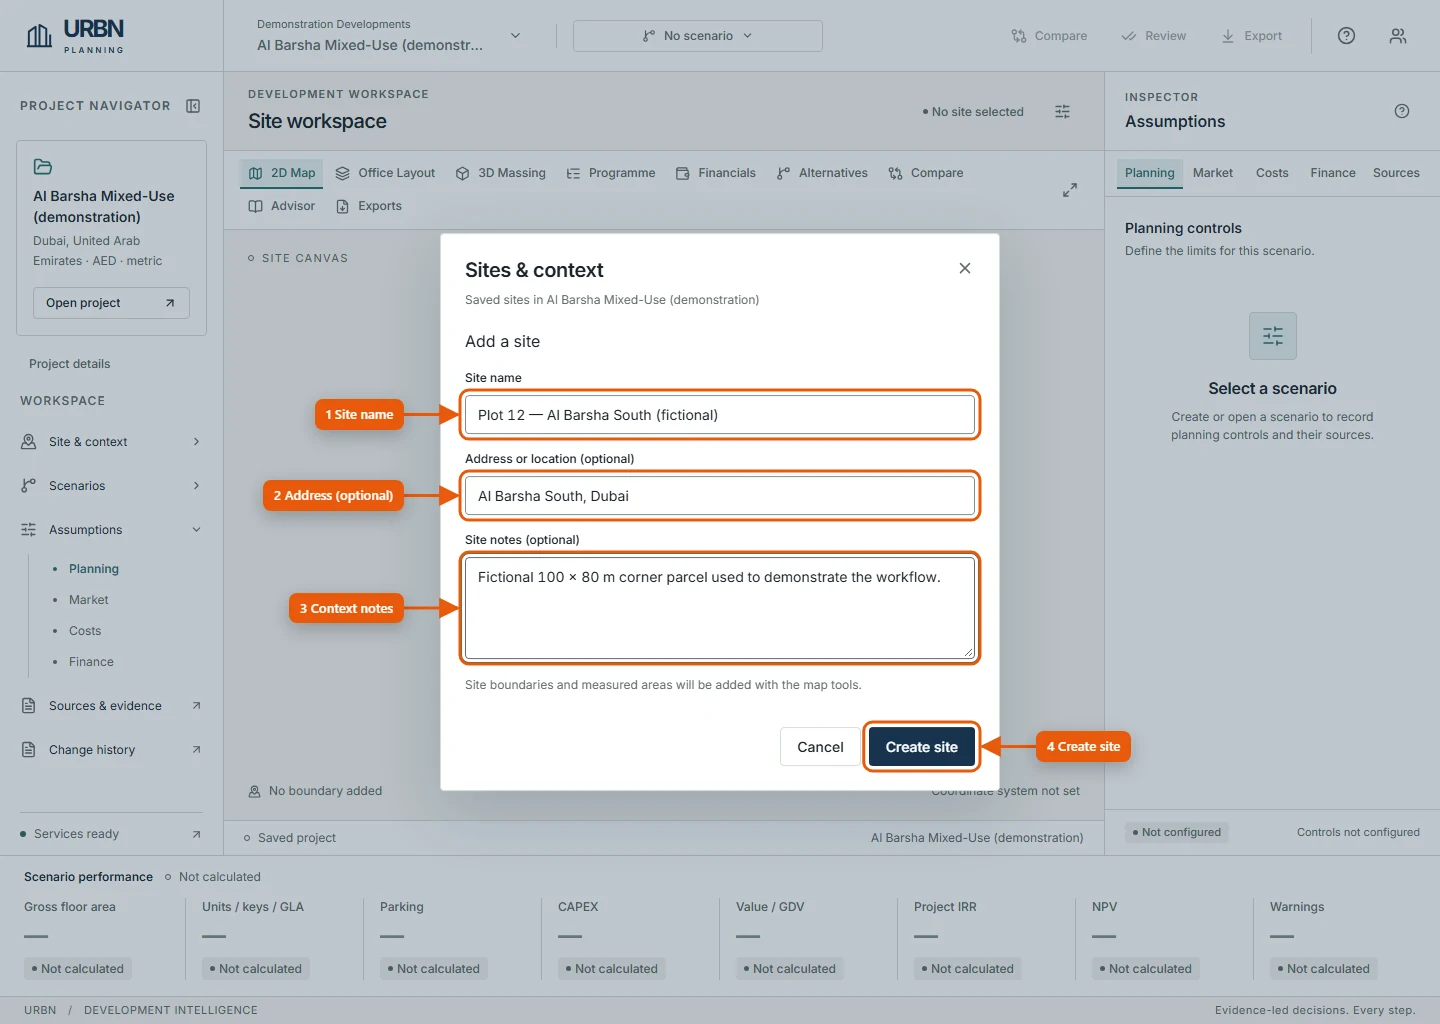
- Type the Site name.
- Optionally add the Address or location.
- Record useful context in Site notes.
- Select Create site. The canvas heading shows the site.
A project can hold several sites. In the same dialog, select a site to switch to it, use the pencil to edit it, or archive and restore it.
3.3 Create a scenario
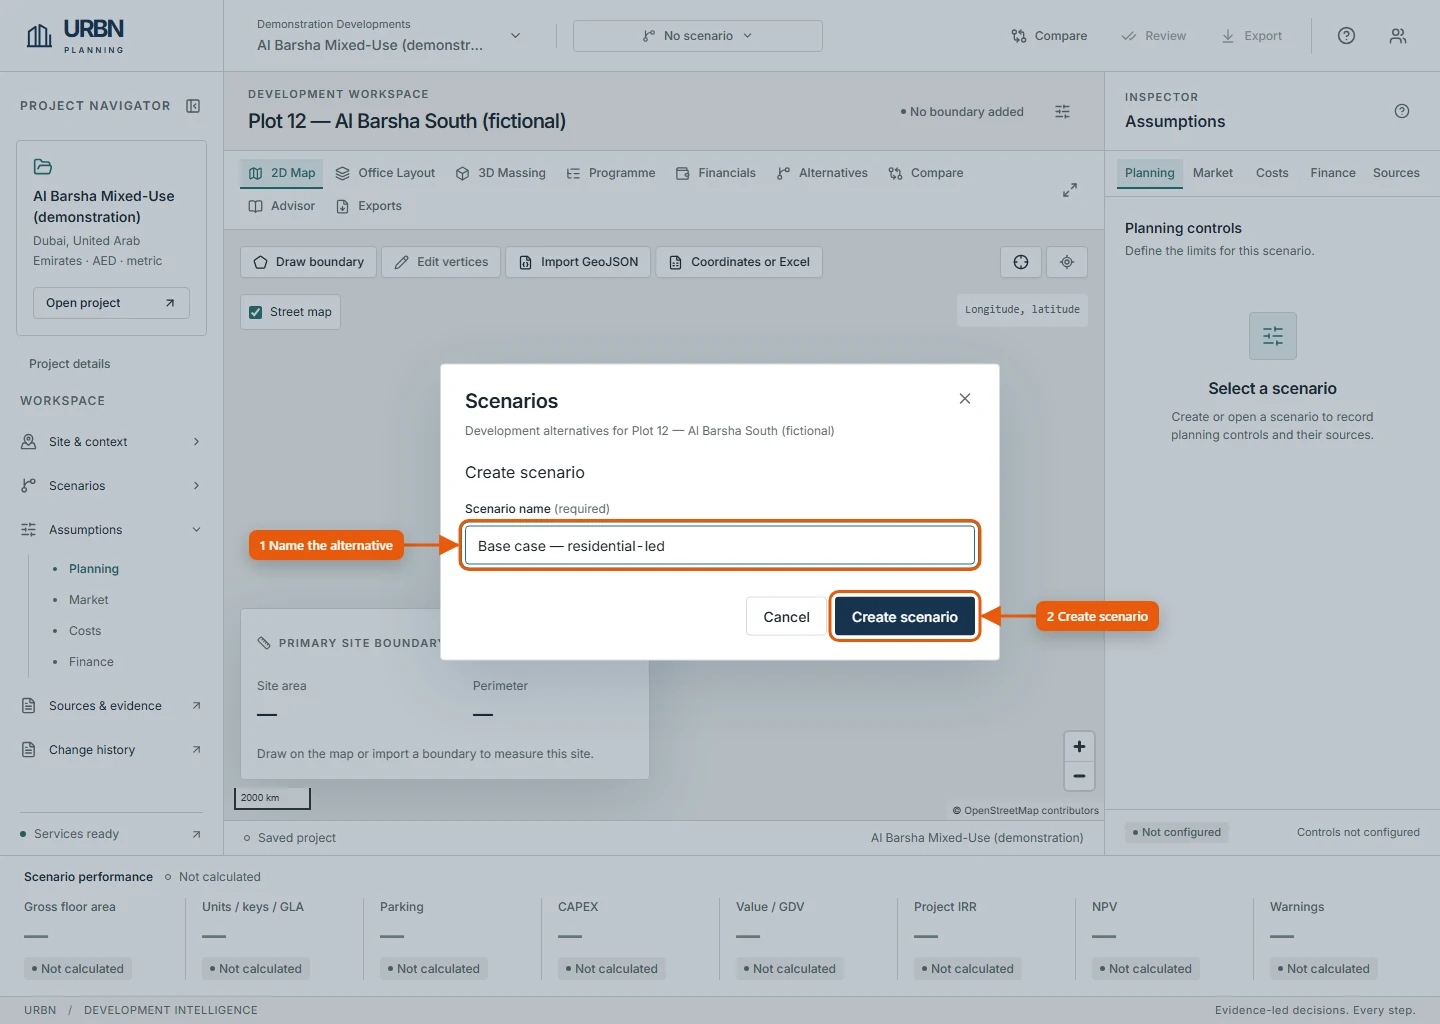
- Navigator → Scenarios → New scenario, then type a Scenario name.
- Select Create scenario.
3.4 Fill in the first inputs, on screen or in Excel
A new site and a new scenario start empty, so the workspace opens a window for each input in turn: the plot boundary, then the scenario's planning controls, then its commercial inputs (programme, market, costs and finance). Each window offers the same two ways in.
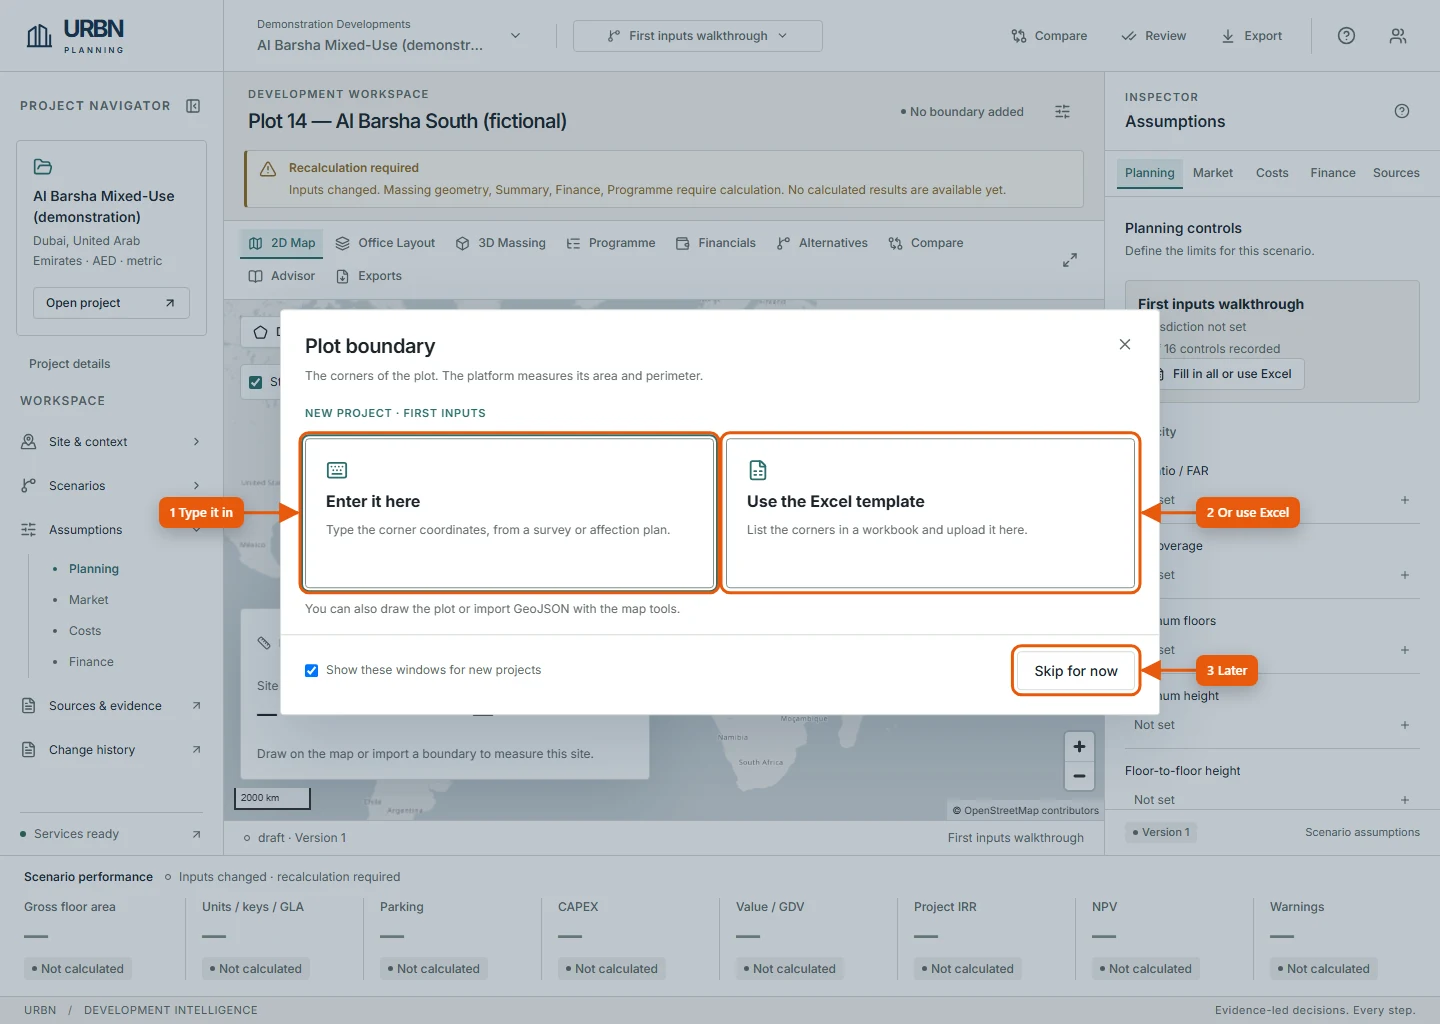
- Enter it here opens a short form with the same fields as the template.
- Use the Excel template gives you a workbook to fill in offline, or to send to a surveyor, planner or market researcher, and upload in the same window.
- Skip for now closes the window. Each window opens once per site or scenario.
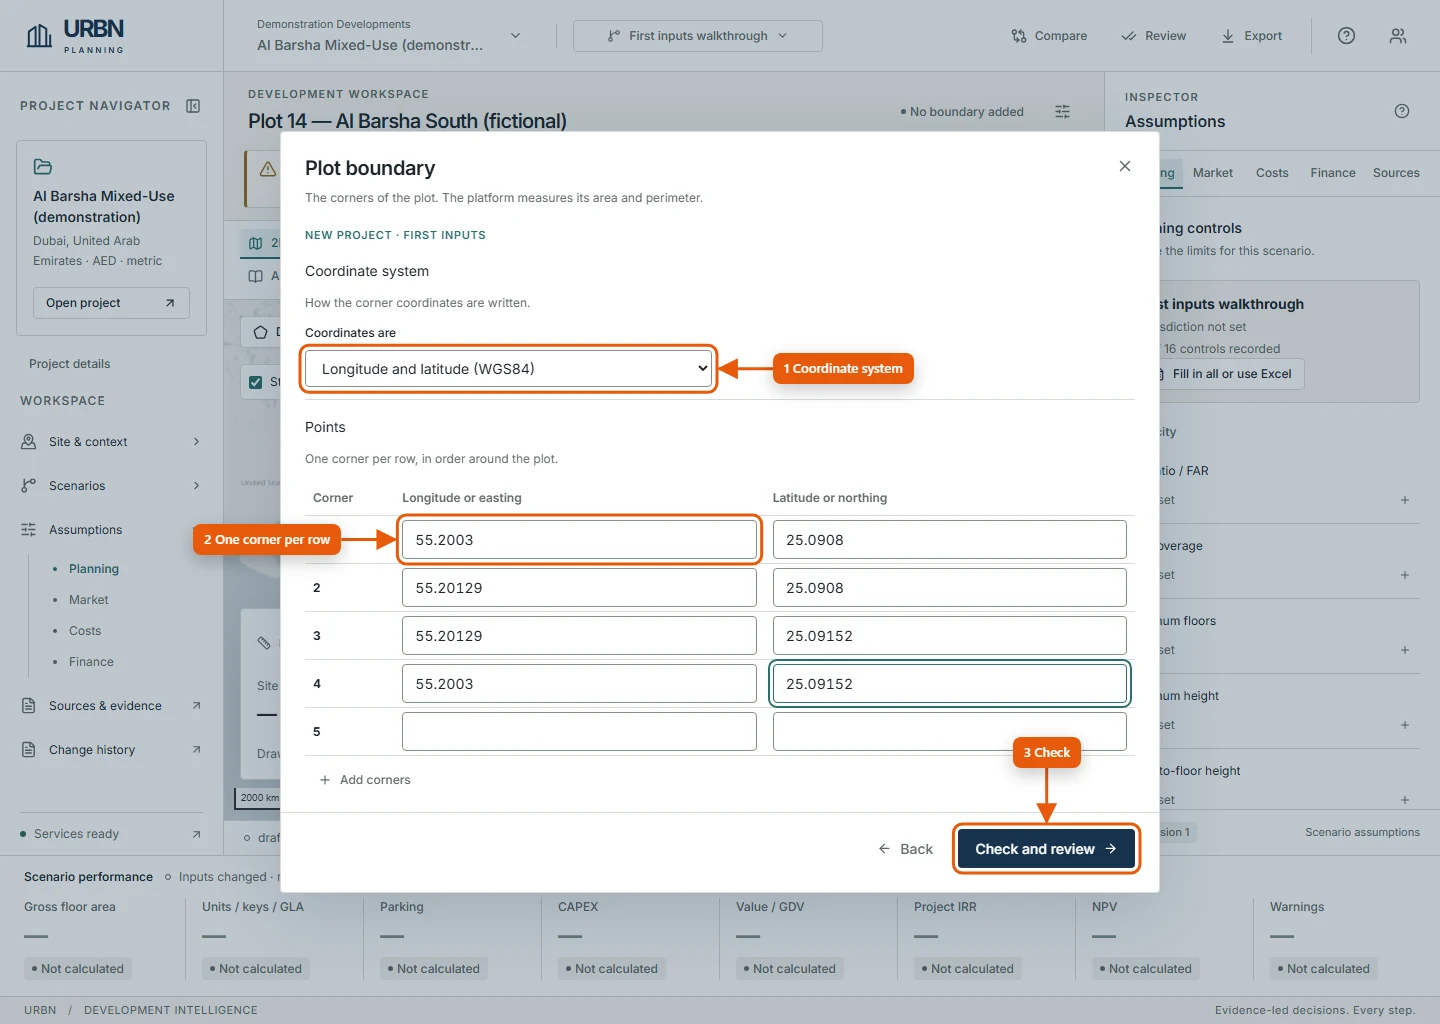
- Choose whether the coordinates are longitude and latitude (WGS84) or UTM eastings and northings. For UTM, give the zone's EPSG code, such as EPSG:32640 for Dubai.
- Type one corner per row, in order around the plot. The boundary closes itself; Add corners gives more rows.
- Select Check and review. Anything that needs fixing is listed, and marked at its field; nothing is saved until it is fixed.
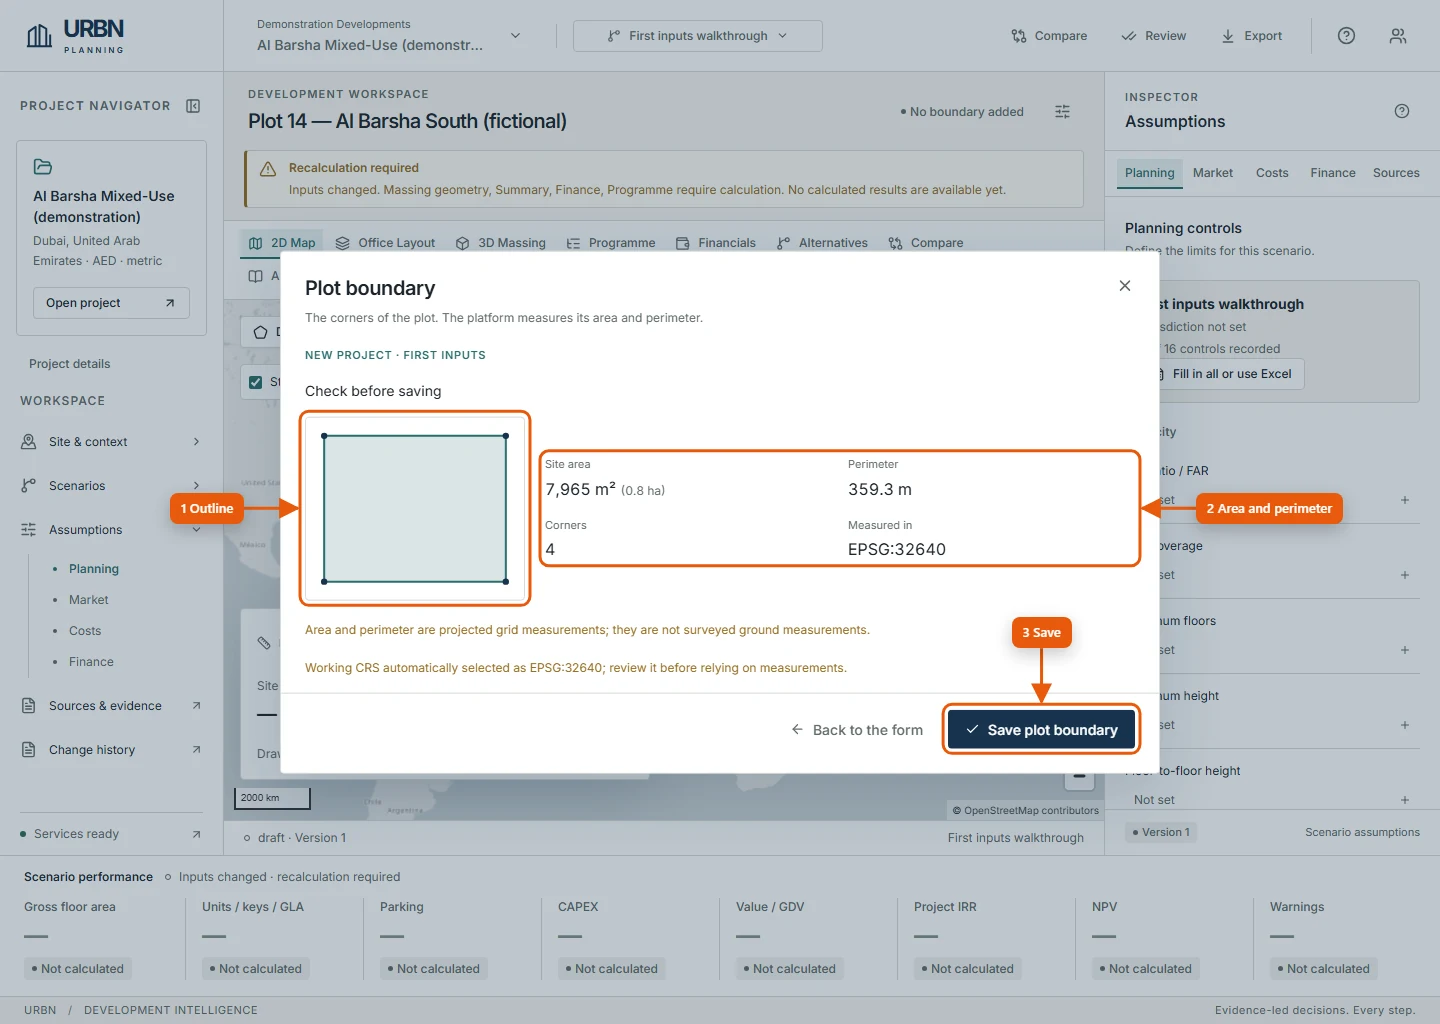
Check the outline, area and perimeter, then select Save plot boundary. The next window opens when you continue.
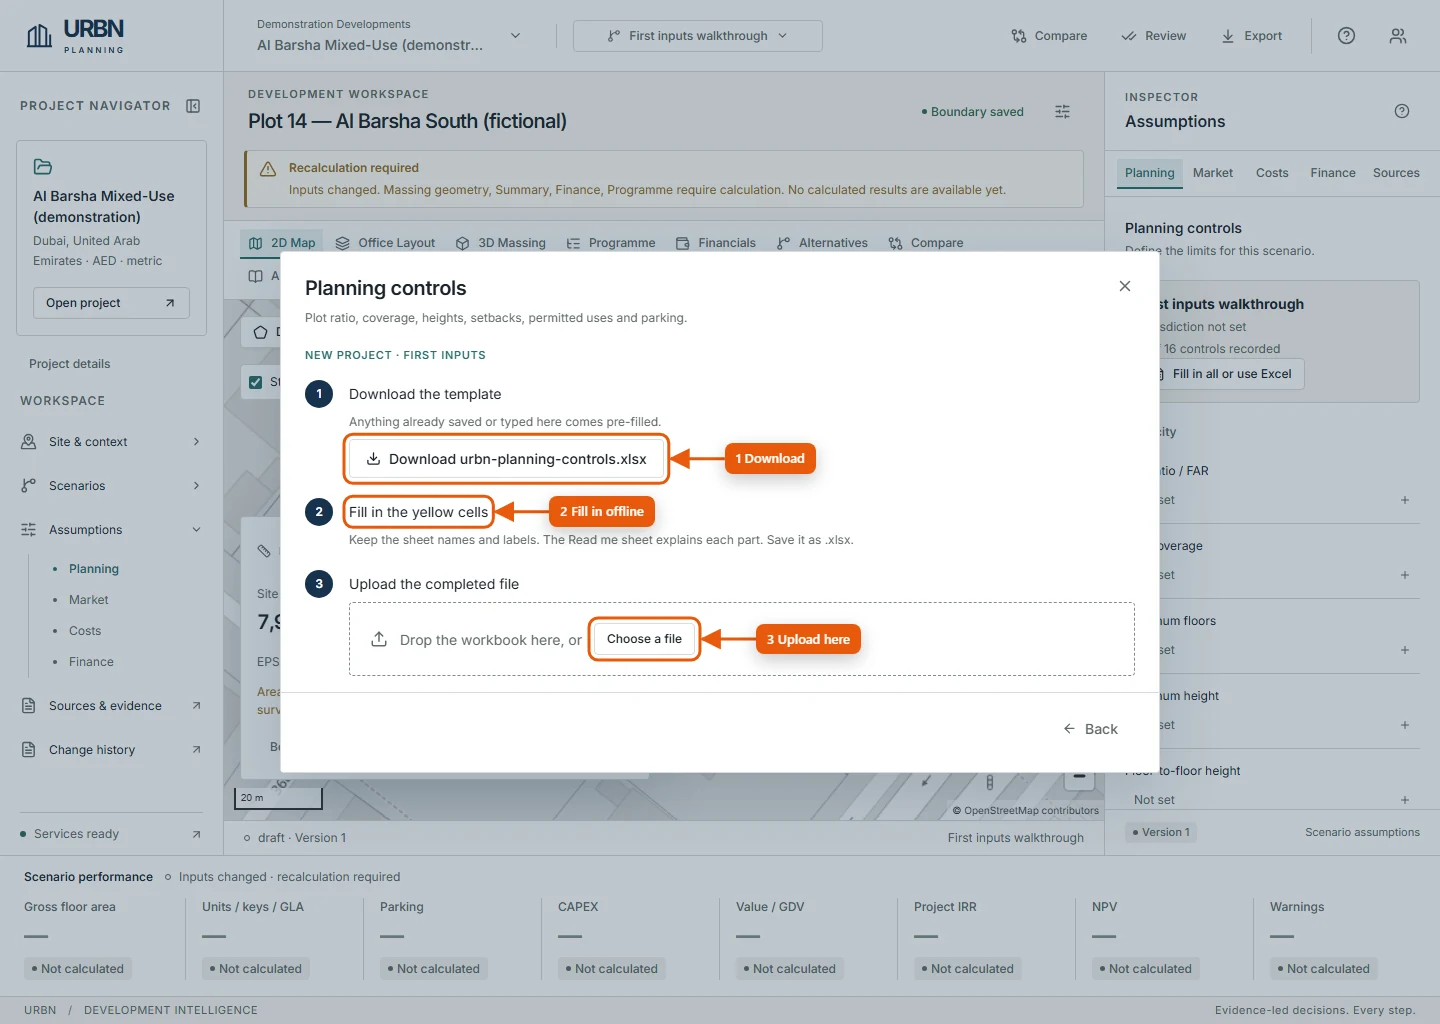
- Download the template. Anything already saved, or typed in the form, comes pre-filled.
- Fill in the yellow cells. Drop-down lists hold the allowed choices, and the Read me sheet explains each part. Enter percentages as numbers: 35 means 35%.
- Upload the saved .xlsx file in the same window. It is checked straight away. Problems are listed by sheet and cell; fix them on screen or upload a corrected file.
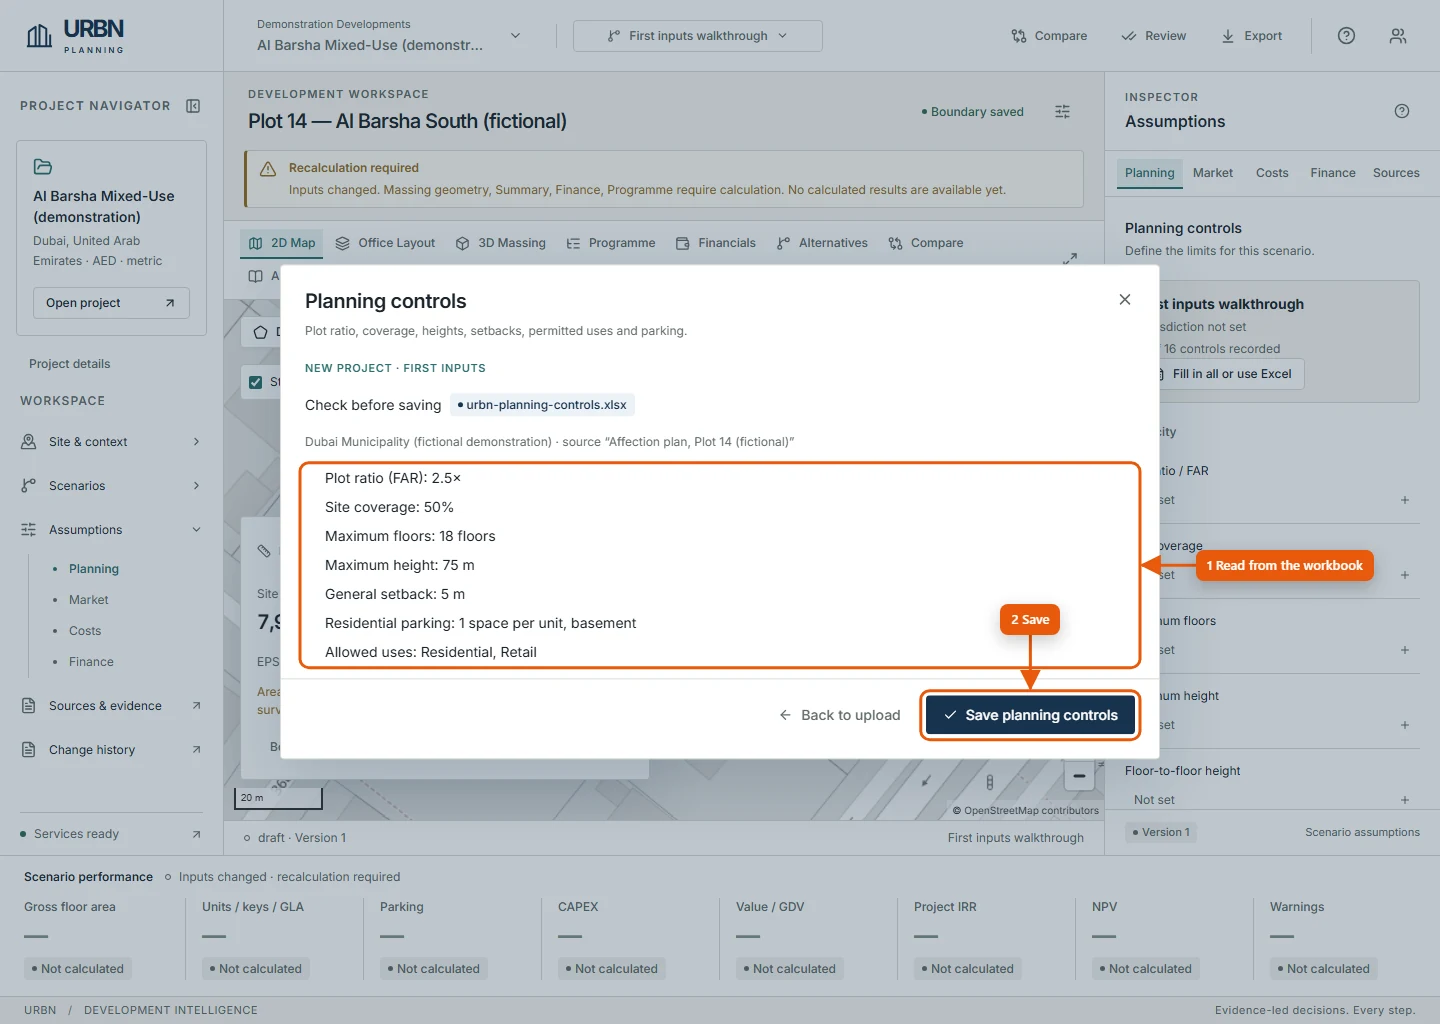
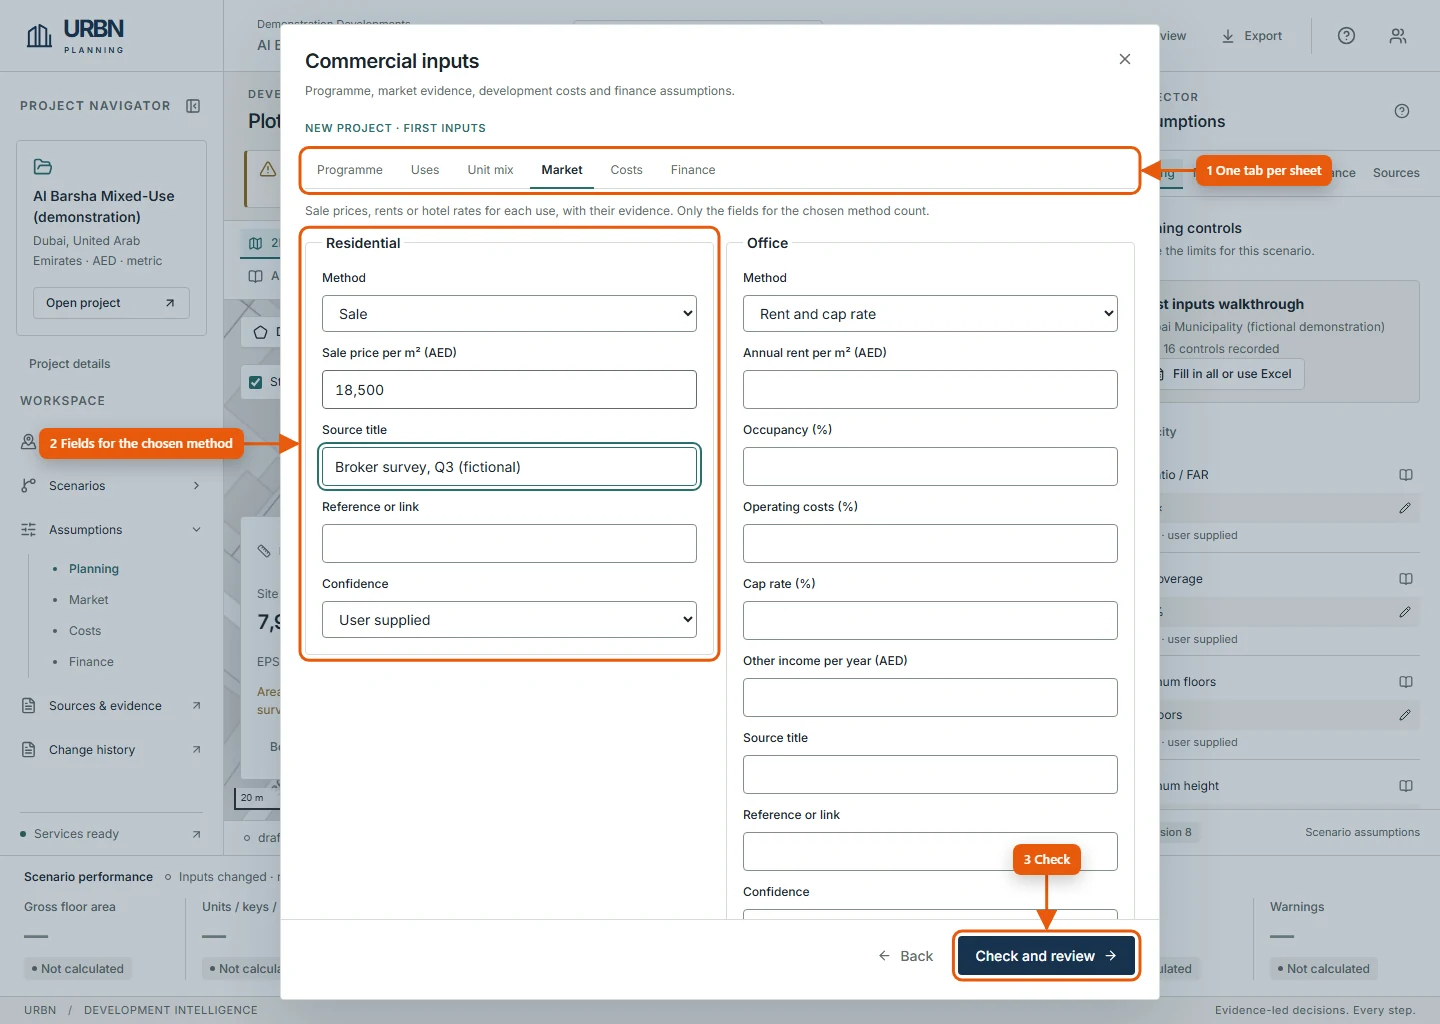
Each value you save records the workbook's source rows (title, reference, type and confidence), so you can trace it later under Sources & evidence. Values that match what is already saved are left as they are, with their original sources.
3.5 Add the site boundary
You can import a boundary file, draw it on the map, or type coordinates.
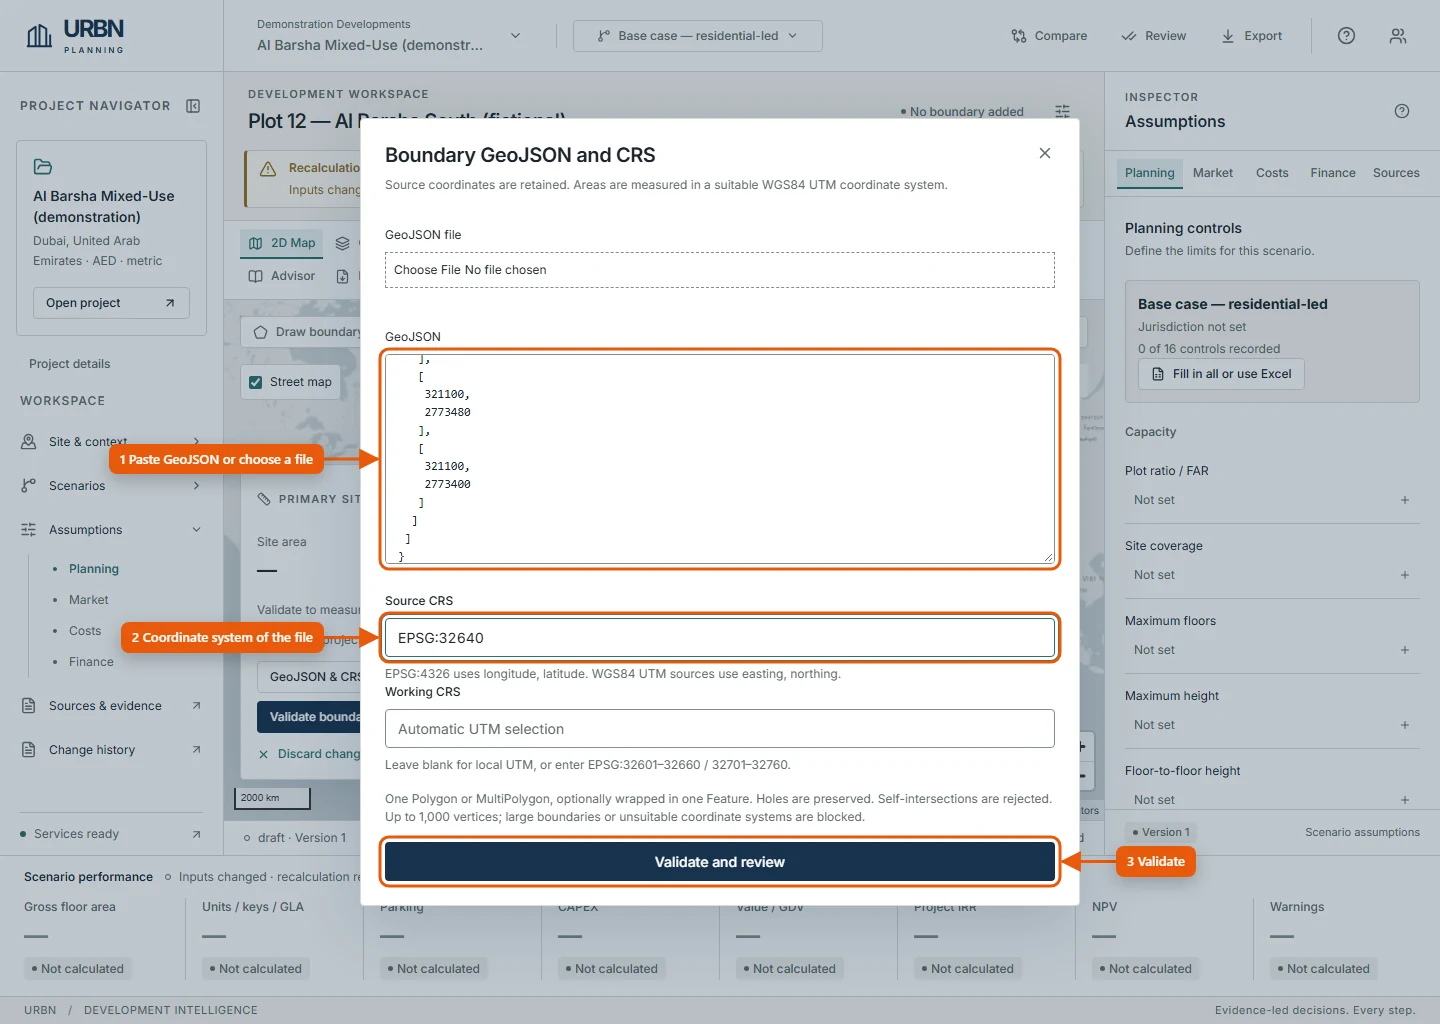
- Paste a GeoJSON Polygon or MultiPolygon, or choose a file (up to 192 KiB and 1,000 vertices, counting each ring's closing point).
- Set the Source CRS of the file — EPSG:4326 for longitude/latitude, or a UTM zone such as EPSG:32640 for Dubai. Leave Working CRS blank for automatic UTM.
- Select Validate and review.
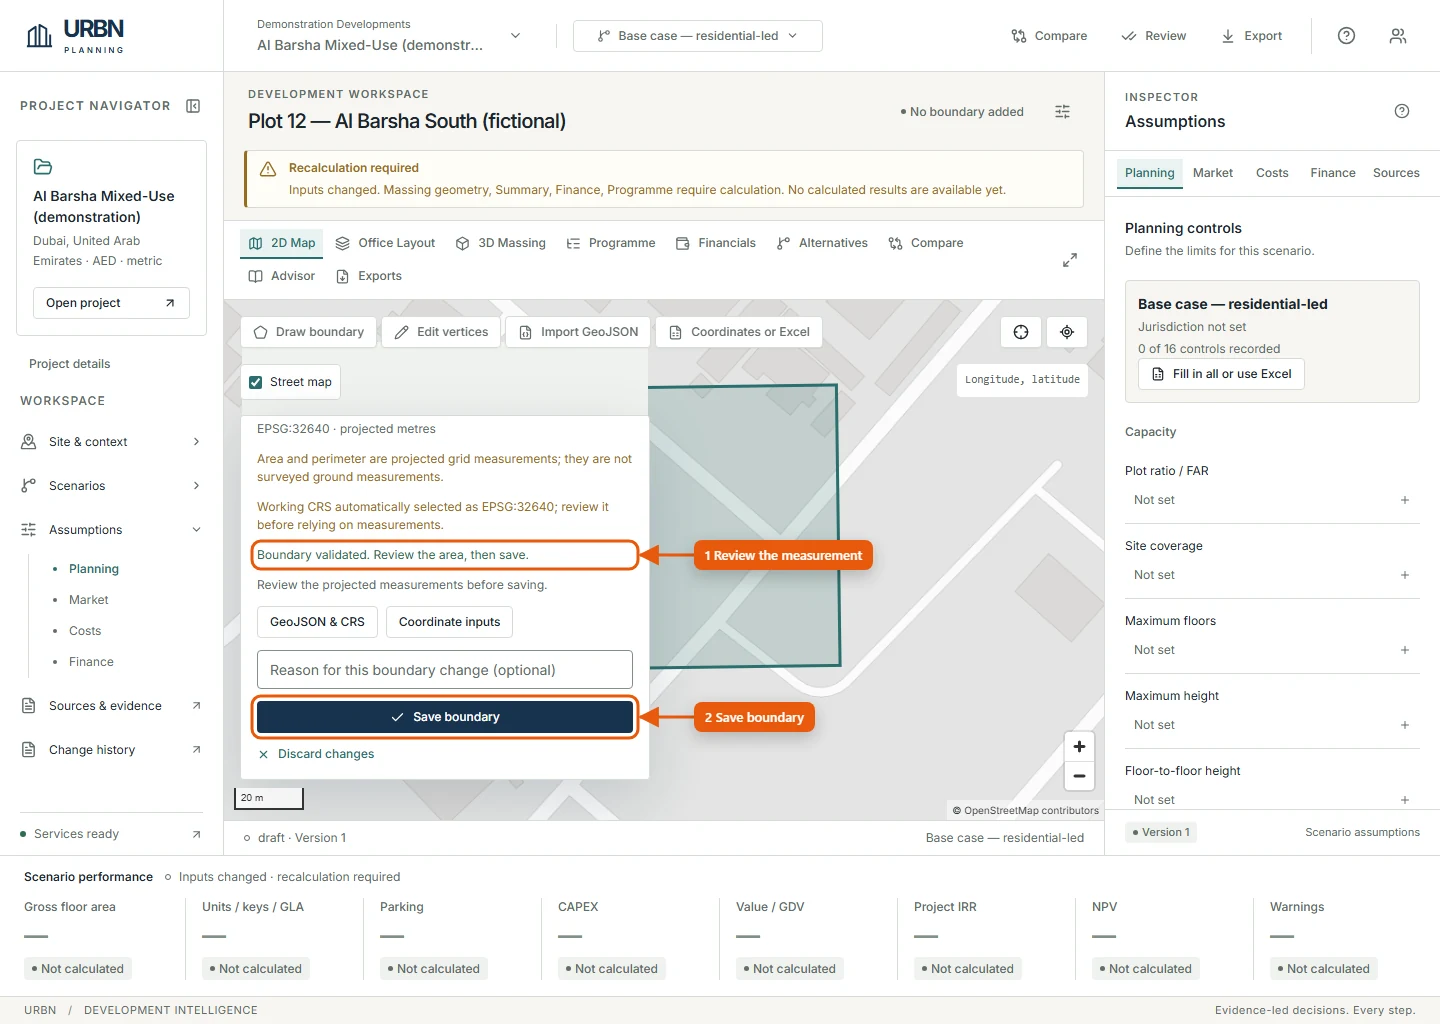
- Review the measurement: the site area and perimeter in projected metres (8,000 m² and 360 m here) and the working CRS chosen for you.
- Optionally give a reason, then select Save boundary. The badge changes to Revision 1.
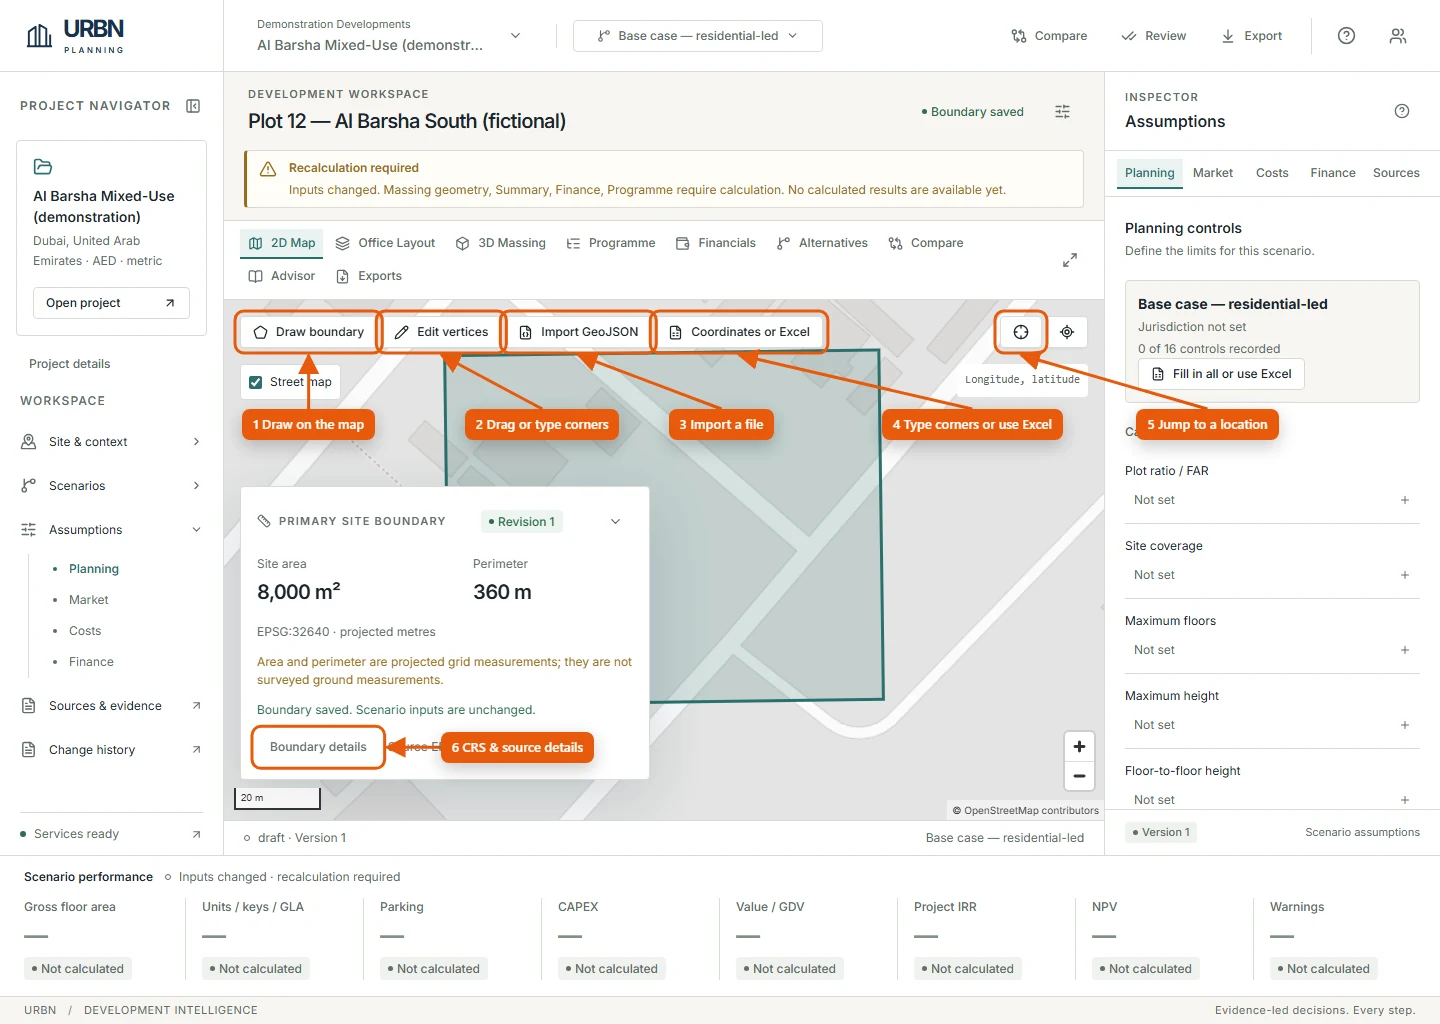
- Draw boundary: click the map to add corners, or type longitude and latitude and select Add point; Finish drawing needs at least three points.
- Edit vertices: drag corners, or Tab to a corner and nudge it with the arrow keys (hold Shift for bigger steps), or open Coordinate inputs; then Validate boundary and Save boundary.
- Import GeoJSON: import or replace from a file.
- Coordinates or Excel: type the corners in a table, or fill in the Excel template (see 3.4).
- Go to coordinates (crosshair icon): move the map to a longitude and latitude.
- Boundary details: see the source and working CRS, the measurement engine and the saved GeoJSON.
Untick Street map to hide the background tiles; the zoom buttons sit at the bottom right.
3.6 Record the planning controls
The inspector's Planning tab lists 16 controls in four groups: capacity (plot ratio / FAR, site coverage, maximum floors, maximum height, floor-to-floor height), setbacks & open space (front, side, rear and general setbacks, minimum open space), uses & parking (permitted uses; residential, office, retail and hotel parking) and planning notes. Record the ones that apply; every value needs a source.
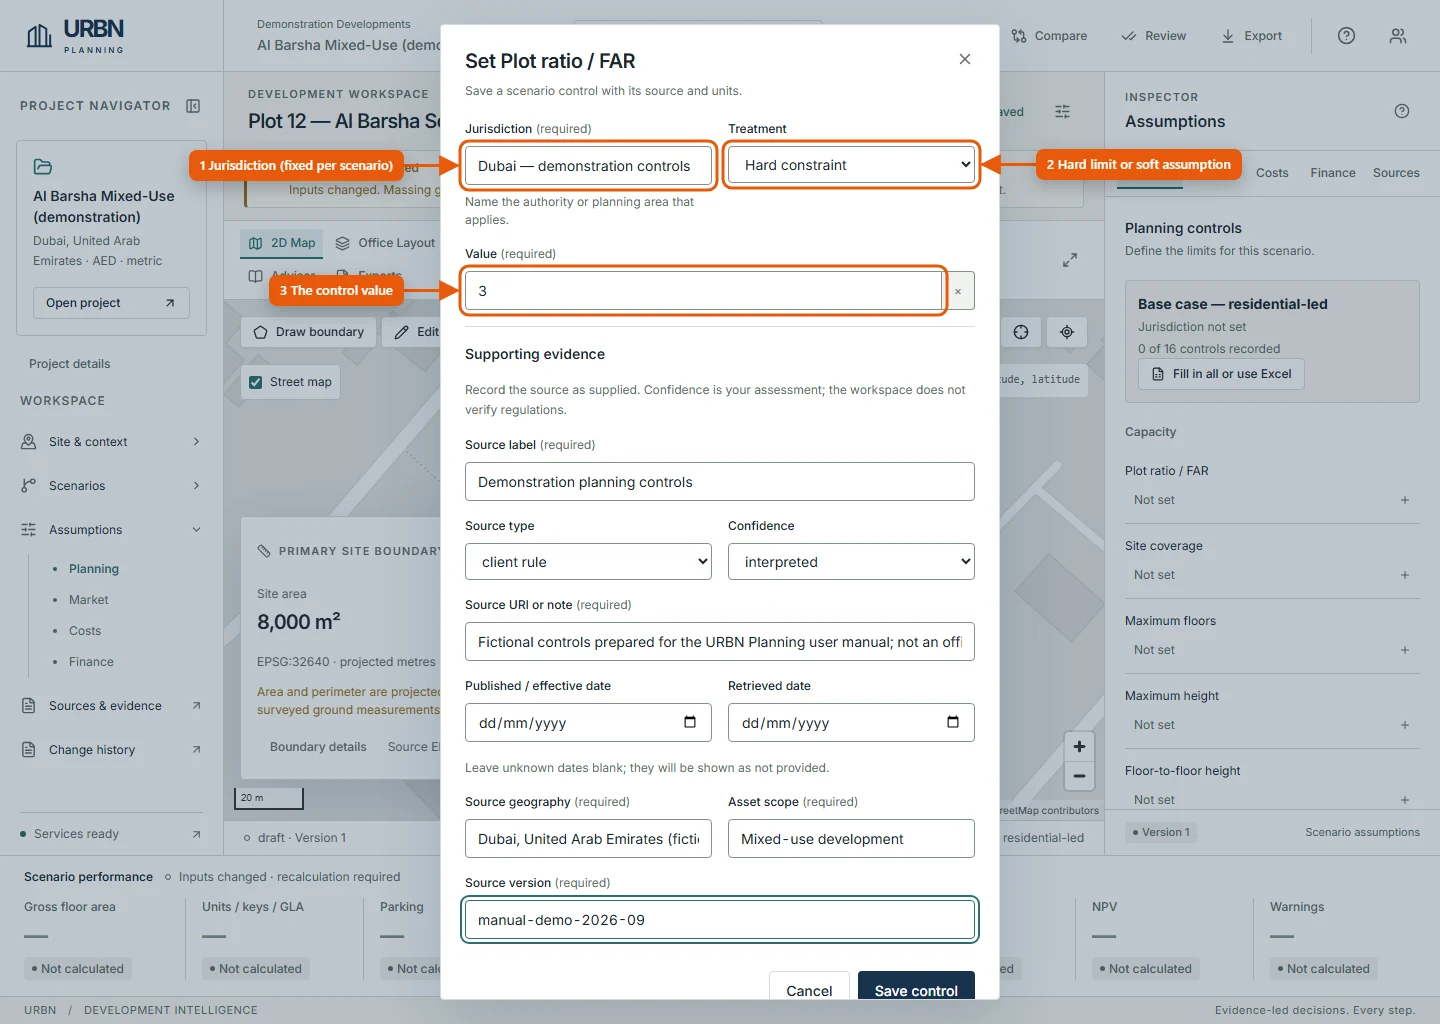
- Enter the Jurisdiction — the authority or planning area. It is fixed for the scenario once the first control is saved.
- Choose the Treatment: Hard constraint (must be met) or Soft assumption.
- Enter the Value (a FAR of 3 here).
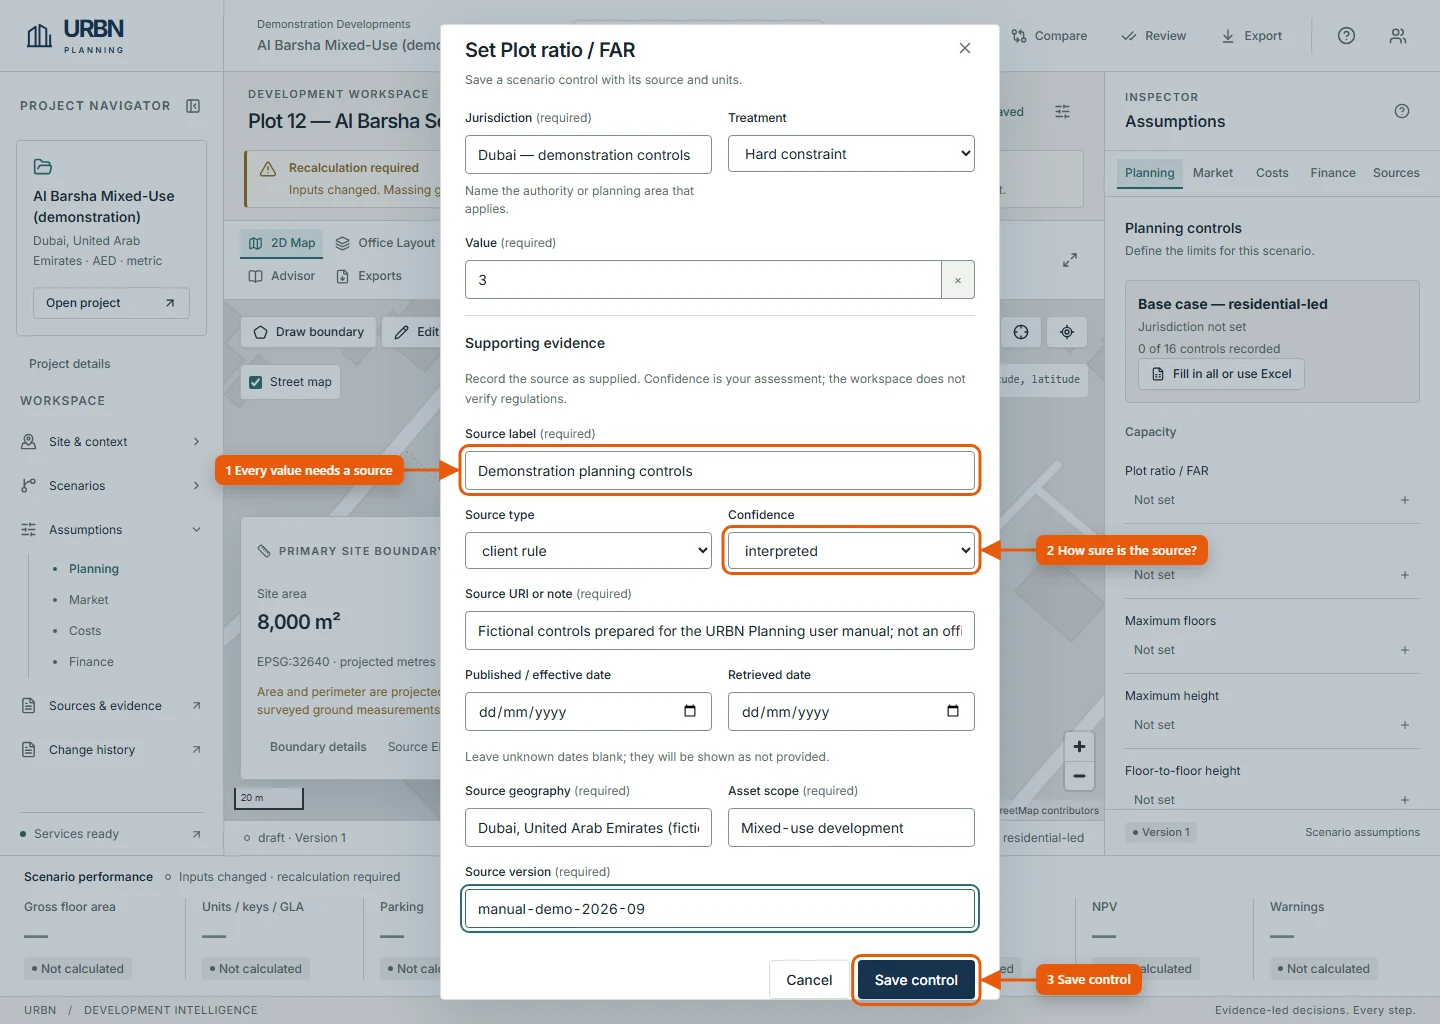
- Describe the source: Source label, Source type and a Source URI or note, plus geography, asset scope, version and dates if known.
- Set the Confidence honestly: user supplied (the default), interpreted, verified or placeholder. The platform records it; it does not verify regulations for you.
- Select Save control.
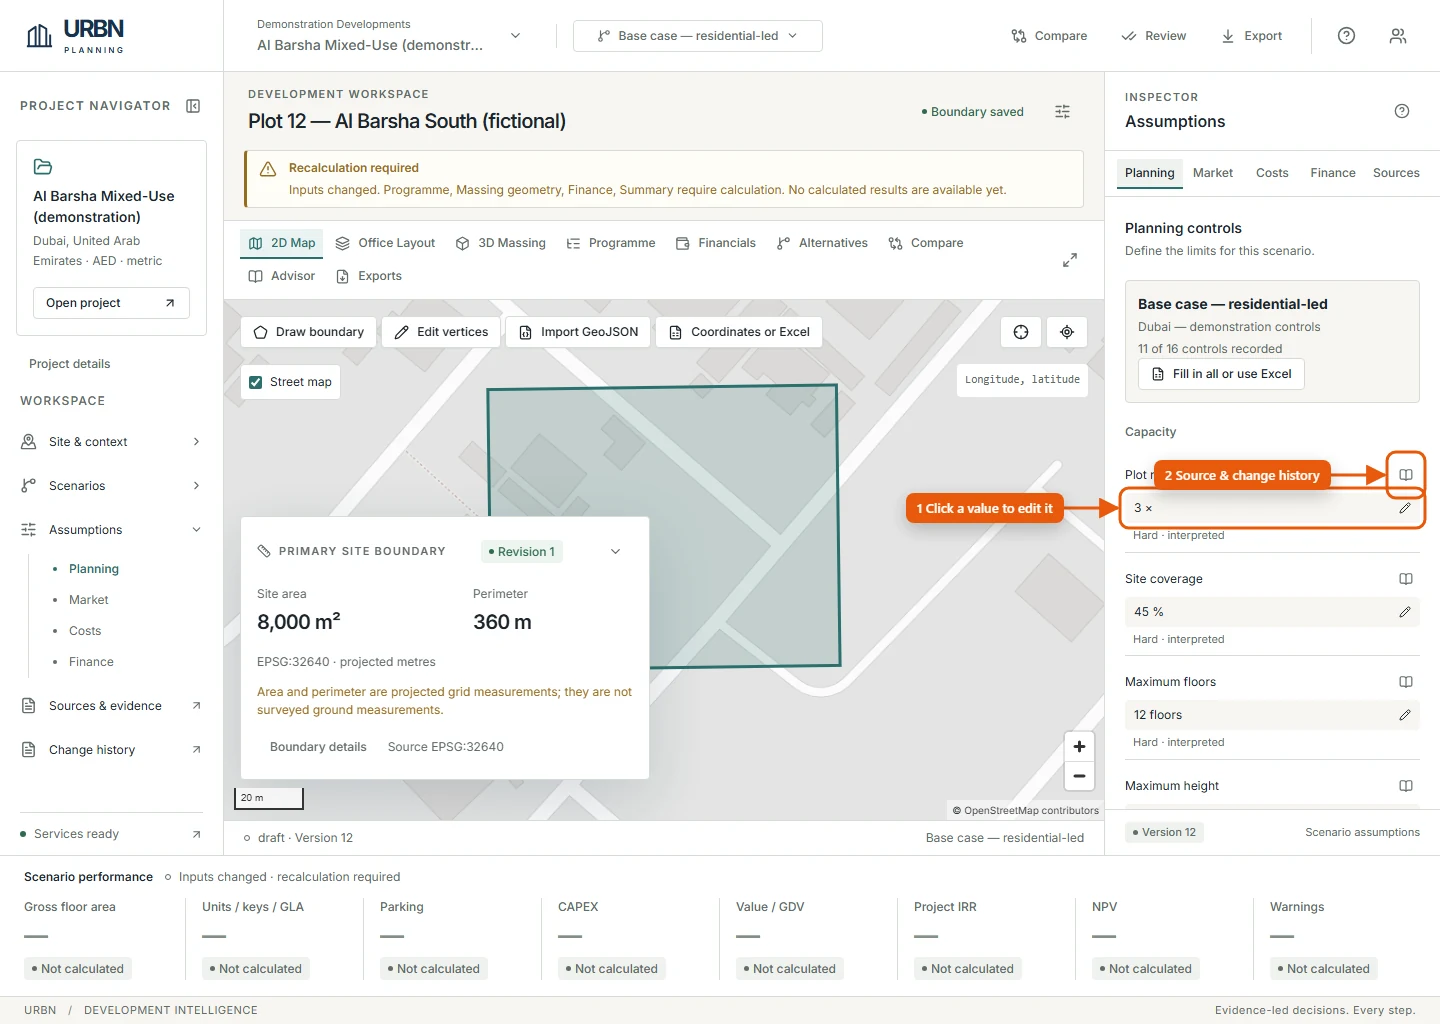
- Select a value to change it. Changing a recorded control asks for an Override reason; the original value and source are kept.
- The book icon opens the control's source and history.
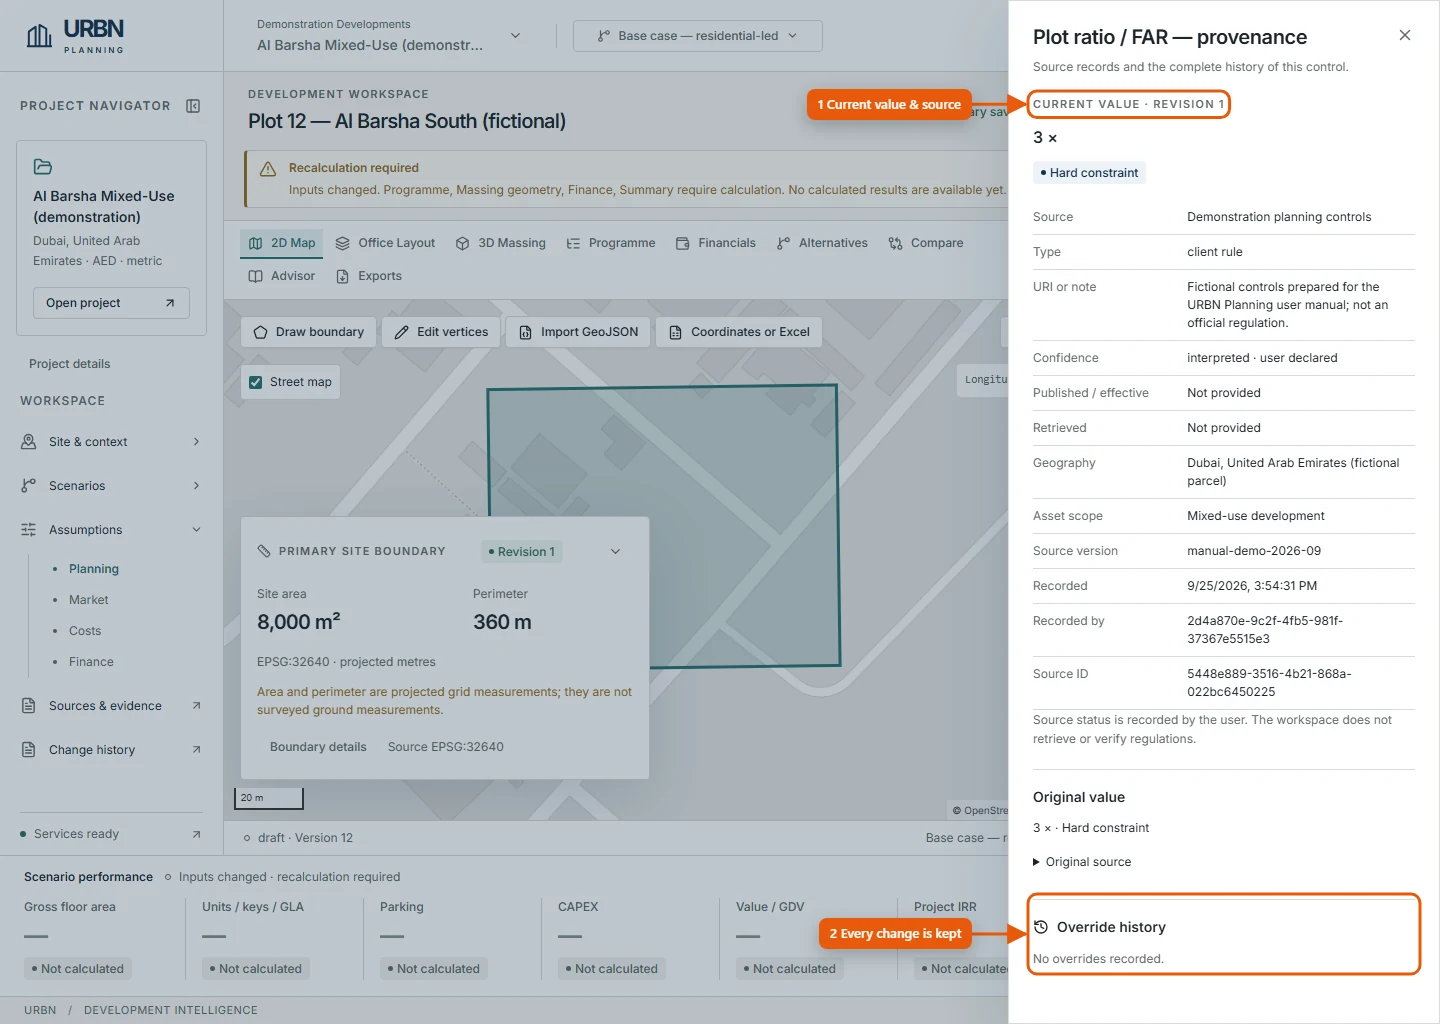
- The current value with its full source record.
- The Original value with its source, and the Override history — who changed it, when, why, and the before and after values.
3.7 Enter the commercial assumptions
Use the inspector's Market, Costs and Finance tabs. Each form records its currency and supporting evidence; saving a change asks for a reason and marks the programme stale.
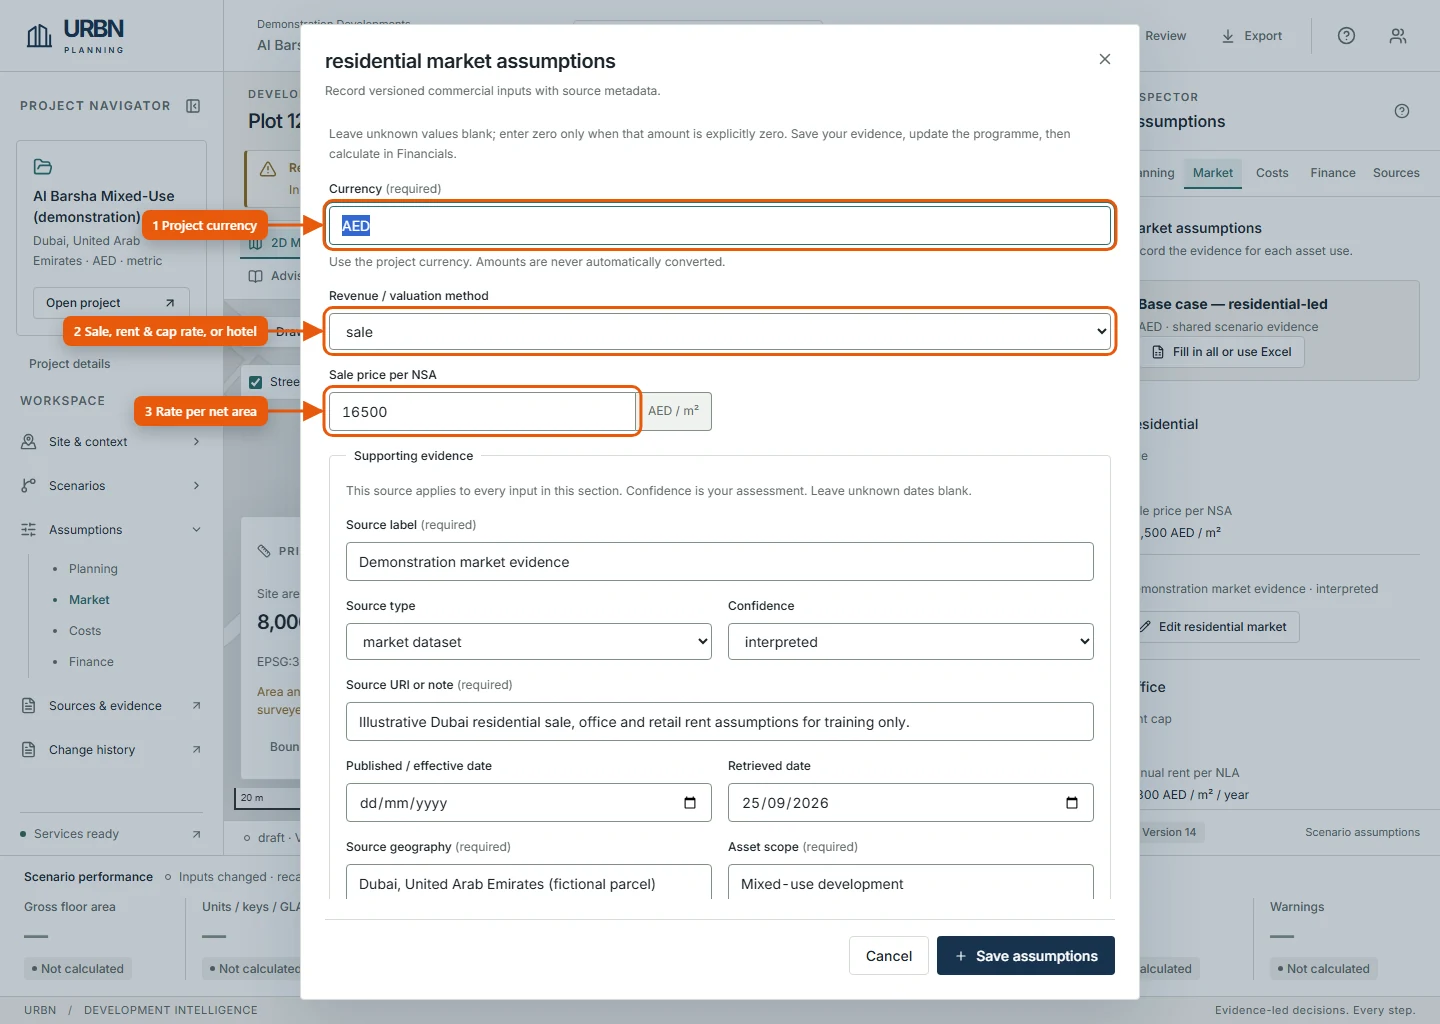
- The Currency must match the project currency.
- Pick the Revenue / valuation method: sale, or rent cap (rent, occupancy, operating cost and cap rate). Hotels use adr occupancy (average daily rate and occupancy) or value per key.
- Enter the rates — for a sale, the Sale price per NSA (16,500 AED/m² here).
Costs. Costs → Edit costs assumptions: land acquisition, hard cost per GFA, soft costs and contingency as a percentage of hard cost, and an infrastructure allowance.
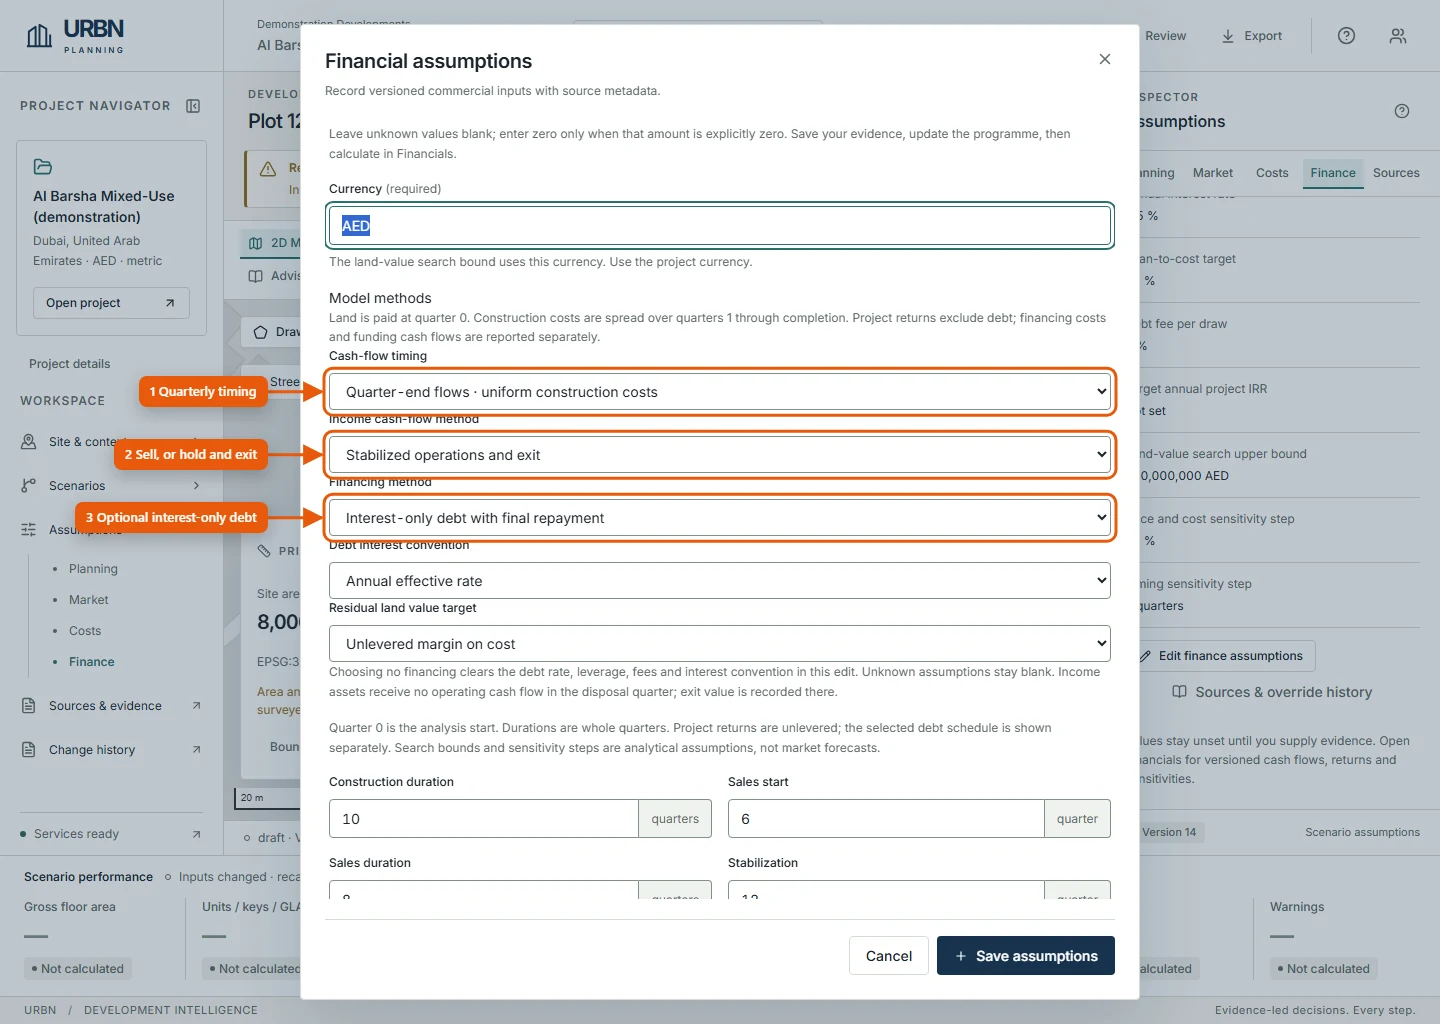
- Cash-flow timing: Quarter-end flows · uniform construction costs.
- Income cash-flow method: Exit value only (sell) or Stabilized operations and exit (hold, then sell).
- Financing method: No financing, or Interest-only debt with final repayment with a loan-to-cost target, annual interest rate, debt fee per draw and interest convention.
Also set the timing in quarters (construction duration, sales start and duration, stabilization, valuation), the annual effective discount rate used for NPV, the Residual land value target (unlevered margin on cost or unlevered project IRR, with its target and a land-value search upper bound) and the price, cost and timing sensitivity steps.
3.8 Define and calculate the programme
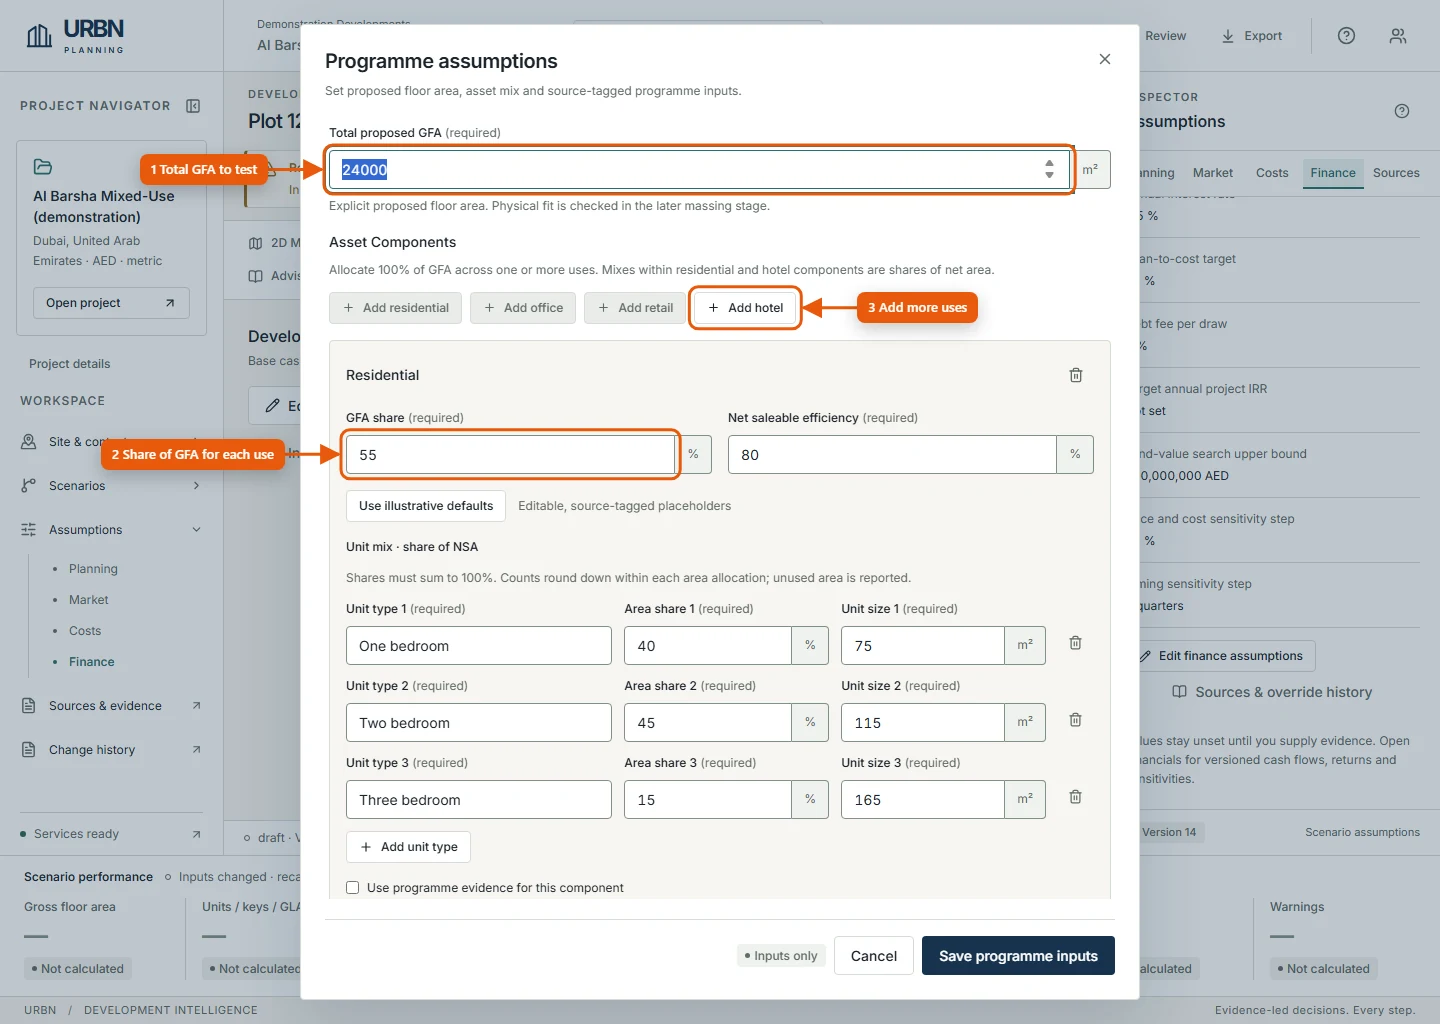
- Enter the Total proposed GFA to test (24,000 m² here).
- For each use, set its GFA share and net efficiency. GFA shares must total exactly 100%; so must each residential unit mix or hotel room mix.
- Add more uses with Add residential, Add office, Add retail or Add hotel. Save with Save programme inputs.
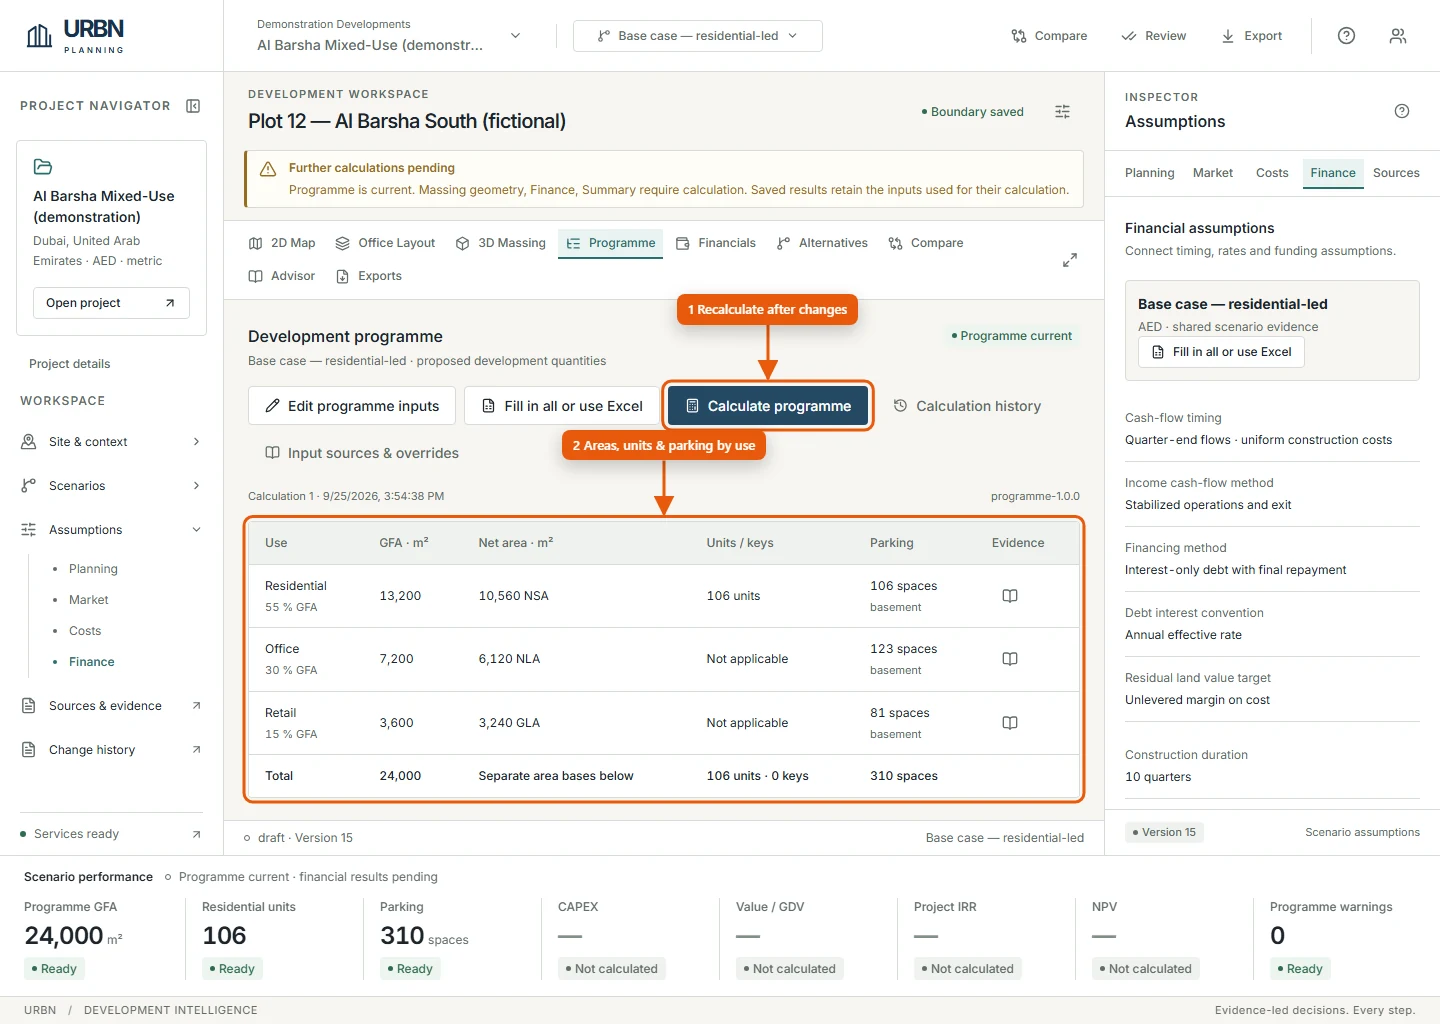
- Select Calculate programme; recalculate whenever inputs change.
- Read the GFA, net area (NSA, NLA or GLA), units or keys and parking for each use. Here: 106 residential units and 310 parking spaces. Use Calculation history for earlier versions and the trace buttons for the full working.
3.9 Generate the 3D massing
Massing tests whether the programme physically fits within the controls. First save the massing inputs with Edit massing inputs:
- Massing mode: Generate orthogonal masses within the controls, or Validate manual footprints for up to 20 buildings you define (Copy saved result footprints starts from the last generated result).
- The floor-to-floor height and a Design floor ceiling — your own limit, which hard planning controls may reduce further.
- Up to 10 exclusions or hardscape areas, such as easements or paved courts.
- Read the Modelling policies and tick Use these policies for this calculation.
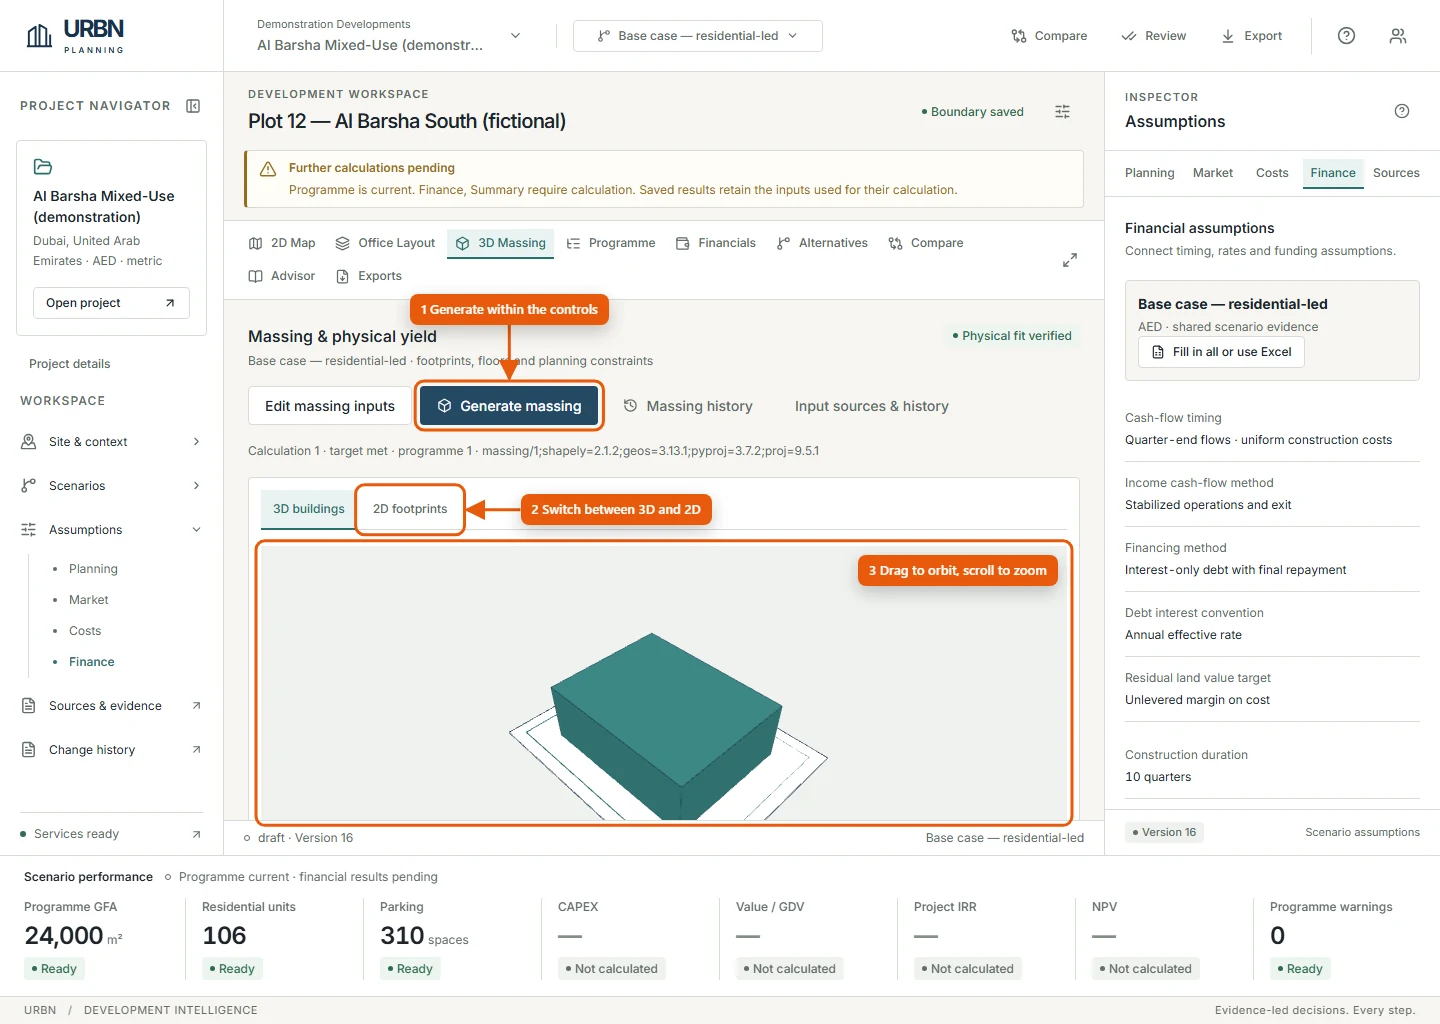
- Select Generate massing (Validate manual massing in manual mode). The badge shows Physical fit verified, Physically infeasible or Physical fit unknown.
- Switch between 3D buildings and 2D footprints.
- Drag to orbit and scroll to zoom; Reset 3D view and View from above restore standard views.
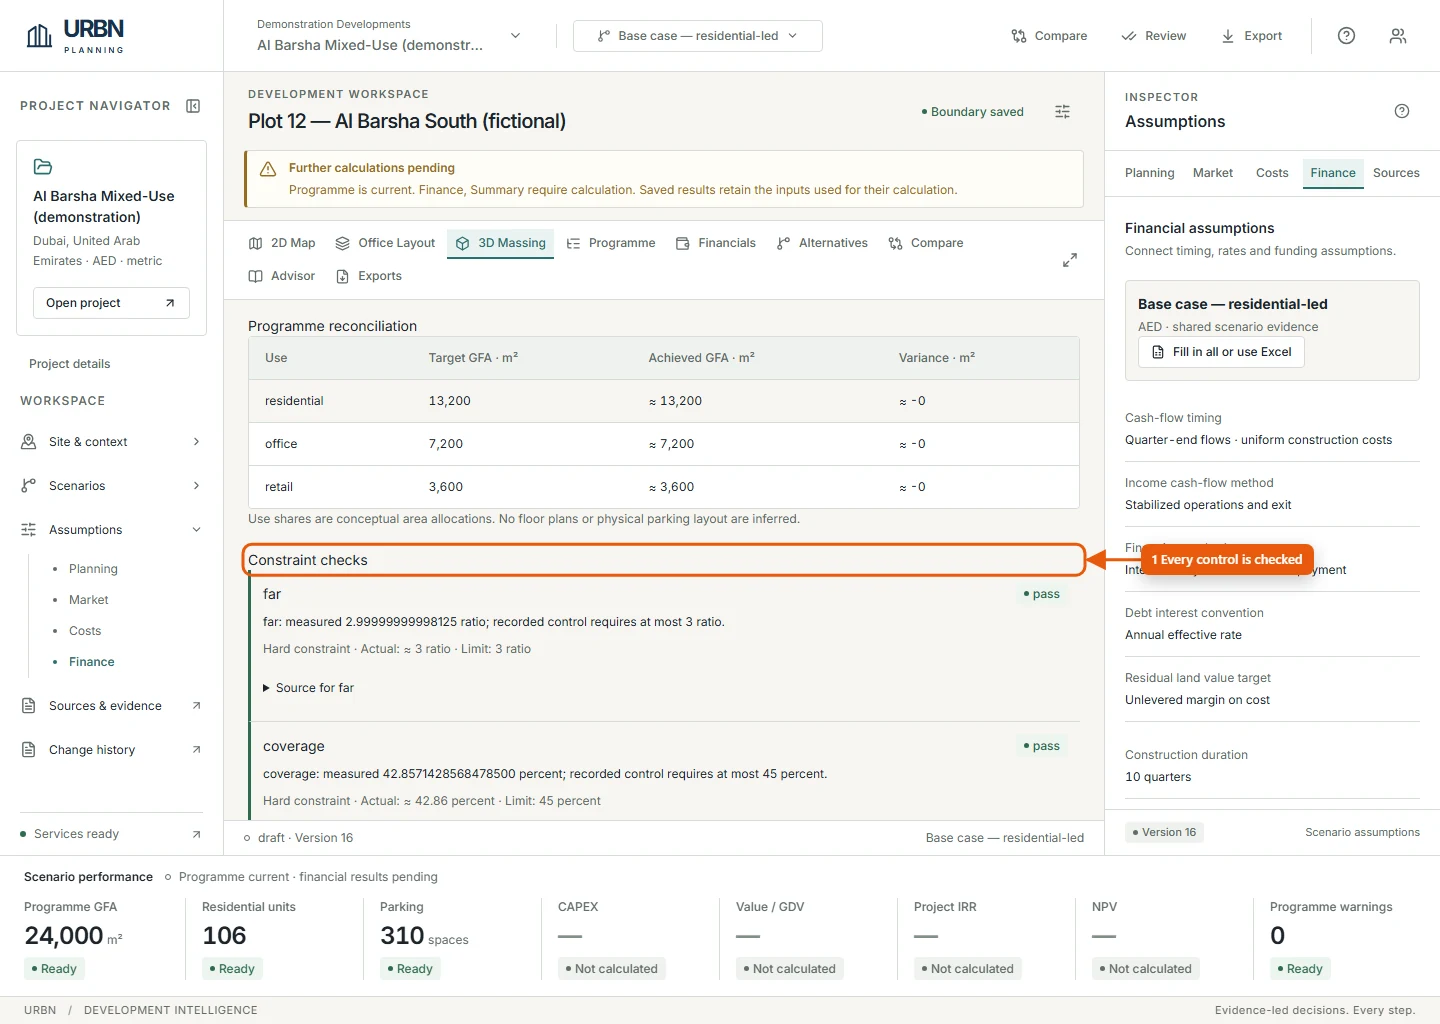
- Every recorded control — FAR, coverage, floors, height, setbacks, open space and uses — is checked against the model, with its source.
3.10 Calculate the finance
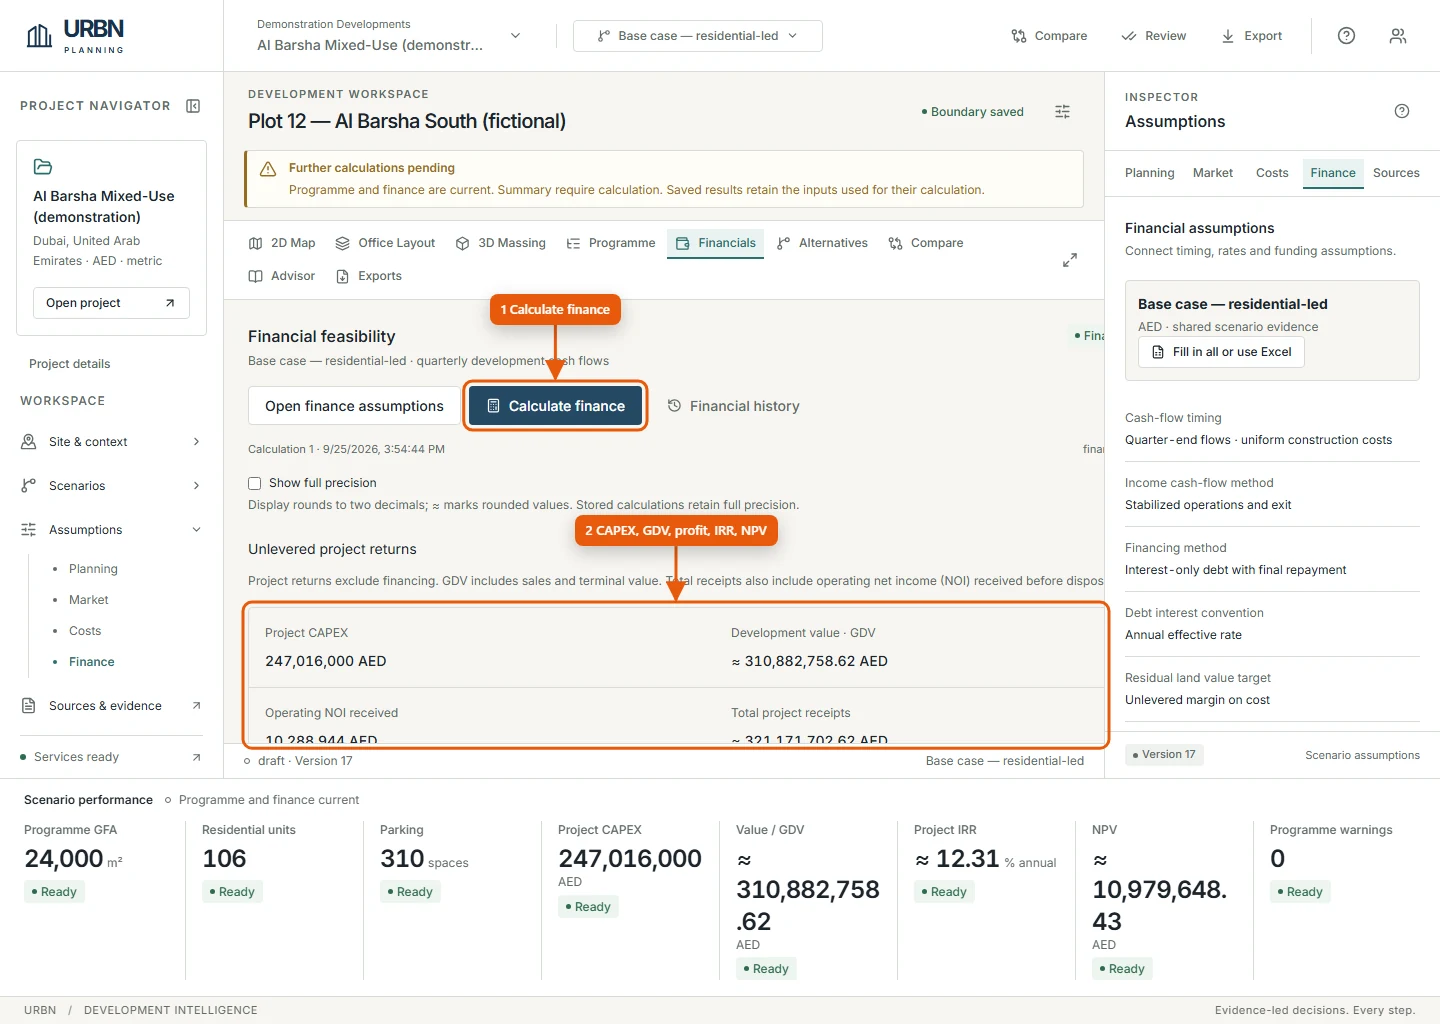
- Select Calculate finance. It needs a current programme.
- Read the unlevered returns: CAPEX (247 M AED here), GDV (≈ 311 M AED), profit, margin on cost (≈ 30%), project IRR (≈ 12.3% a year) and NPV (≈ 11 M AED). The residual land value follows.
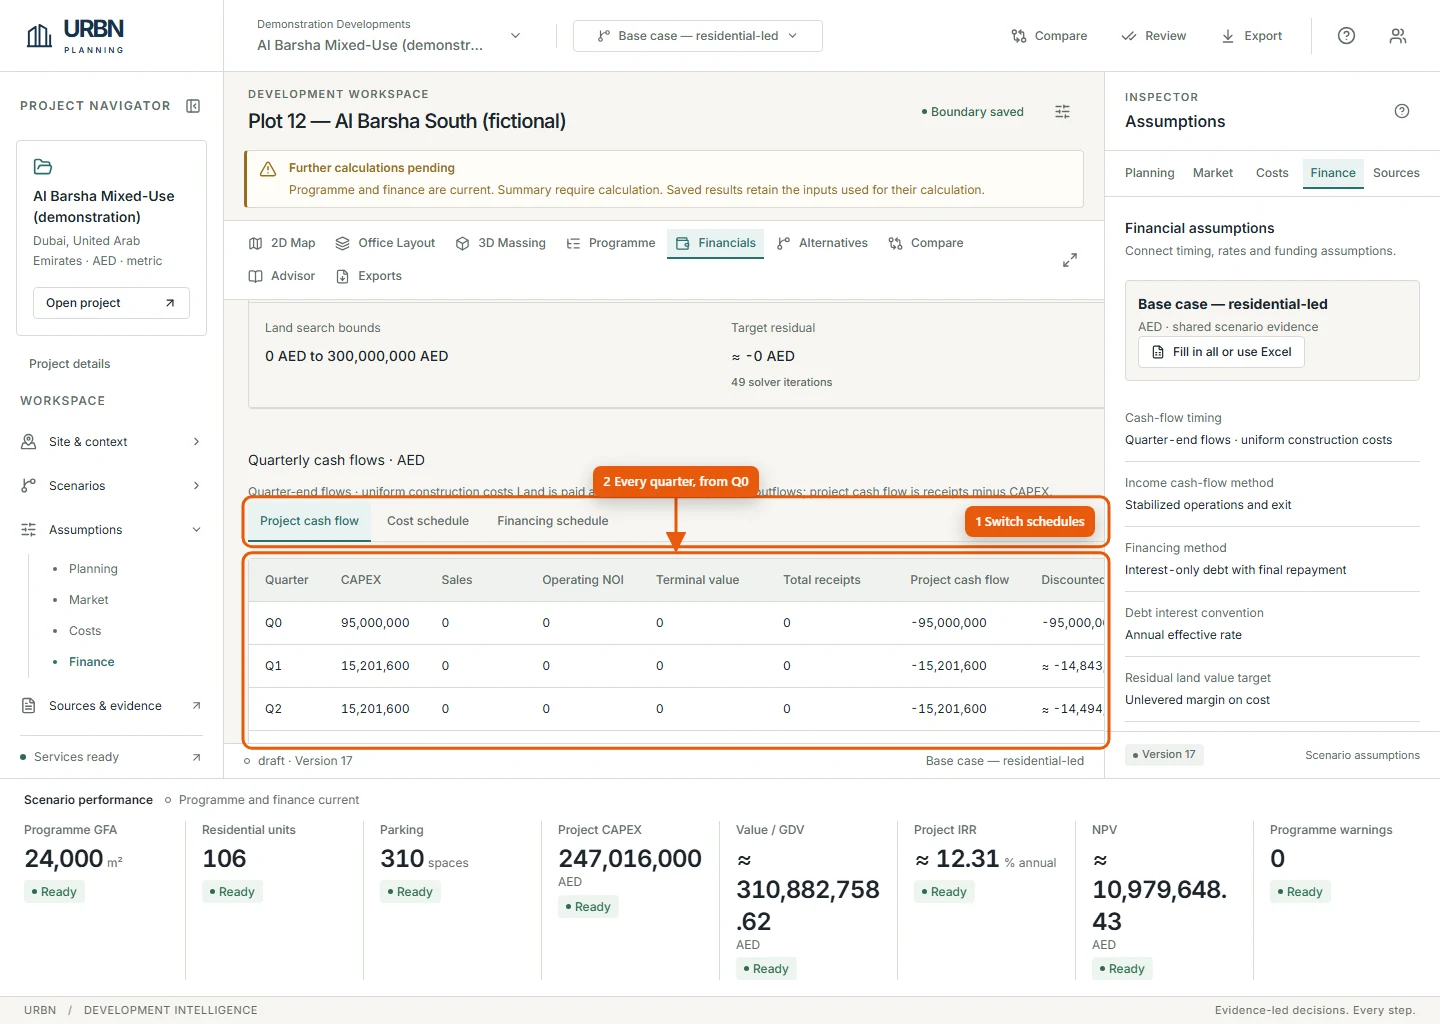
- Switch between Project cash flow, Cost schedule and Financing schedule.
- Every quarter from Q0 (land) onwards, with discounted values.
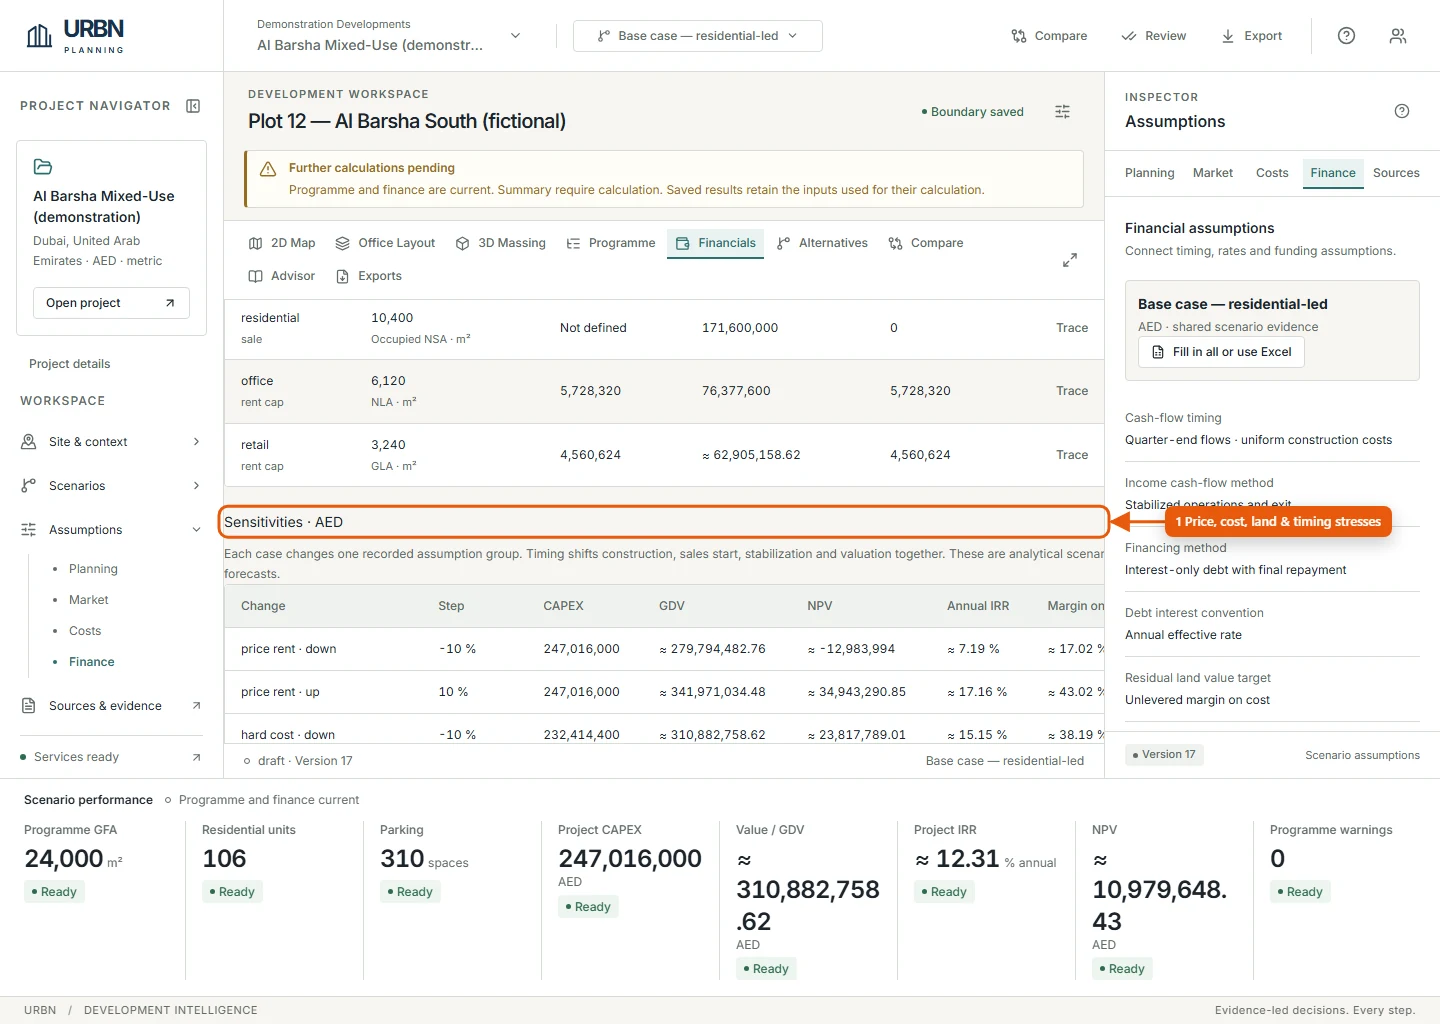
- Price or rent, hard cost, land cost, development timing and absorption, each stressed down and up by your chosen step. These are stresses you choose, not forecasts.
4. Tutorial 2 · Generate and compare alternatives
Let the platform search use mixes for you, then compare the shortlist side by side.
4.1 Generate alternatives
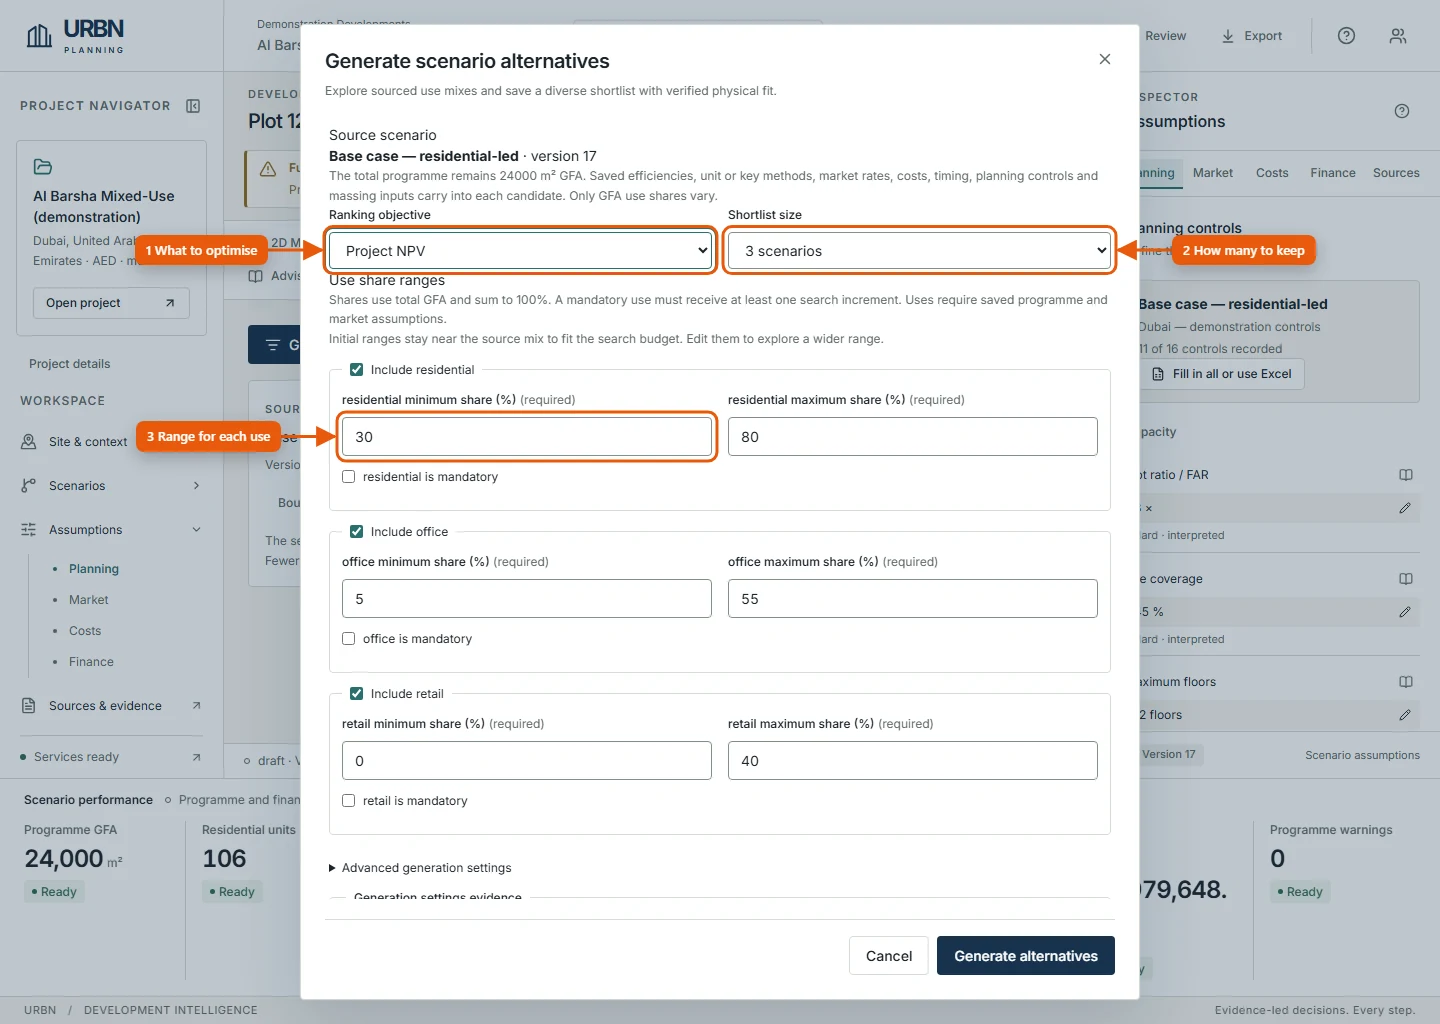
- Choose the Ranking objective: Project IRR, Project NPV (the default), Residual land value, Gross development value, Lowest risk proxy or Weighted score.
- Choose the Shortlist size: 3, 4 or 5 scenarios.
- Set the minimum and maximum share for each use, and mark uses as mandatory. Advanced generation settings hold the Use share increment (10 or 5 percentage points), the Minimum mix difference (%) between options (default 20) and the Maximum candidate count (up to 50). Add the settings evidence, then select Generate alternatives.
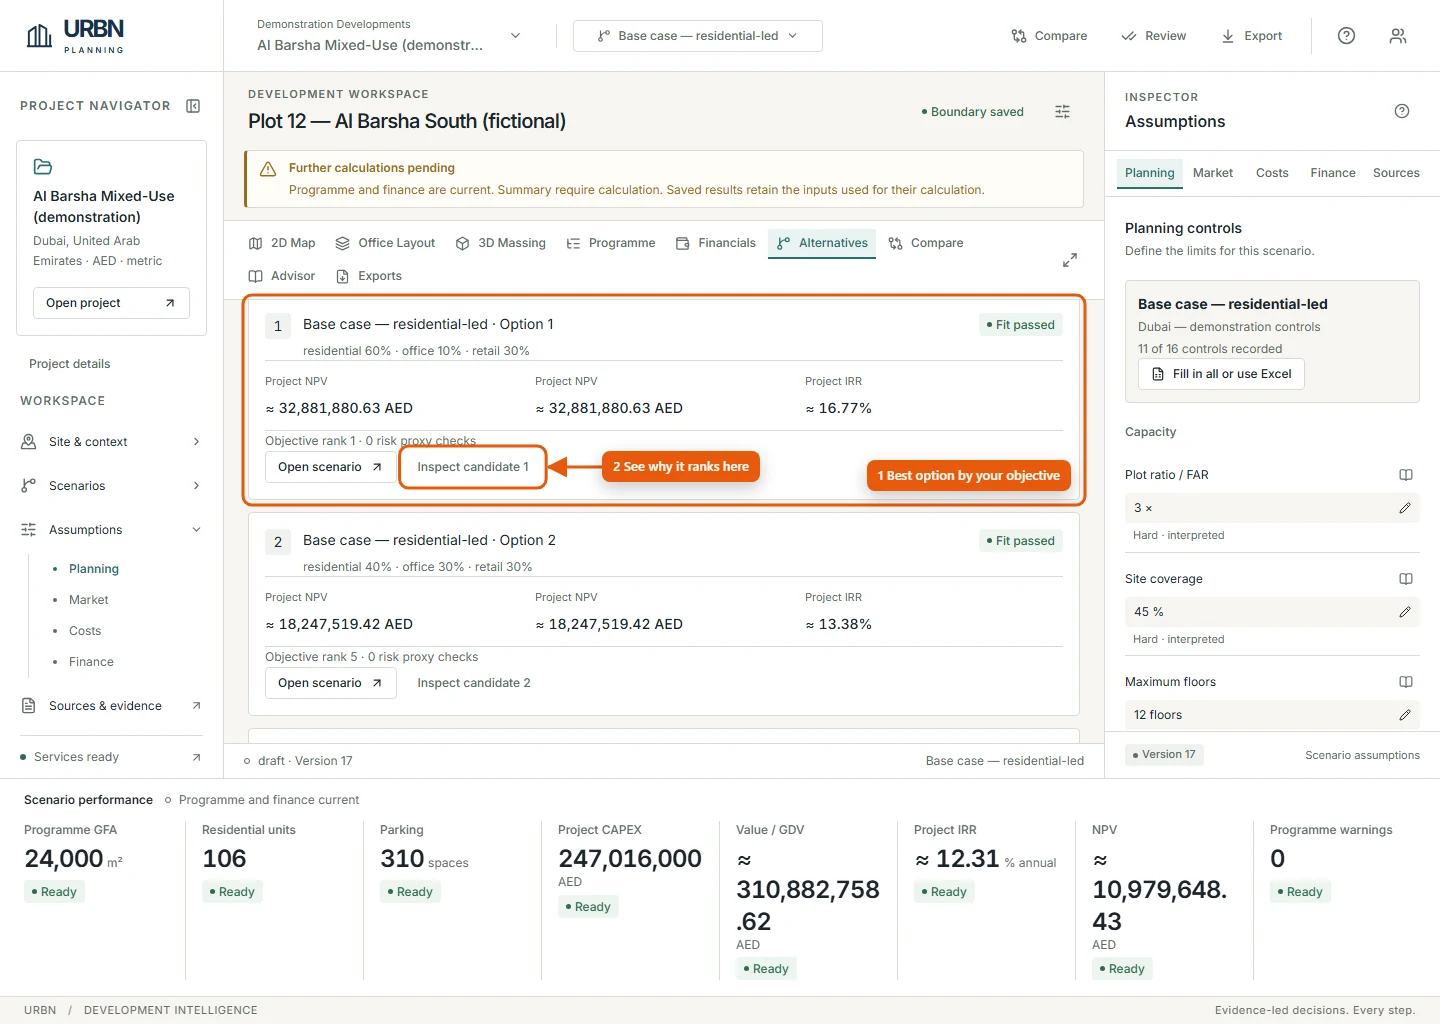
- The shortlist, best first, with its mix, fit status, NPV and IRR. Open scenario opens an option as a normal scenario.
- Inspect candidate shows why it passed or failed each stage and how it scored.
4.2 Compare scenarios
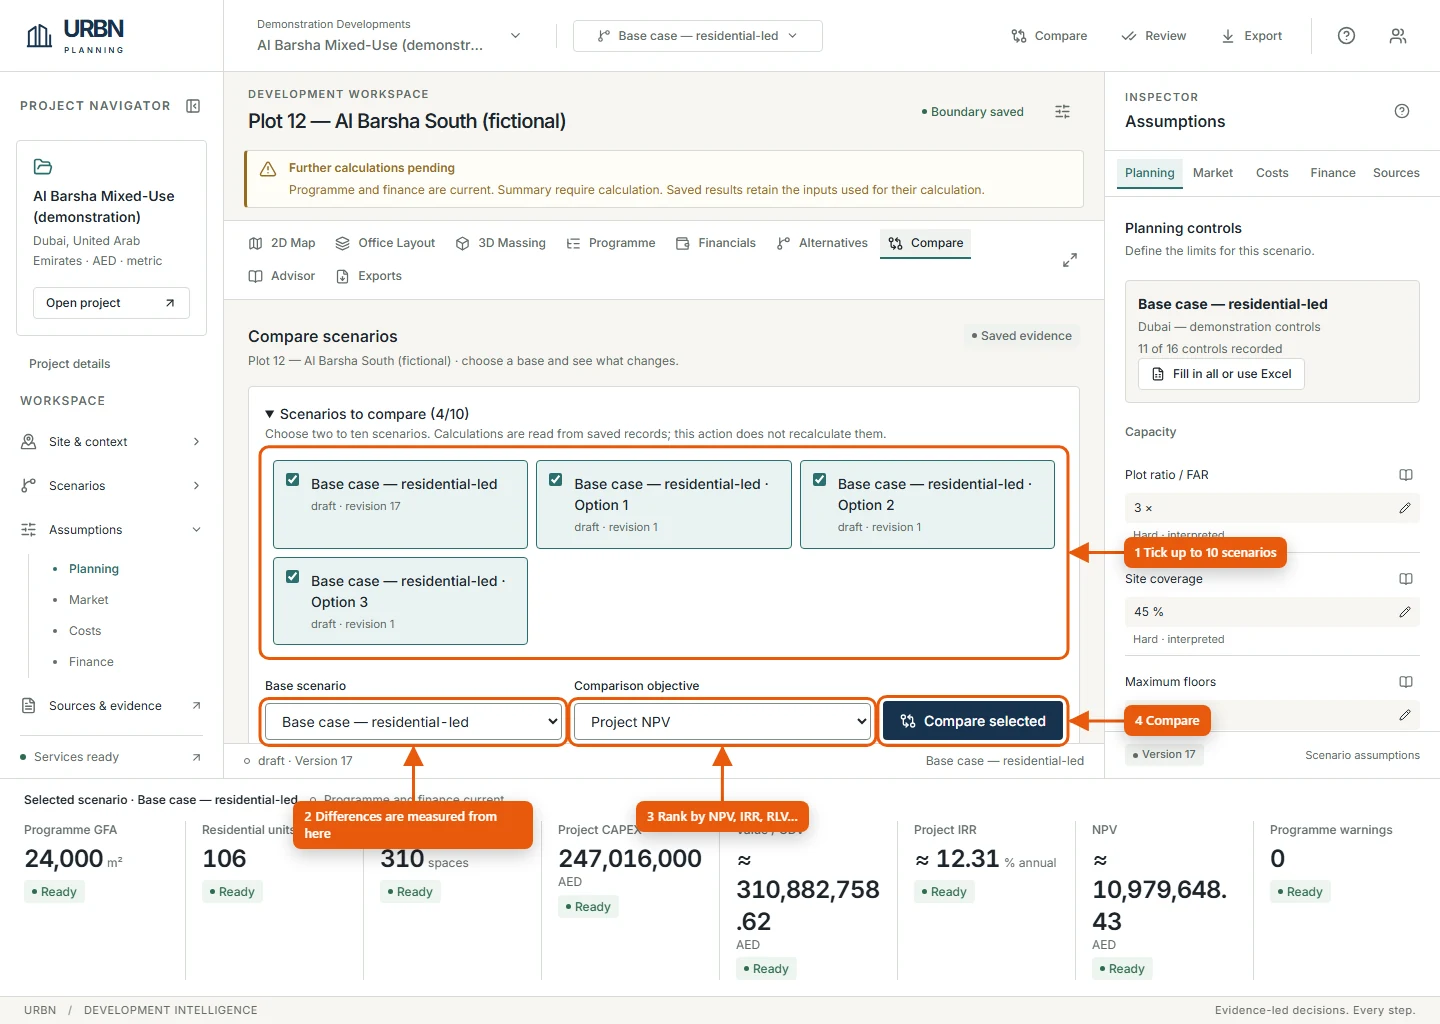
- Tick two to ten scenarios under Scenarios to compare.
- Choose the Base scenario; differences are measured from it.
- Choose the Comparison objective used for ranking.
- Select Compare selected.
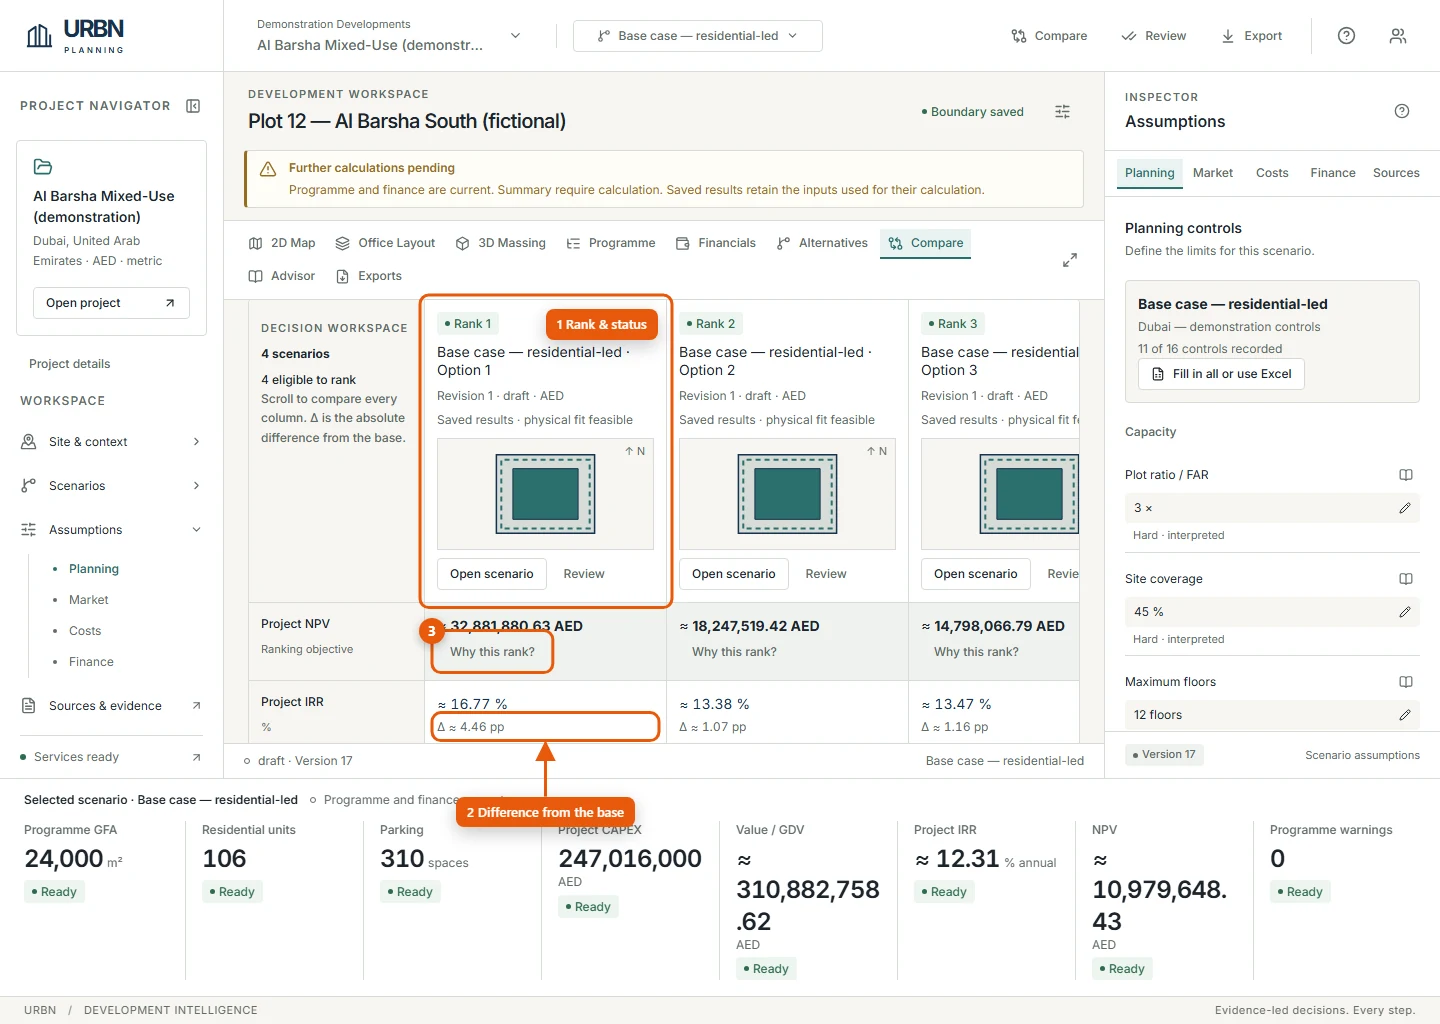
- Each column shows the rank, a 2D thumbnail, status and physical fit, with Open scenario and Review.
- Δ values are differences from the base (percentage points for rates).
- Why this rank? explains the ranking; Inspect evidence lists warnings, risk checks and input differences.
Above the matrix, Column order sorts the columns by objective rank or scenario name, Show exact stored values switches off rounding and Refresh saved results reloads them after recalculating. View input comparison sets the inputs side by side.
5. Tutorial 3 · Review, approve and export
Freeze the evidence, record the decision, and share a stamped memo and workbook.
5.1 Save a decision summary and review
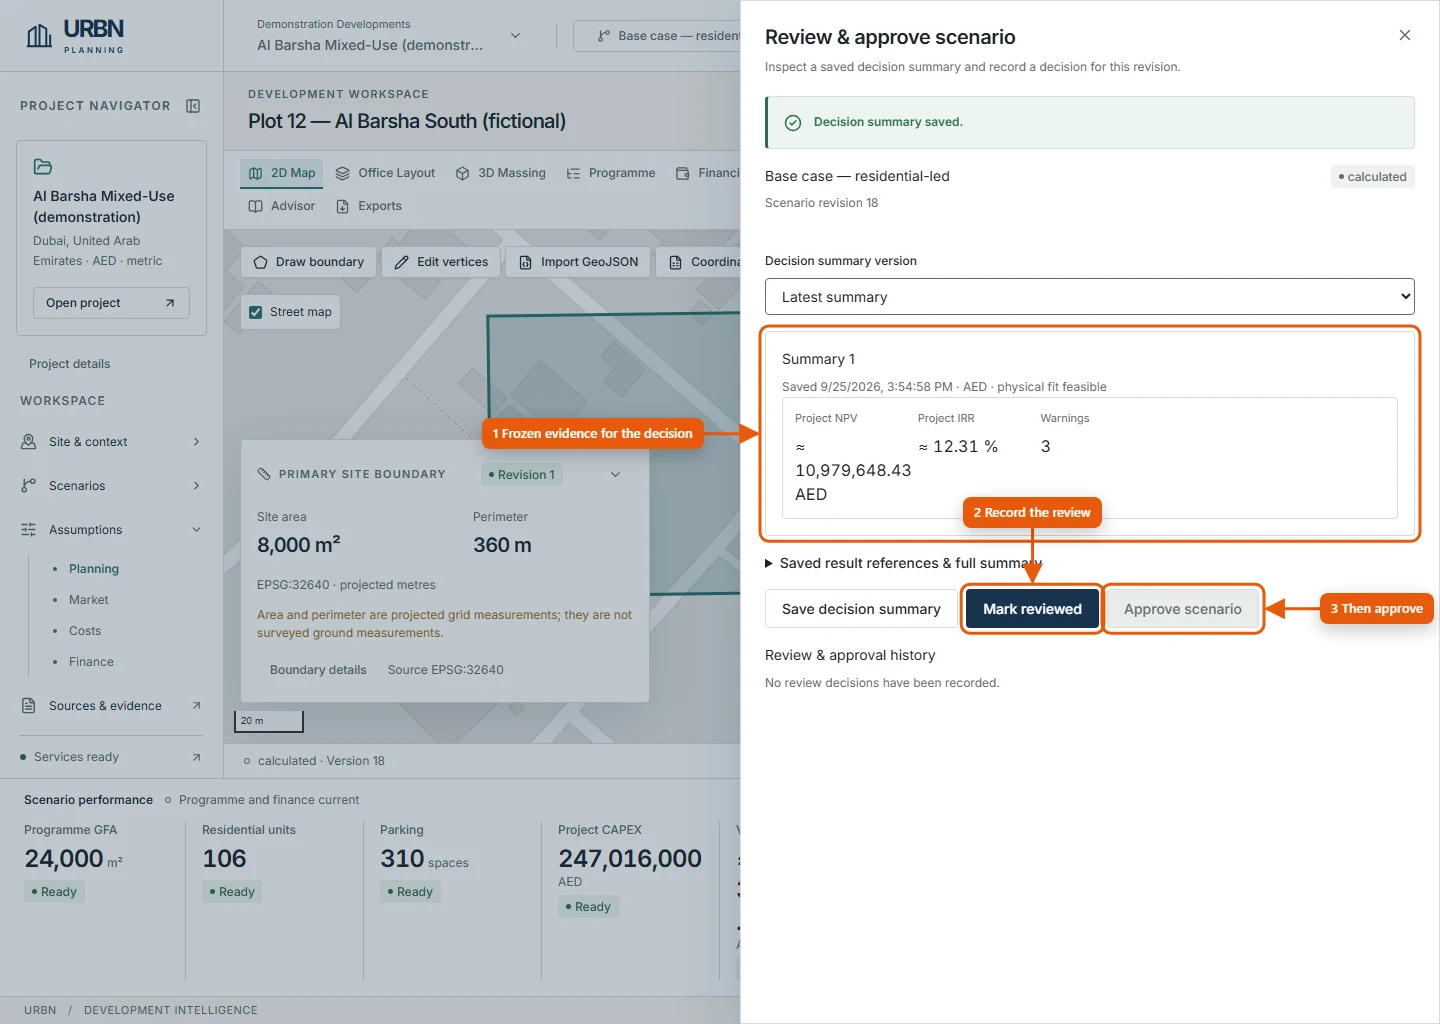
- Save decision summary freezes the current programme, massing and finance results into an immutable summary.
- Mark reviewed: enter a Decision reason, then Save review.
- Approve scenario: enter a reason, then Confirm approval.
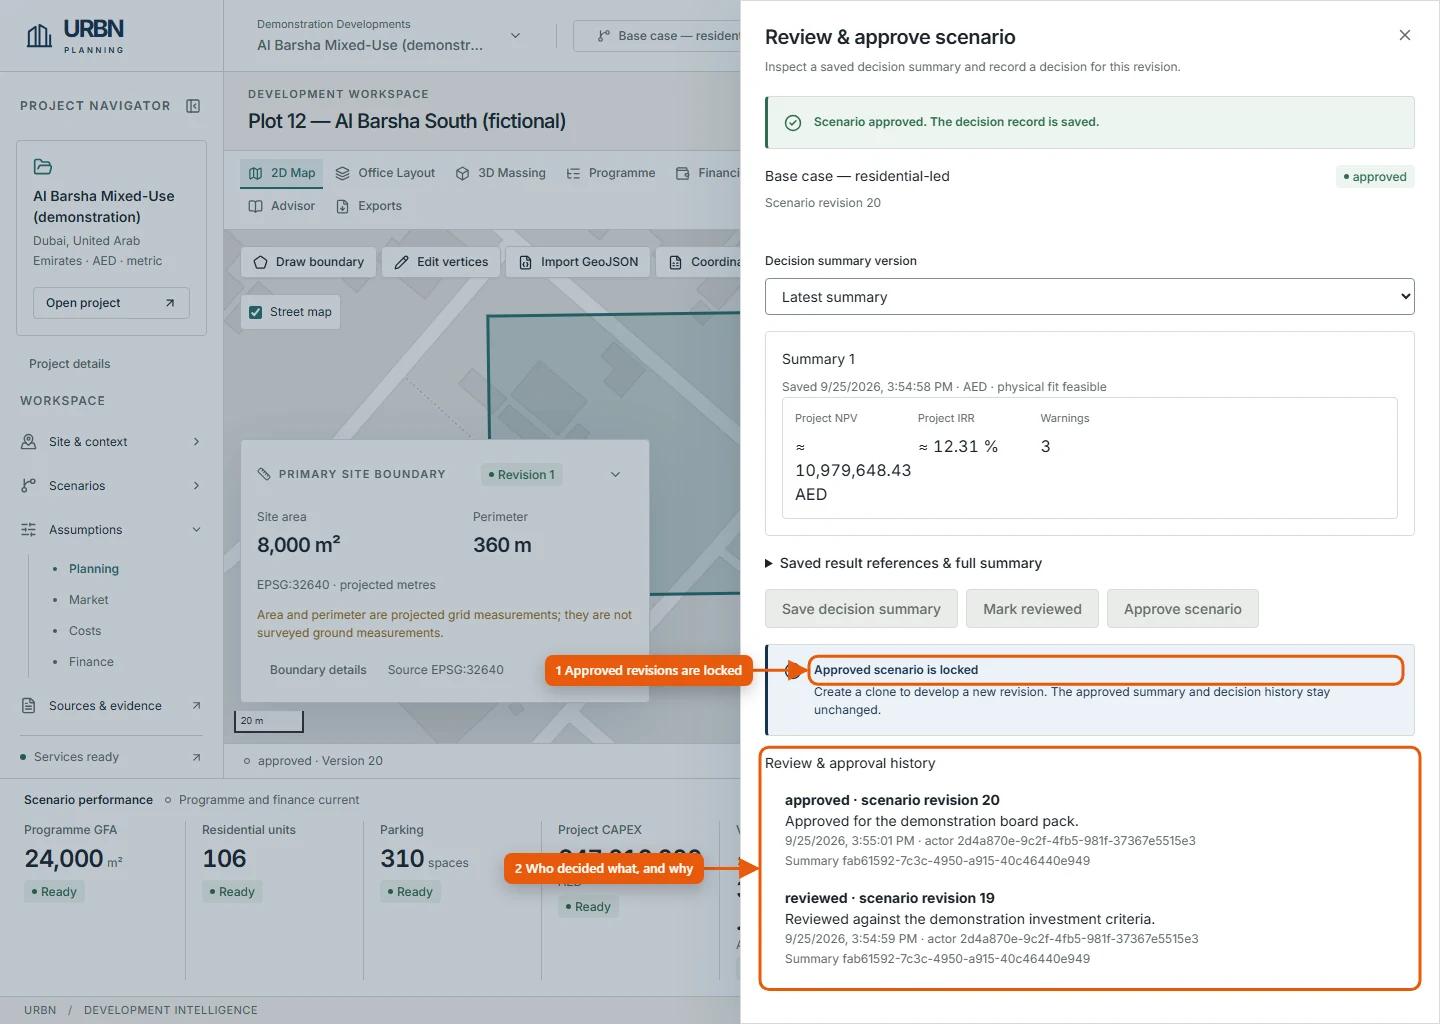
- Approved revisions are locked. To change them, clone the scenario.
- The review and approval history records who decided what, when and why.
5.2 Export a PDF memo and an Excel workbook
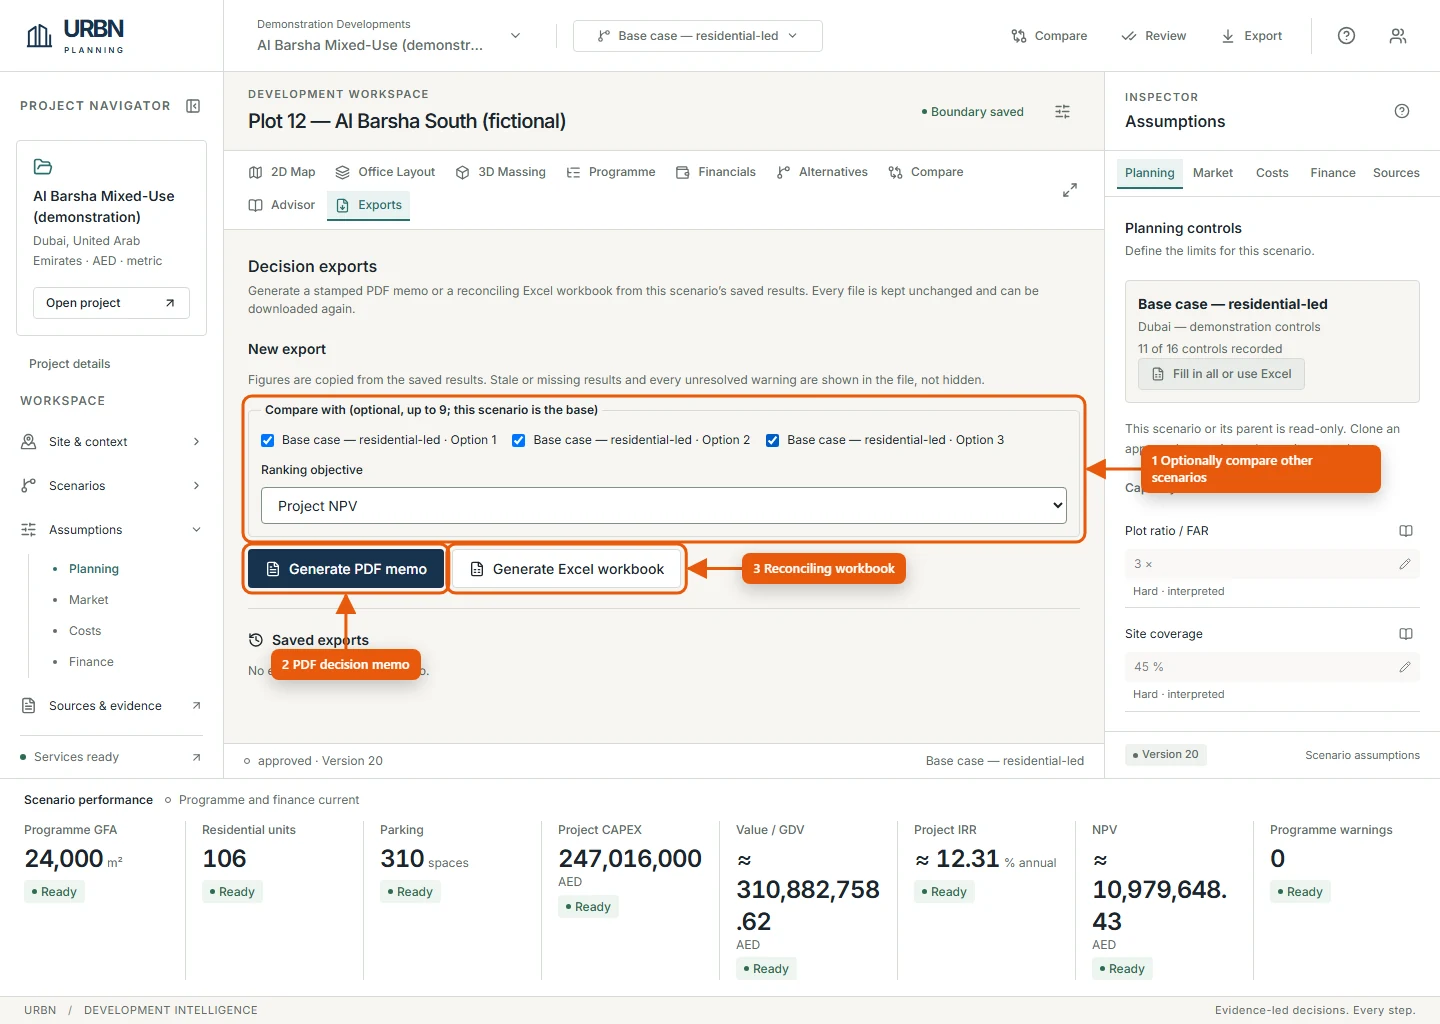
- Optionally tick up to nine other scenarios to include a comparison; this scenario is the base. Choose the ranking objective (here Fewest adverse checks replaces the risk proxy).
- Generate PDF memo: an A4 decision memo with outcomes, drawings, programme, controls, finance, sensitivities, comparison, sources, every unresolved warning and a version stamp.
- Generate Excel workbook: the same evidence as formulas that reconcile to the saved results, including a Reconciliation sheet.
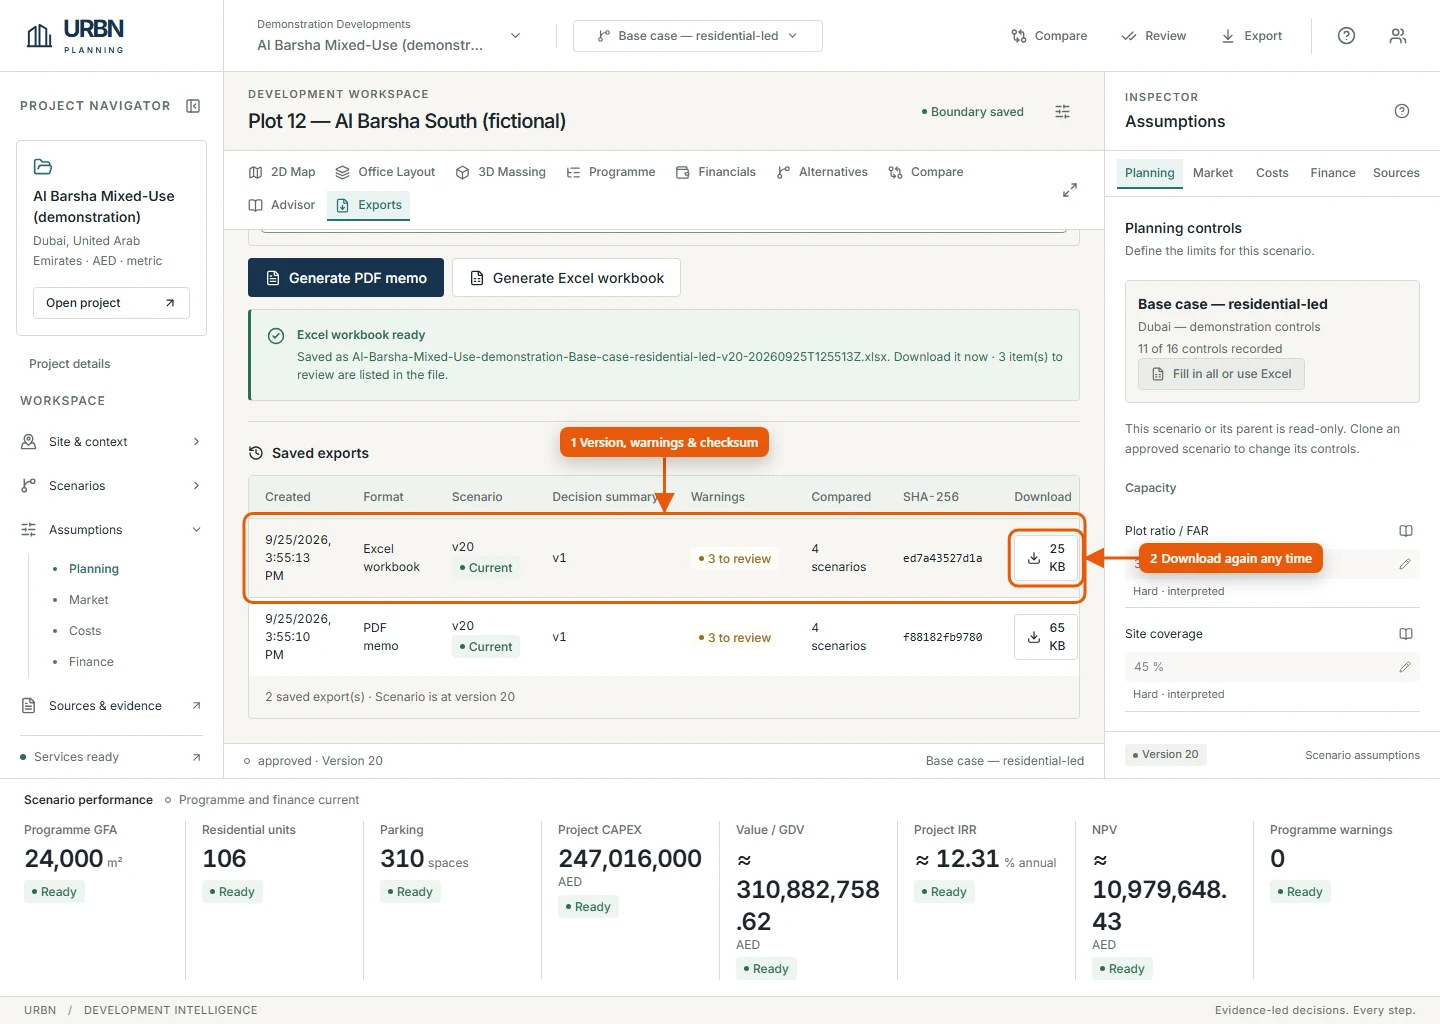
- Each export records the scenario version, decision summary, warning count and SHA-256 checksum. Exports are never changed after creation.
- Download any export again at any time.
See a sample decision memo generated from this tutorial's fictional study. Viewers can download exports; editors and owners create them.
6. The Advisor
Ask structured questions about your project and preview planning changes before applying them. The Advisor runs in Guided mode: answers and previews come from the platform's own calculations, and no external AI provider is called.
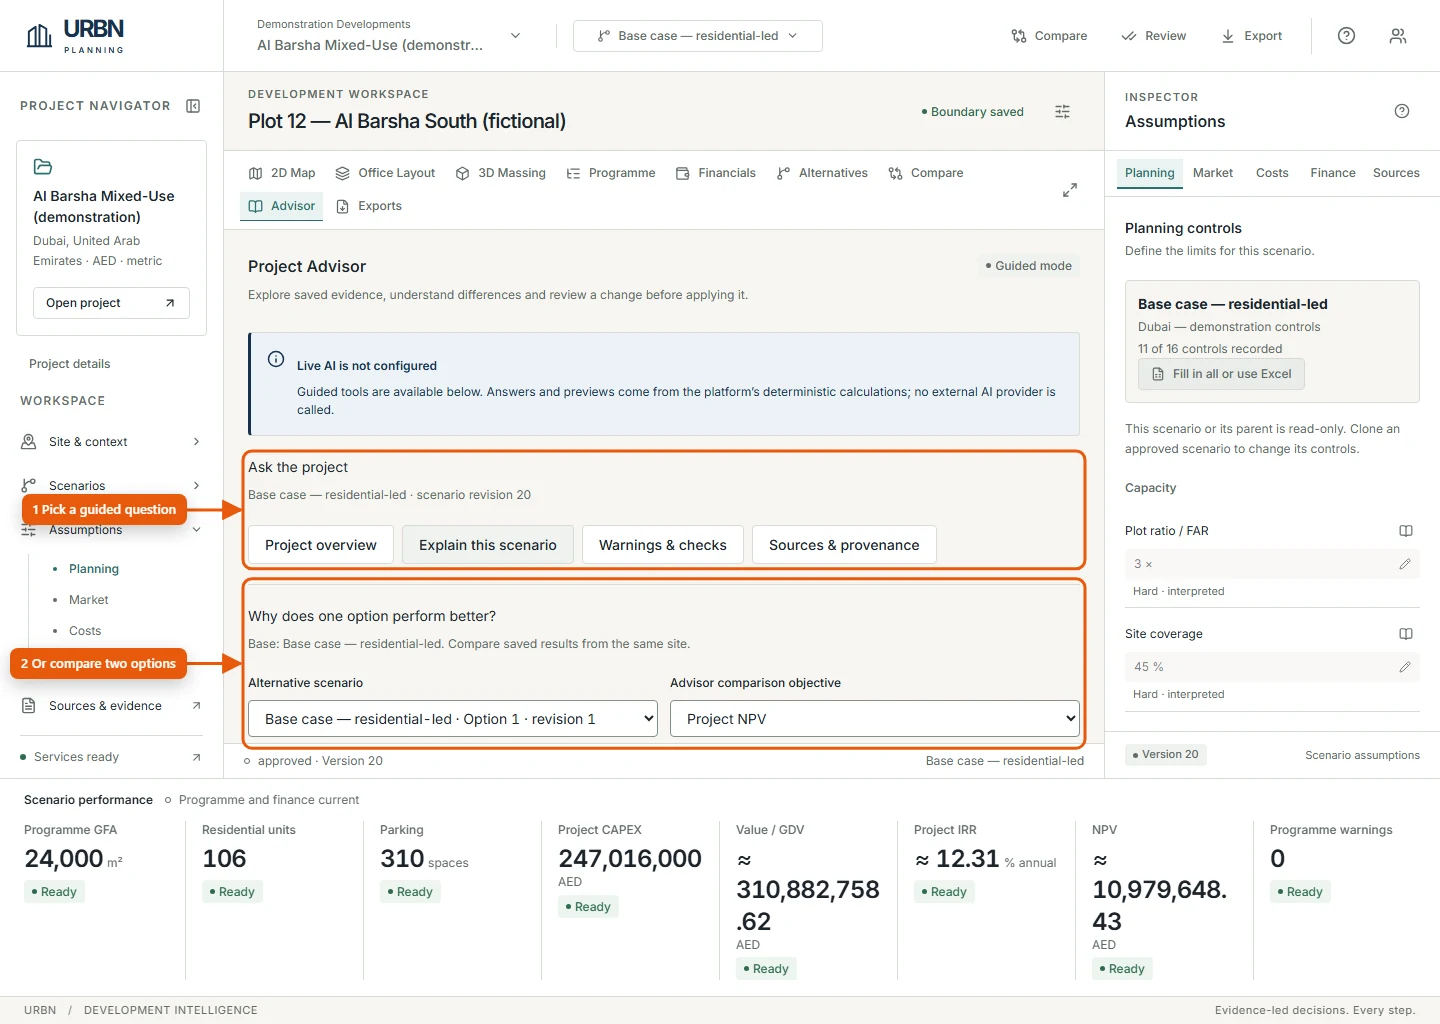
- Under Ask the project, pick a guided question: Project overview, Explain this scenario, Warnings & checks or Sources & provenance.
- Or, under Why does one option perform better?, choose an Alternative scenario and an objective, then select Explain comparison.
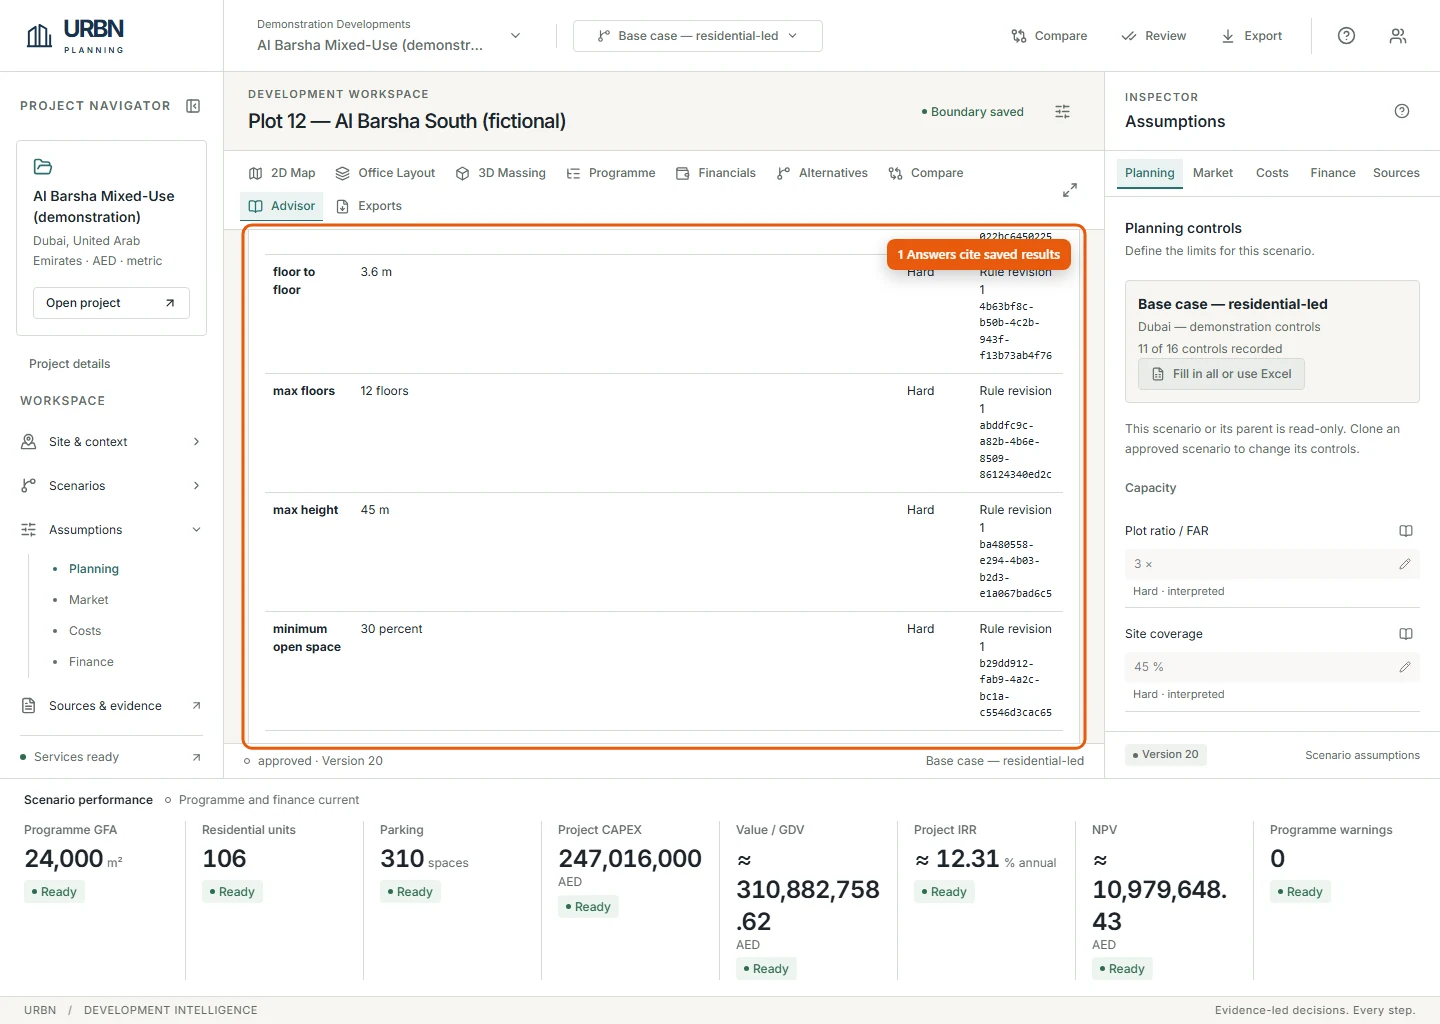
- Answers cite the saved results and record IDs they come from, and label stale evidence.
Preview a FAR change
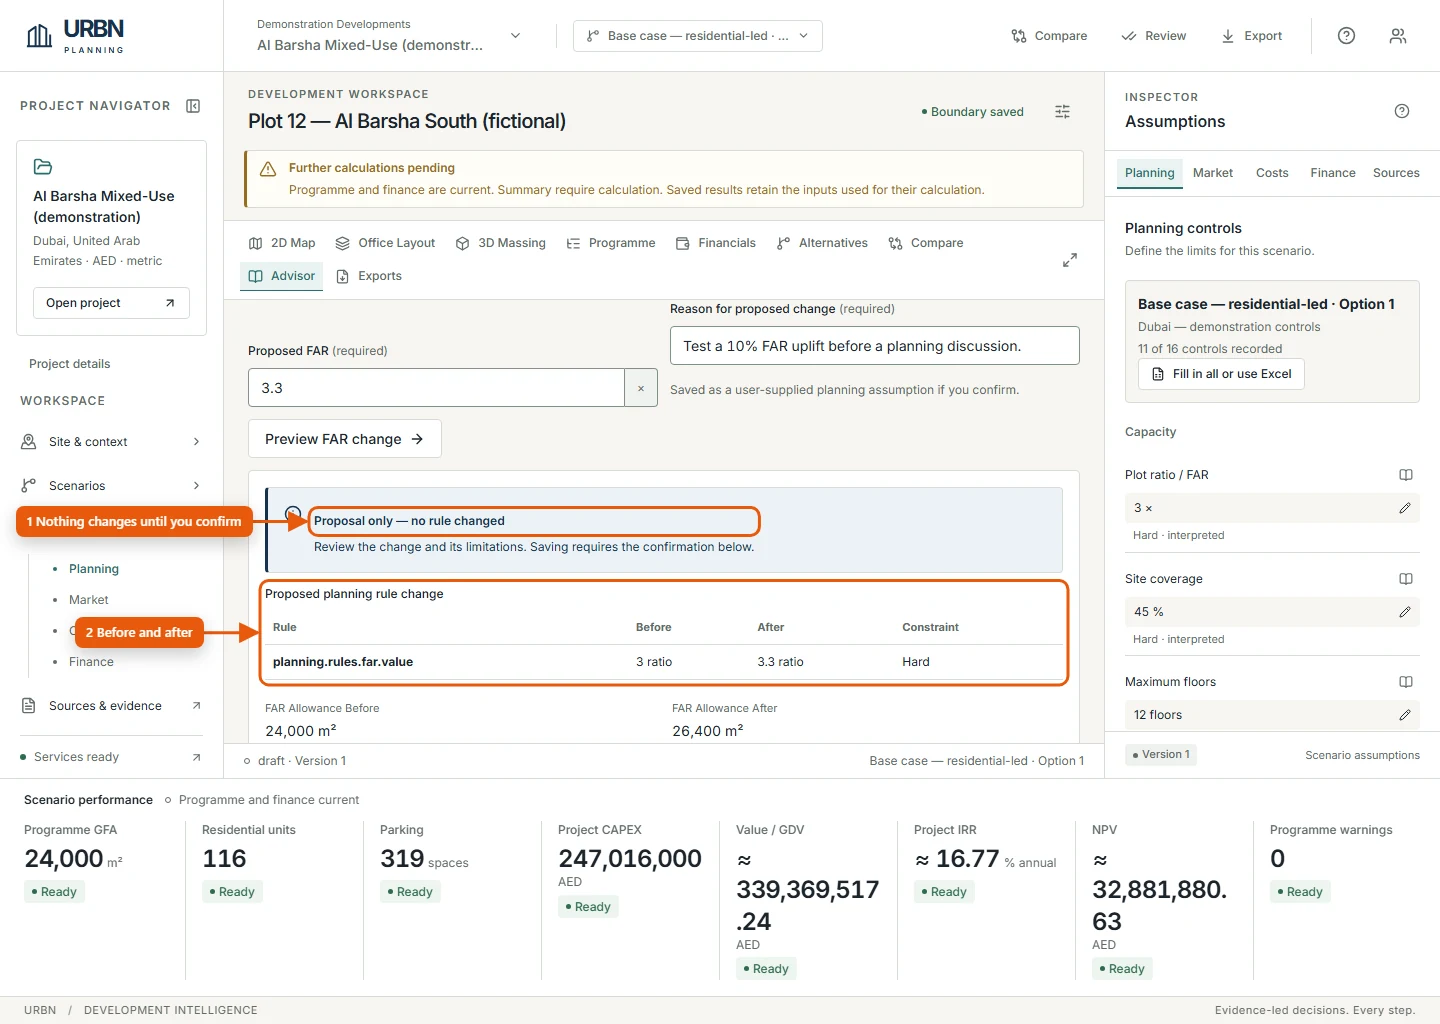
- Enter a Proposed FAR and a Reason for proposed change, then select Preview FAR change. The preview reads Proposal only — no rule changed.
- Review the before-and-after planning allowance and programme checks. To apply it, tick I reviewed this exact change… and select Confirm & apply FAR change; otherwise Discard proposal. Proposals expire after 30 minutes. After applying, recalculate programme, massing and finance.
7. Tutorial 4 · Office floor planning
Plan measured office floors with rooms, furniture, doors and windows, check them, view them in 3D and export CAD drawings. No site or scenario is needed — just a project.
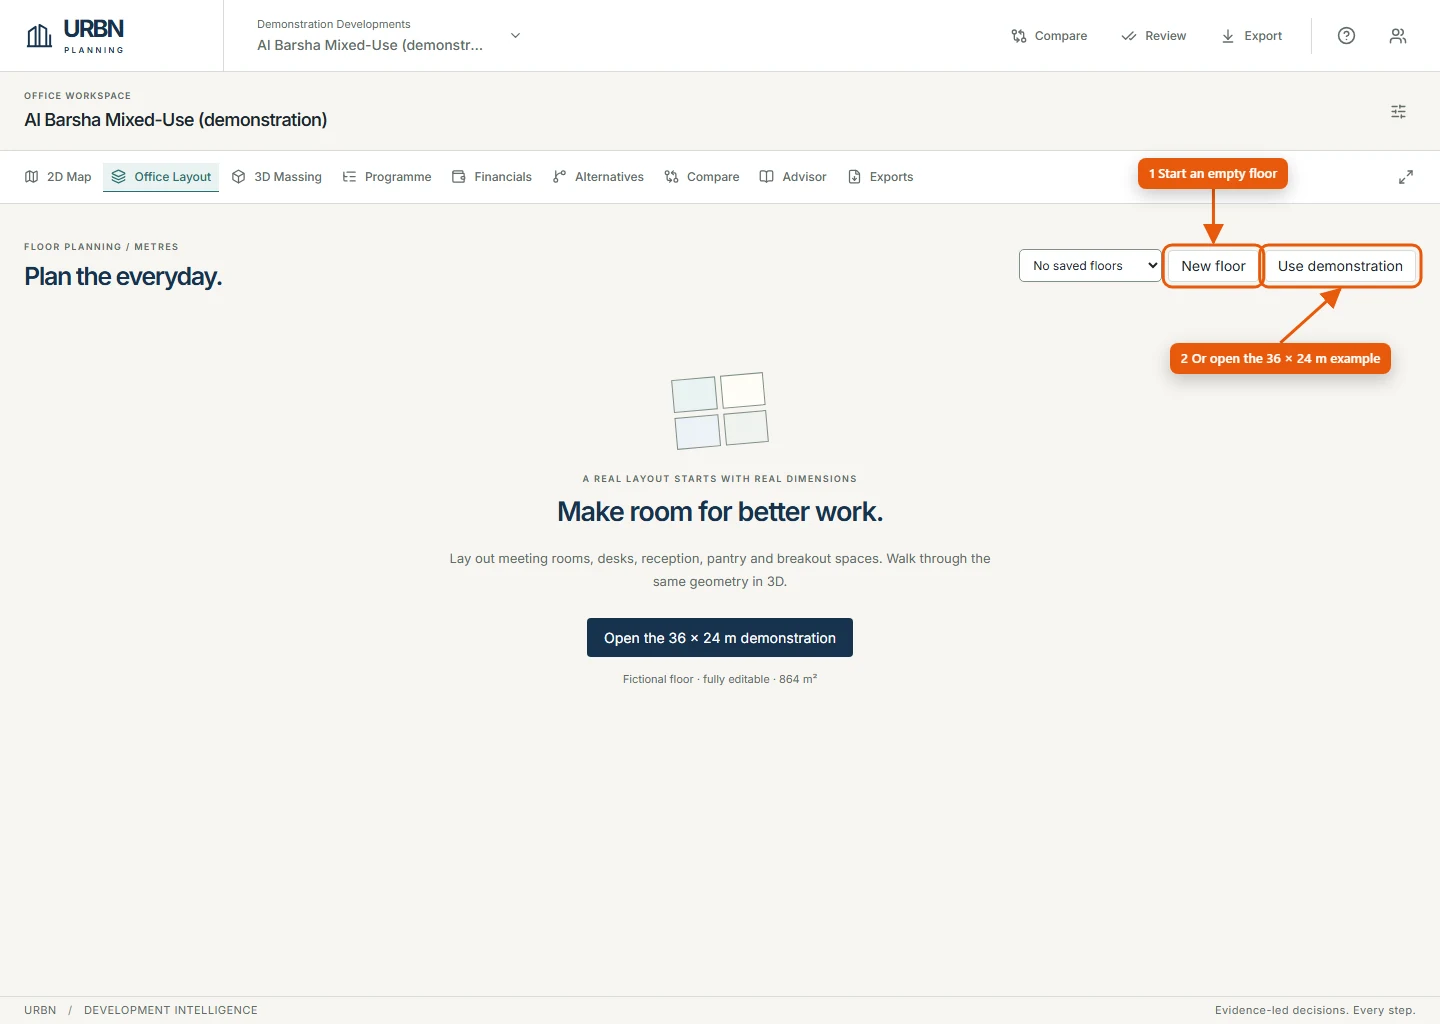
- New floor starts an empty 36 × 24 m floor.
- Use demonstration opens Studio 36 · office demonstration, a furnished, fictional 36 × 24 m (864 m²) floor you can edit.
Editors see these buttons; viewers can open saved plans. Saved plans are listed in the picker beside them.
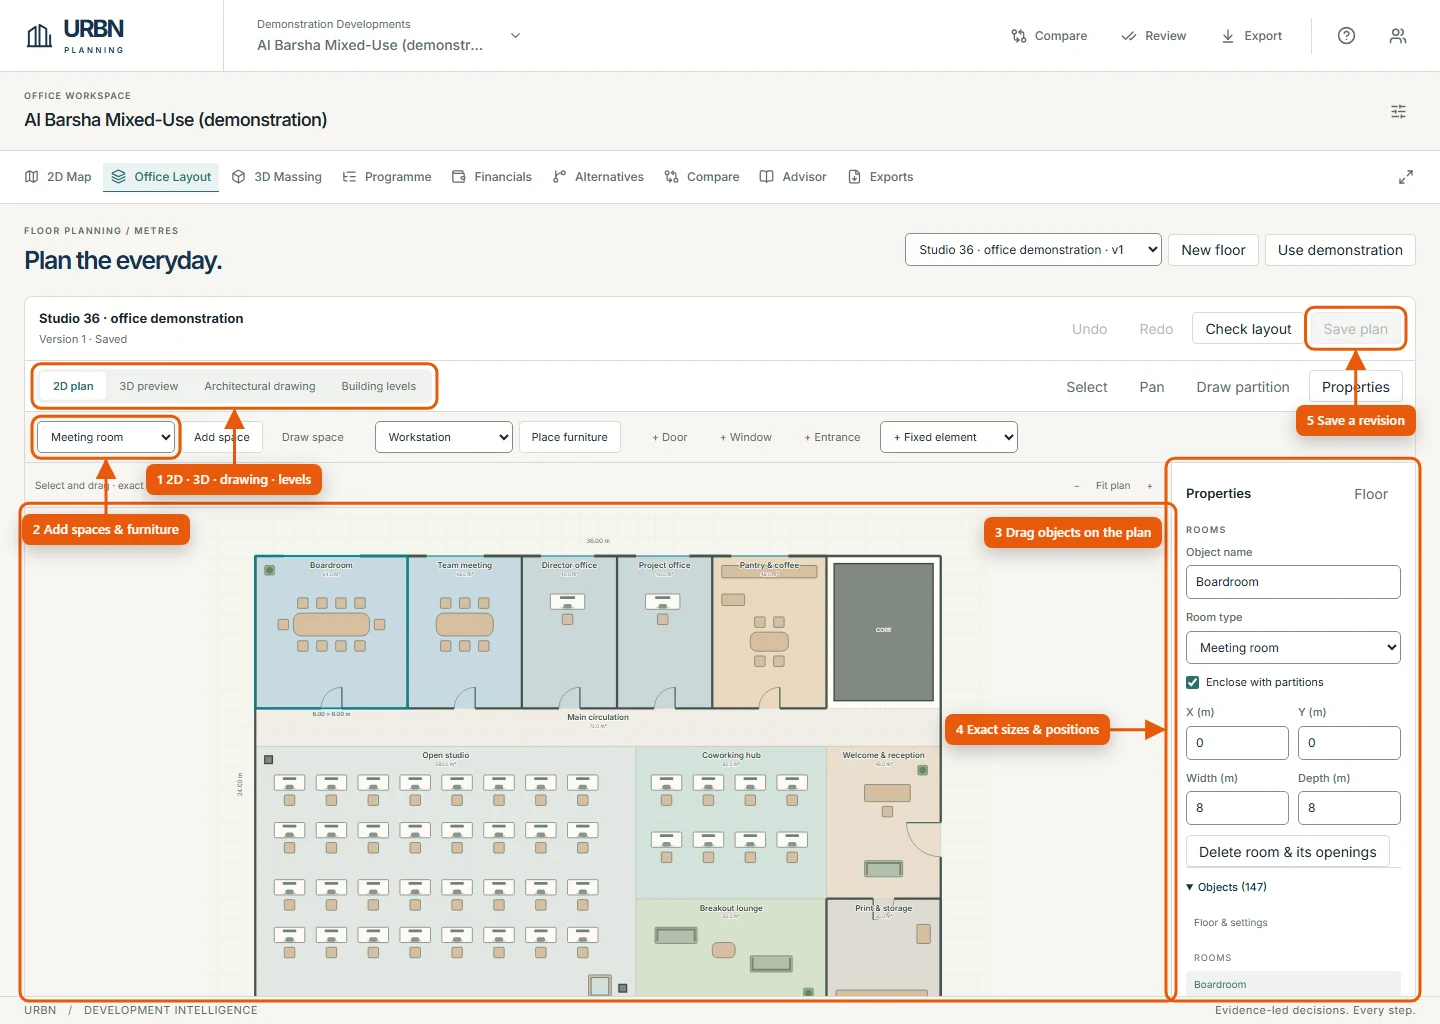
- Switch between 2D plan, 3D preview, Architectural drawing and Building levels.
- Pick a space type and select Add space (or Draw space to draw it), pick furniture and select Place furniture, add + Door, + Window and + Entrance, and use + Fixed element for a column, lift / stair core or service zone.
- Drag objects on the plan; switch between Select, Pan and Draw partition, and use the zoom controls or Fit plan. Esc cancels a drawing.
- Set exact names, room types, sizes, positions, rotation and seats in Properties. Values apply when you press Enter or leave the field; invalid values revert. Choose Floor (or Floor & settings in the object list) to edit the floor outline, Ceiling (m), Snap (m), Design targets and a PNG or JPEG reference image of up to 350 KB.
- Save plan keeps an immutable version. Later saves record a Save reason (under Files & versions). Undo and Redo cover the last 50 steps.
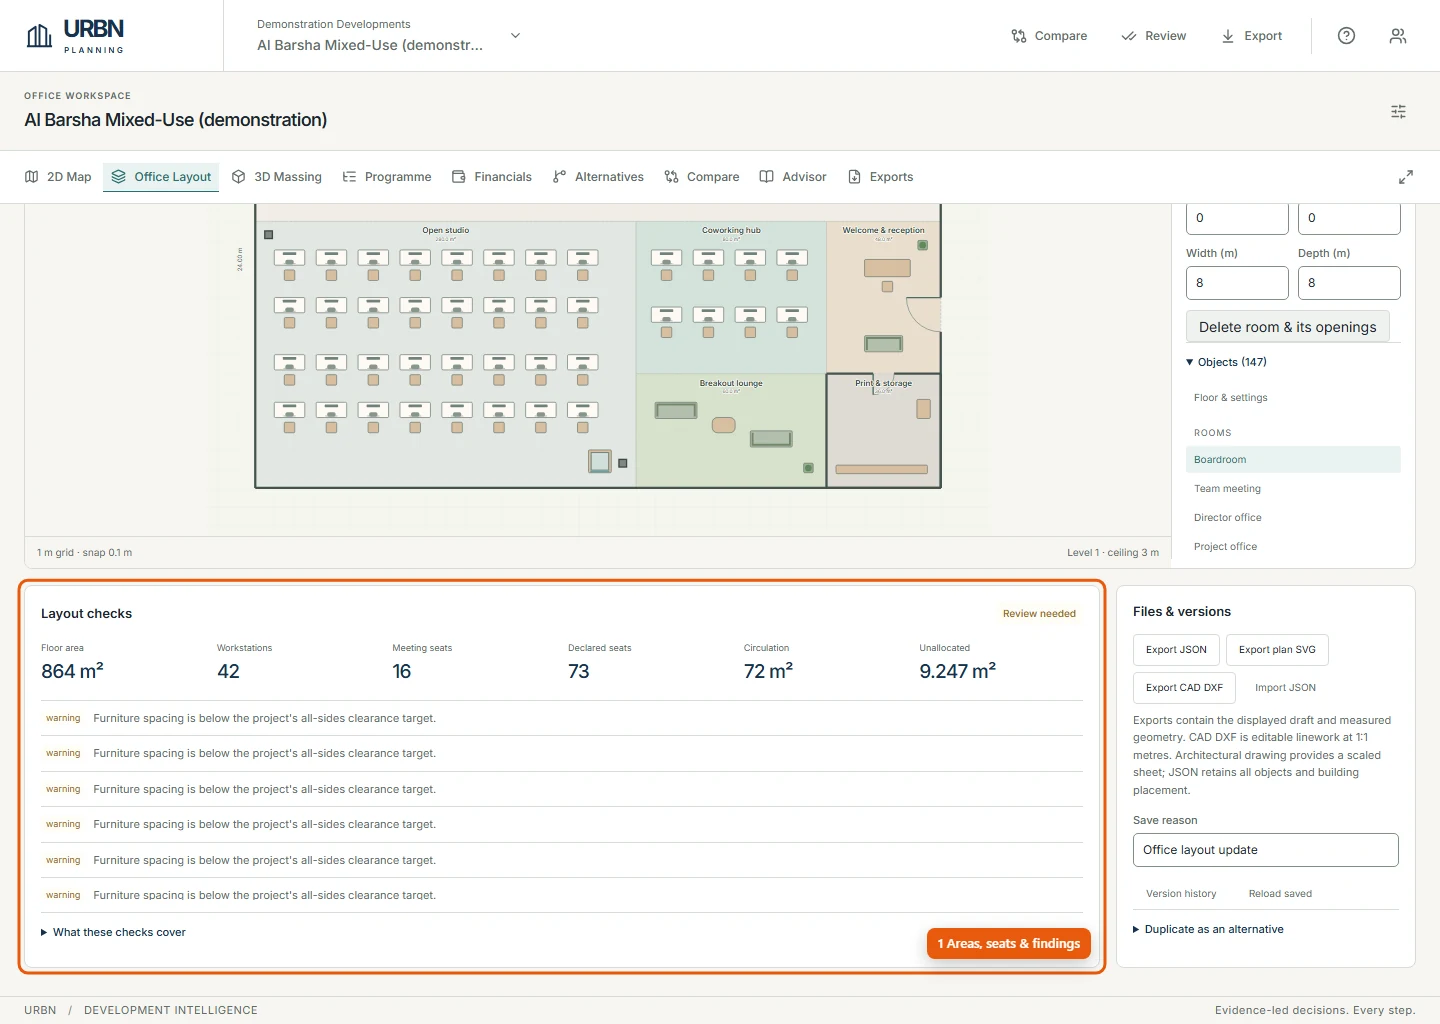
- Floor area, workstations, meeting seats, declared seats, circulation and unallocated area, plus findings on geometry, overlaps, door access and clearances. Select a finding to jump to the object. Checks are design guidance, not certification of egress, accessibility or building code compliance.
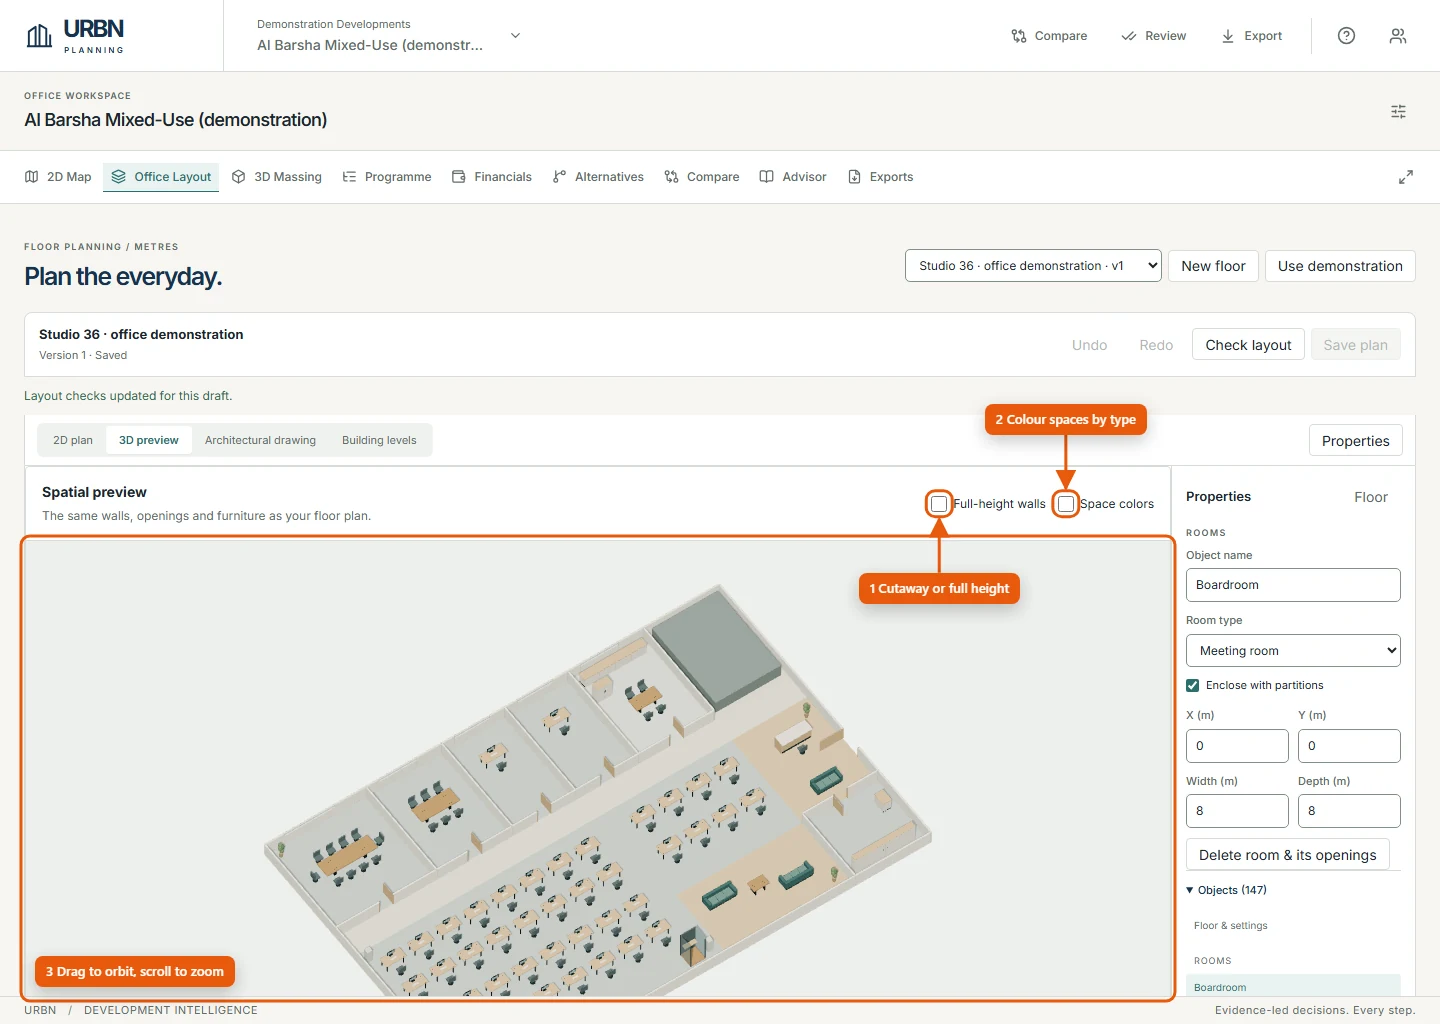
- Switch between cutaway and Full-height walls.
- Tick Space colors to colour rooms by type.
- Drag to orbit and scroll to zoom. Reset office view and View floor from above restore standard views.
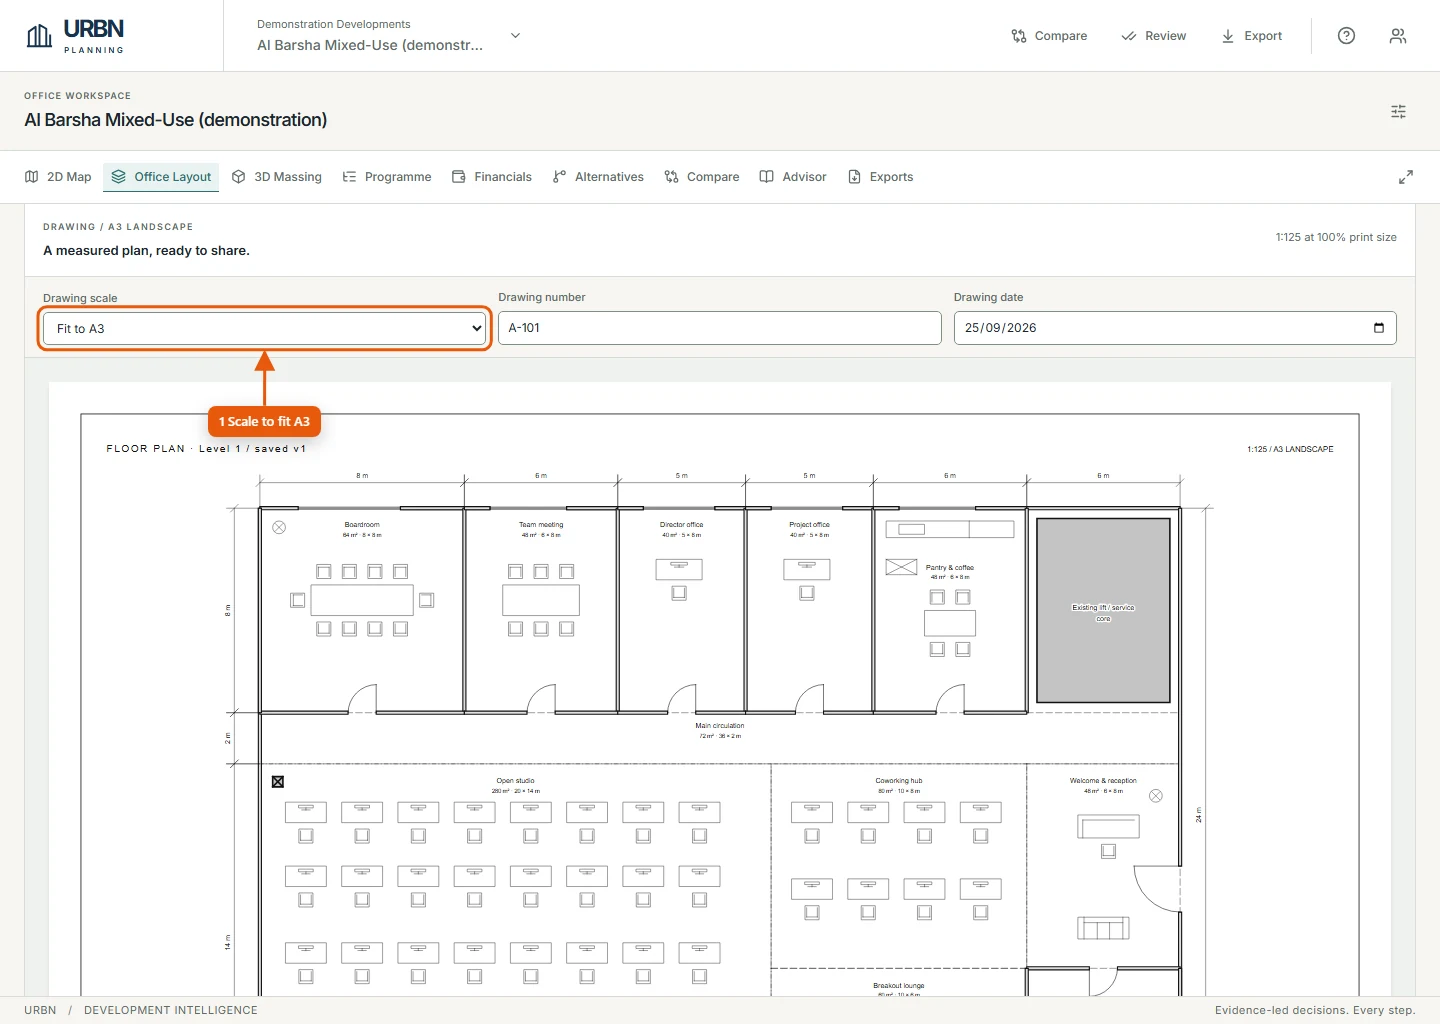
- Choose the Drawing scale — Fit to A3 picks the largest scale that fits — and set the Drawing number and Drawing date.
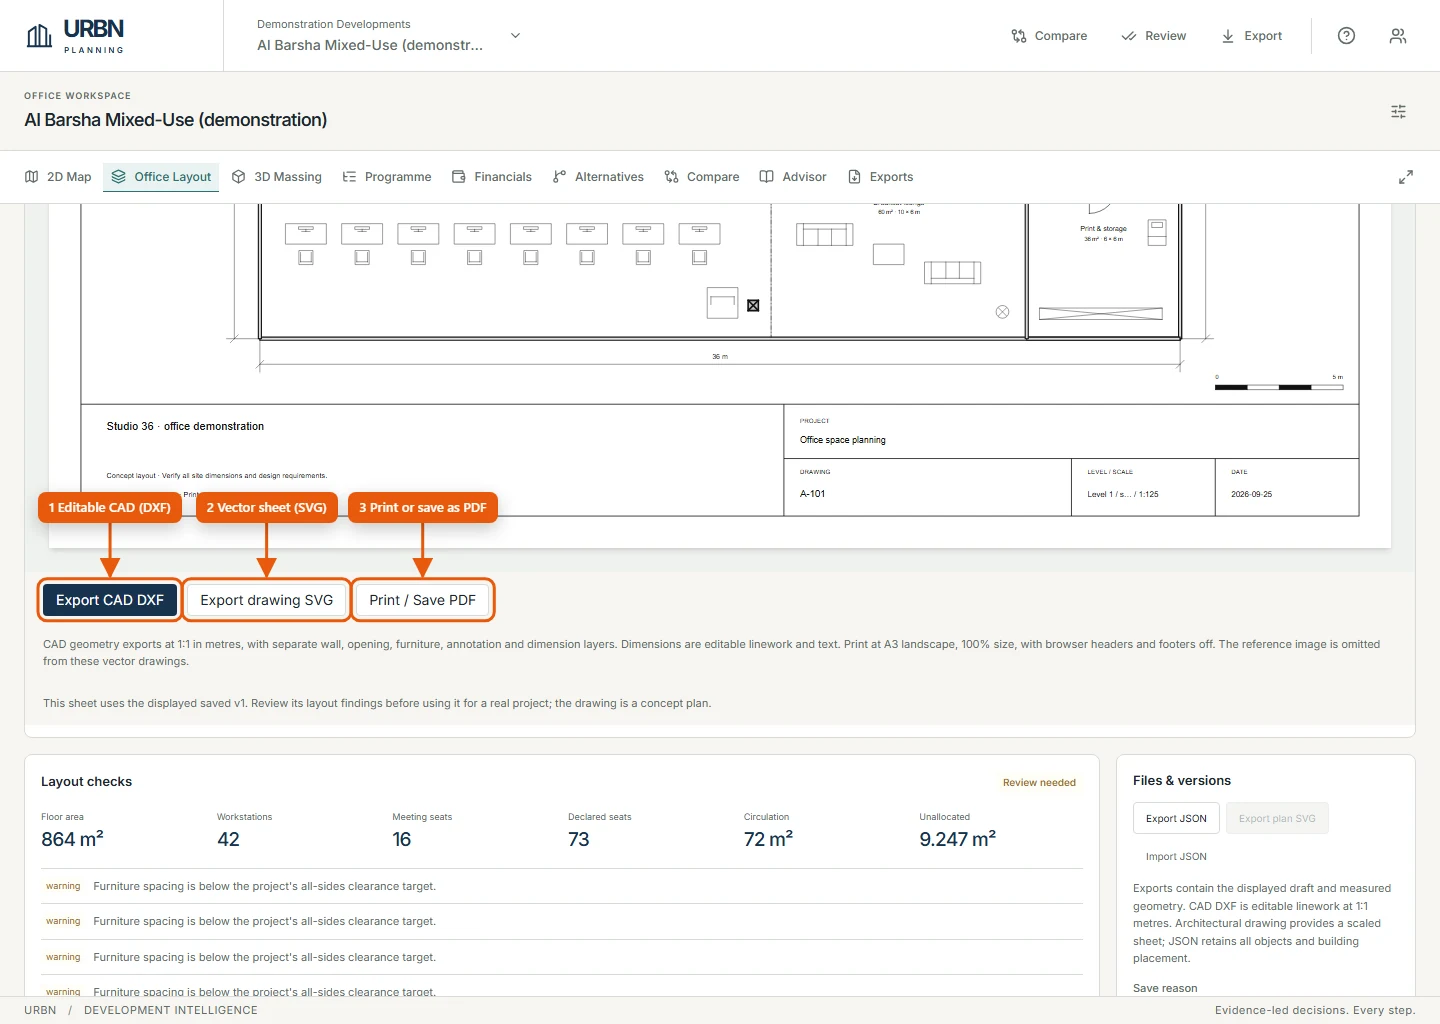
- Export CAD DXF: editable, layered 2D linework in metres for CAD software.
- Export drawing SVG: the vector sheet.
- Print / Save PDF: print at 100% with browser headers and footers turned off.
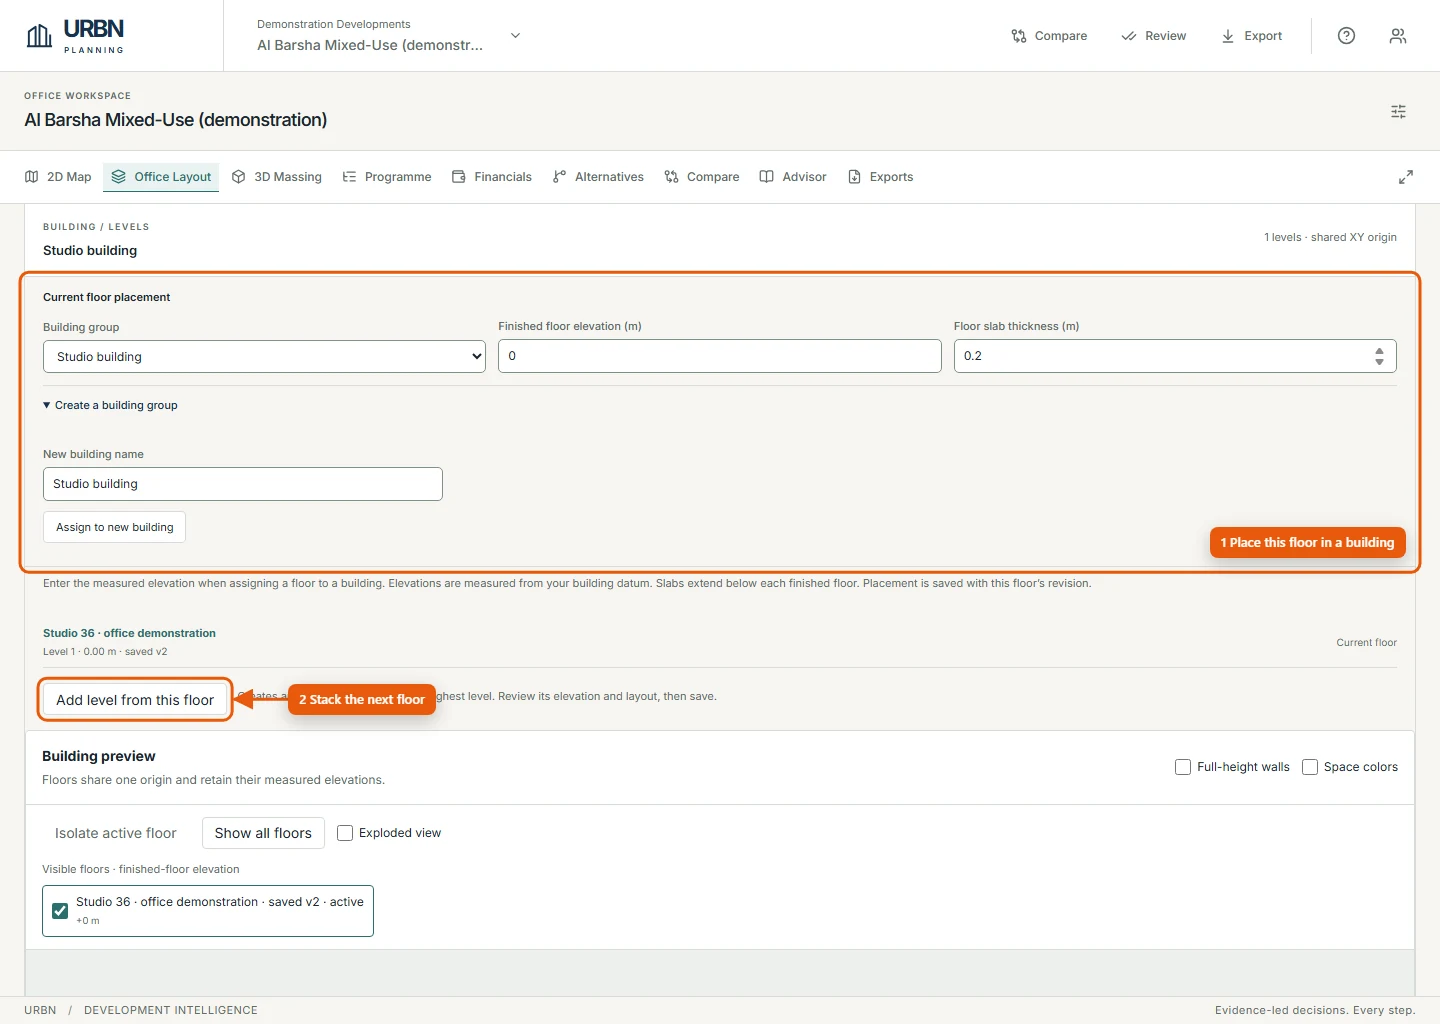
- Under Current floor placement, choose a Building group — or open Create a building group, name it and select Assign to new building — then set the Finished floor elevation (m) and Floor slab thickness (m). Save the plan.
- Add level from this floor creates an editable copy one level above; save it to add it to the building.
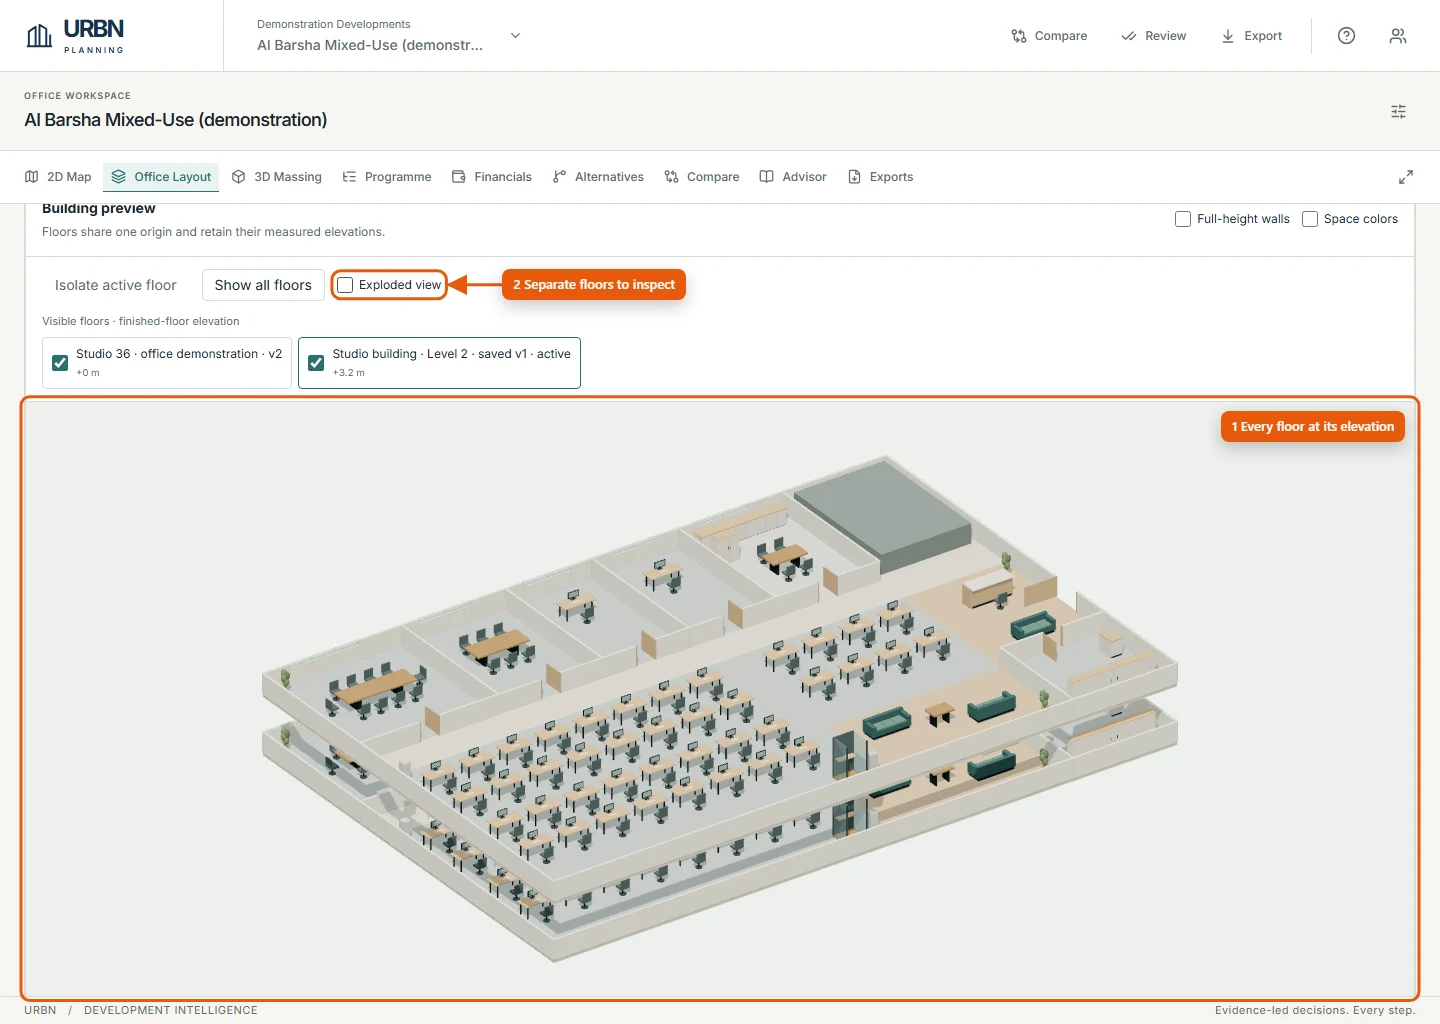
- Every saved floor at its elevation. Select a floor, then Isolate active floor, or return with Show all floors.
- Exploded view separates floors so you can inspect each one.
8. Team, evidence and history
Organizations and members
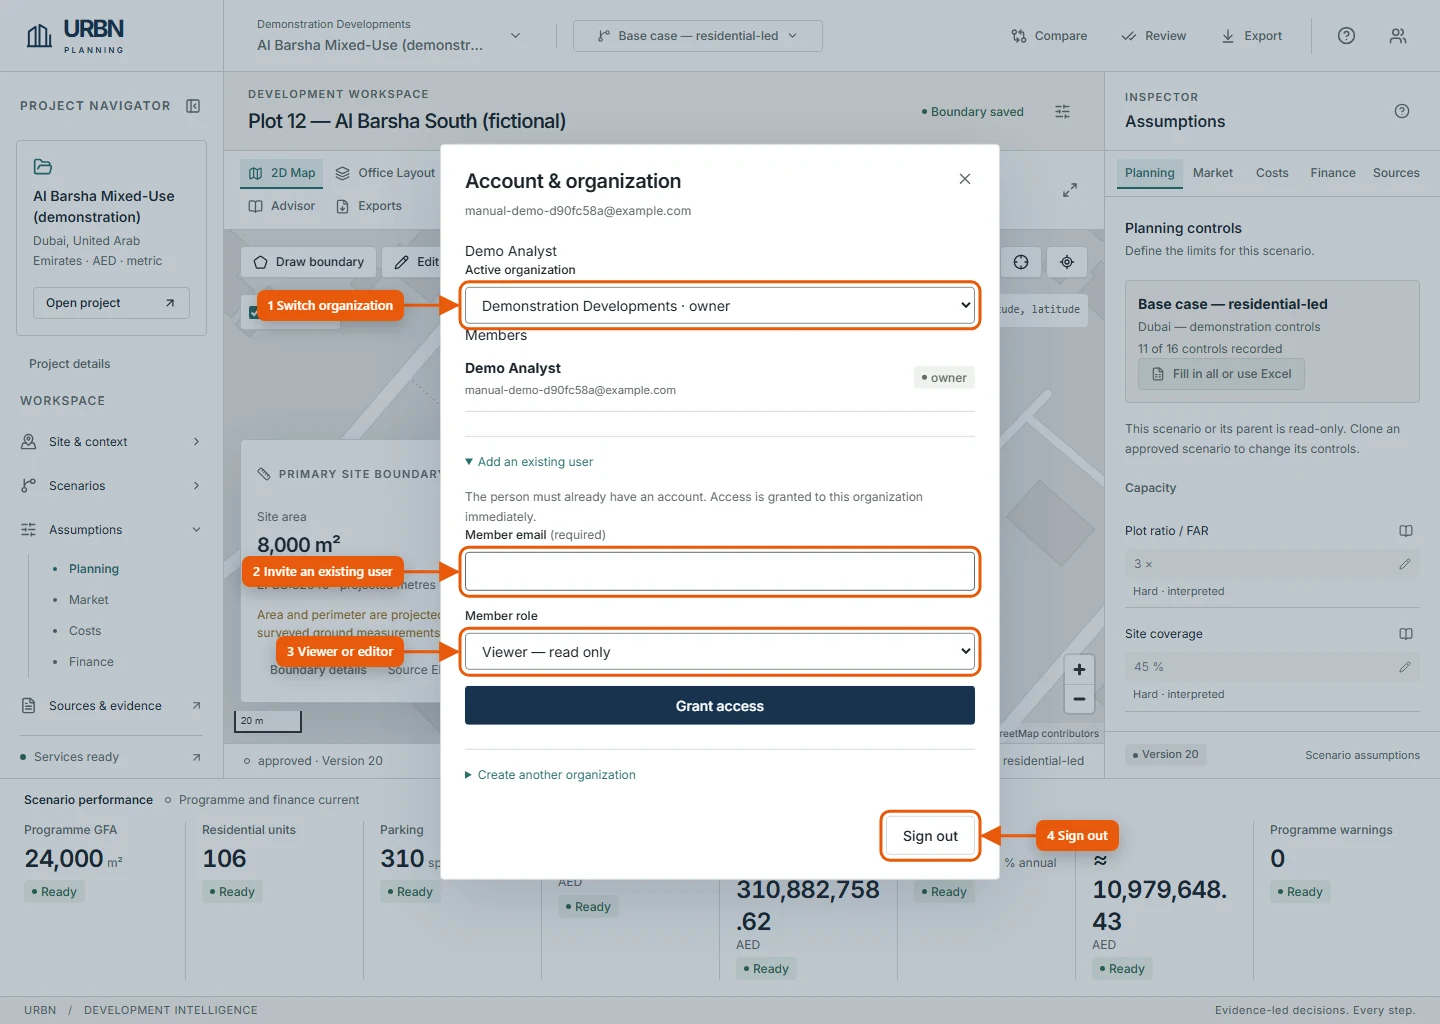
- Switch the Active organization if you belong to several.
- Owners grant access under Add an existing user: enter the person's email (they need an account first)…
- …choose Viewer — read only or Editor — create and edit, then select Grant access. Revoke removes access.
- Sign out ends your session. Create another organization is also here.
| Role | Can do |
|---|---|
| Owner | Everything an editor can, plus add and revoke members. An organization always keeps at least one owner. |
| Editor | Create and edit projects, sites, scenarios, inputs and office plans; calculate, generate, review, approve and create exports. |
| Viewer | Read everything, open sources and history, compare scenarios, ask the Advisor's guided questions and download existing exports. |
Sources and evidence
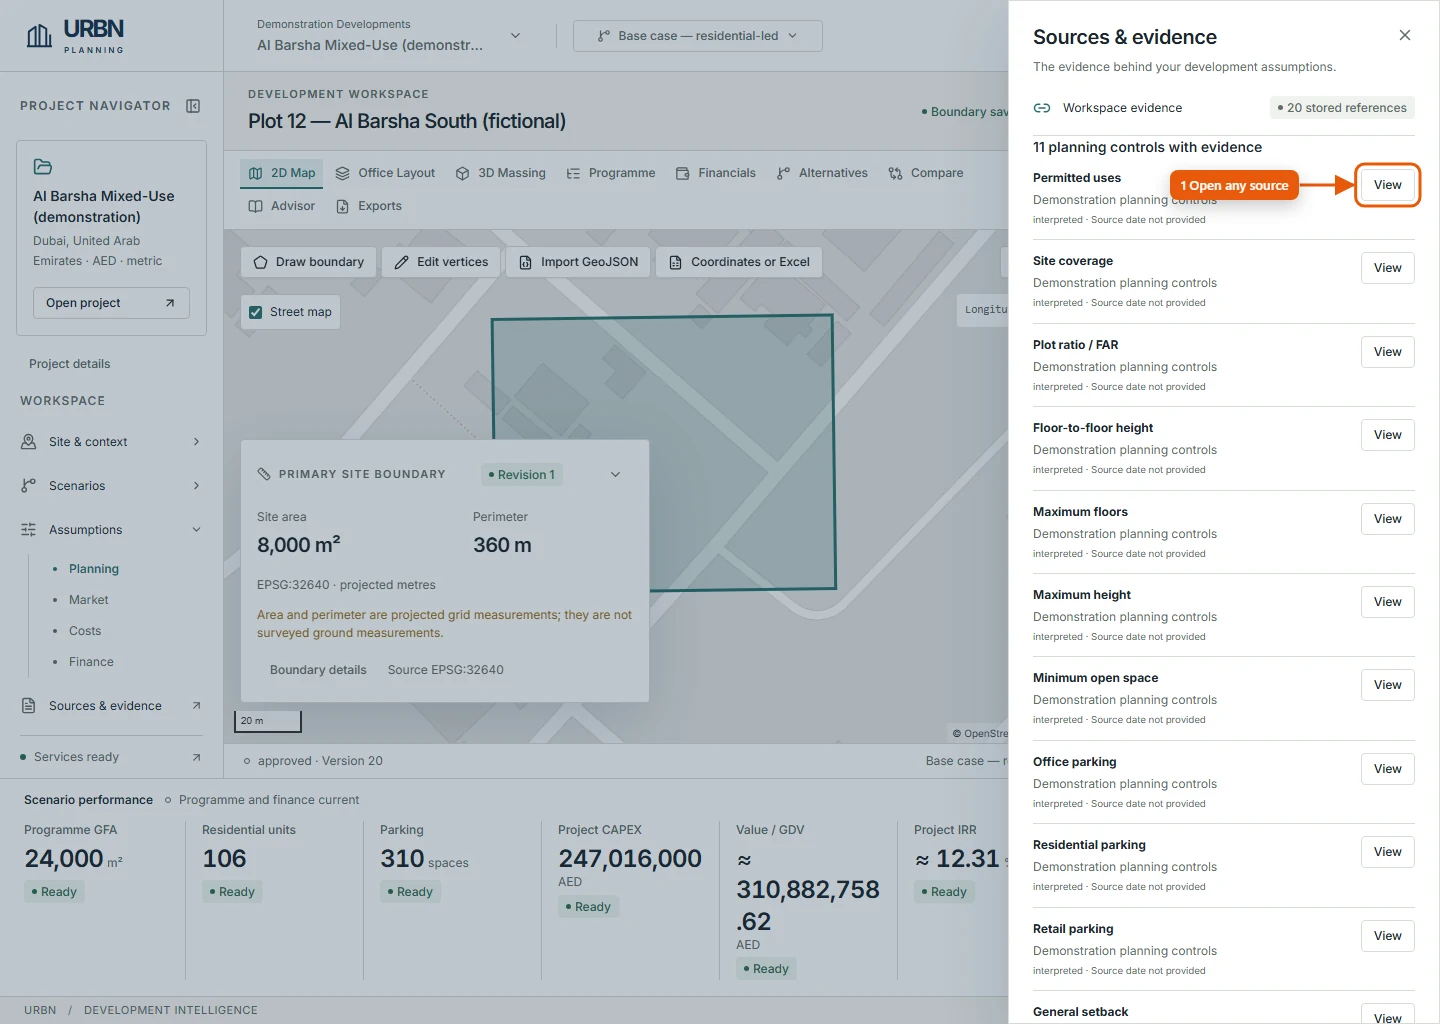
- Every planning control and assumption section with evidence is listed; View opens the full source record. The inspector's Sources tab shows the same register.
Change history
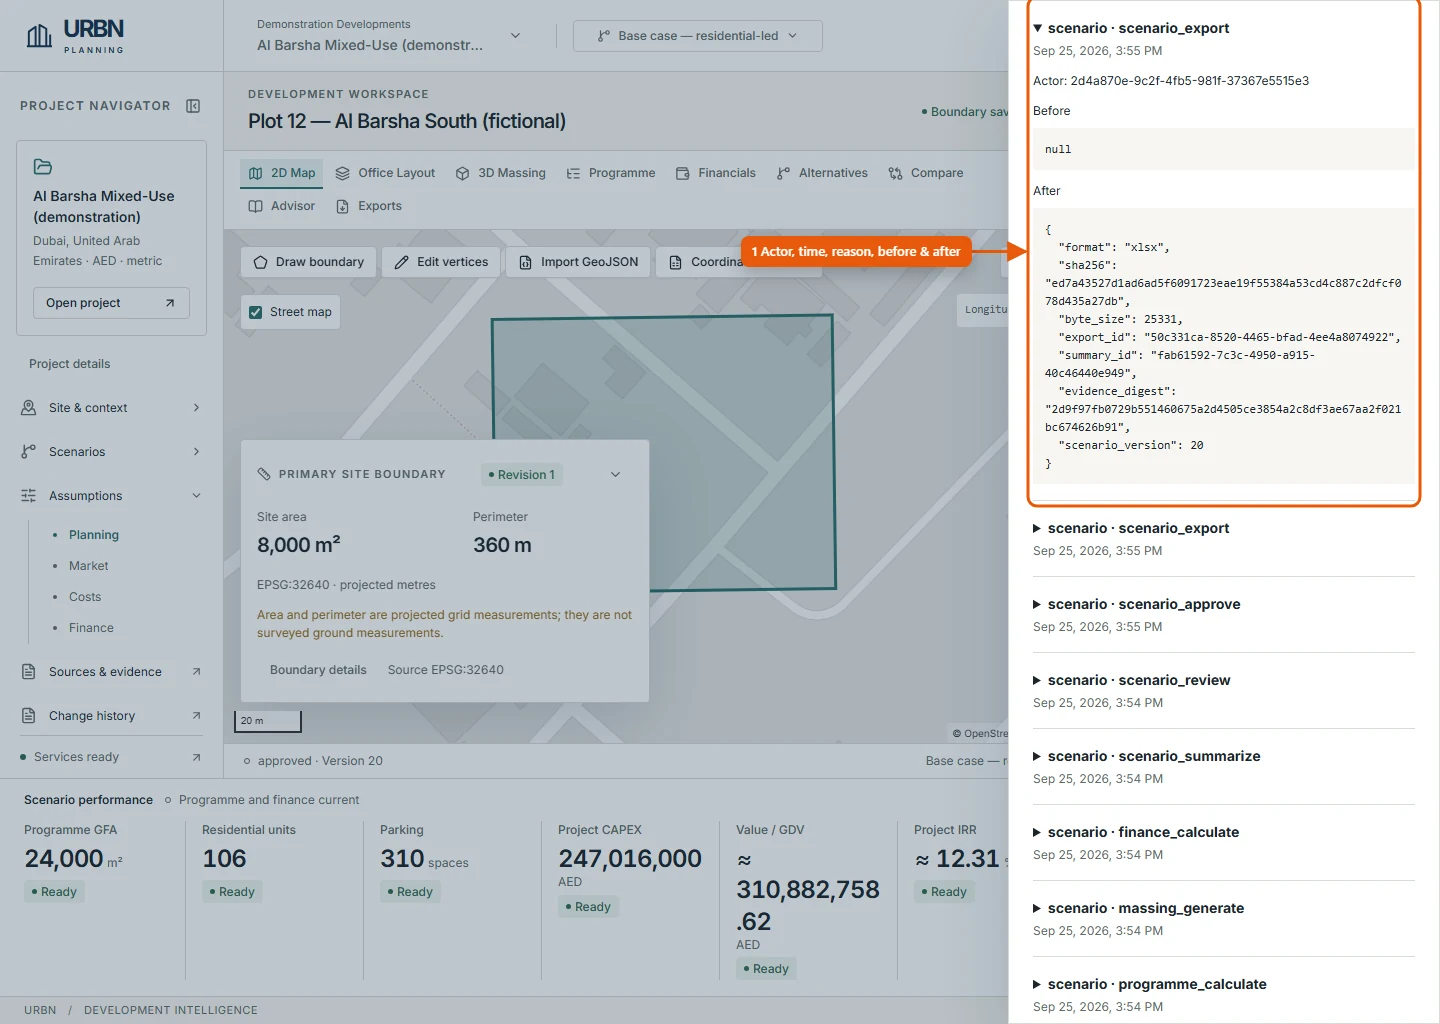
- Every saved change — calculations, controls, reviews, exports and more — with the person, time, reason, and the values before and after.
9. Reference and glossary
Scenario statuses
| Status | Meaning |
|---|---|
| draft | Being edited; results may be missing or stale. Any input change returns a scenario to draft. |
| calculated | A decision summary has been saved from current results. Running calculations alone does not change the status. |
| reviewed | The exact summary revision has been reviewed, with a reason. |
| approved | Approved and locked. Clone it to explore changes. |
| archived | Kept for the record; read-only. |
The status bar under the canvas shows the status and version, for example draft · Version 3.
Glossary
| Term | Meaning |
|---|---|
| GFA | Gross floor area: the total built floor area tested by the programme. |
| NSA · NLA · GLA | Net saleable area (residential), net lettable area (office), gross lettable area (retail) — the areas that earn revenue. |
| FAR (plot ratio) | Maximum GFA divided by site area. FAR 3 on 8,000 m² allows 24,000 m². |
| Coverage | Building footprint as a percentage of the site area. |
| Setback | Minimum distance from the boundary. Massing applies the largest recorded hard setback to every edge. |
| Hard / soft | A hard constraint must be met; a soft assumption is recorded but not enforced. |
| GDV | Gross development value: sales plus capitalised terminal values. |
| CAPEX | Land, hard, soft, contingency and infrastructure costs, before financing. |
| Margin on cost | Profit as a percentage of unlevered CAPEX. |
| IRR | Project internal rate of return on unlevered quarterly cash flows, stated as an annual effective rate. |
| NPV | Net present value of the project cash flows at your annual discount rate. |
| RLV | Residual land value: the land price that exactly meets your target margin or IRR. |
| Cap rate | Annual NOI divided by value; used to capitalise rental income. |
| LTC | Loan-to-cost: the share of each cost funded by debt. |
| Stale | A saved result whose inputs have since changed. Recalculate before relying on it. |
| CRS / EPSG | Coordinate reference system. EPSG:4326 is longitude/latitude; UTM zones (such as EPSG:32640) measure in metres. |
Good practice
- Record a real source for every input, and set its confidence honestly.
- Clone scenarios to explore options instead of overwriting them.
- Recalculate programme, massing and finance after any input change, then save a new decision summary.
- Keep exported memos with their checksums as your decision record.
10. Troubleshooting
| You see | What to do |
|---|---|
| Recalculation required, Further calculations pending or Stale | An input changed. Recalculate the listed stages in order: programme, massing, finance, then save a new summary. |
| This record has changed since you opened it | Someone saved first. Your edits are still in the form: close and reopen it to load the latest version, then apply your changes again. |
| Selection unavailable | The link points to a record you cannot access or that was archived. Choose another project, or ask an owner for access. |
| Buttons are disabled | You may be a viewer, or the scenario, site or project is approved or archived. Clone the scenario or ask an owner. |
| You are back at the sign-in page | Sign-ins last 8 hours. Sign in again: the link restores your selection, but unsaved form input is lost. |
| Unable to sign in. Try again later. | Five failed attempts in 15 minutes pause sign-in for 15 minutes. Wait, then try again. |
| Street tiles are unavailable | The background map could not load. Your boundary and coordinate tools remain available. |
| 3D view unavailable | Your browser blocked 3D graphics. The 2D views, metrics and checks remain available; try another browser. |
| Exports are busy; retry shortly or Generation is busy; retry shortly | Other exports or generation runs are in progress. Wait a few seconds and try again. |
| Commercial currency needs review | The project currency changed. Select Review commercial currency and reconcile the market, cost and finance assumptions. |